Hi all, I have spent a lot of time creating my custom fit moulage (x2 for my daughter as well) manually from Gina Renee designs course. I’ve been manually pattern drafting from the resulting blocks for the last couple of years and am now ready to go digital. Ideally I’d like to input the block shapes directly into seamly without redrafting and fitting. Is it possible to do this? Because it’s custom fit they are quite non standard and working direct from measurements in traditional drafting would also not be ideal. (Because I’d have to do all the moulage fitting again and that’s stressful  ) I realise there would still be some finangling but I’d like to not reinvent my wheel
3 Likes
@Grace or @Douglas will be able to give you a better reply than I can, but here’s what I can say: you will have to re-draft, but you can compare the results of your formulae to your adjusted paper blocks to see if it’s the same. So at least you won’t have to sew a half dozen mock ups just to get your pattern to where it’s currently at.

2 Likes
Well, technically it’s semantics - you wouldn’t be drafting a pattern in Seamly, but rather entering data. That being said, No, you would have to redraft your patterns. I wish the 100’s of patterns I’ve done over the 40 years in my costume business could magically appear in Seamly, but alas that won’t happen. LOL
As long as the drafting system you use, formulizes the measurements, you can input a pattern into Seamly. I just happened to stumble on the Gina site you mentioned. It looks like the system would easily adapt to Seamly. You could enter your basic blocks (slopers), save those, and then use those to base new designs on. Like @Pneumarian mentioned, you could use your existing blocks / patterns to use as a comparison to a pattern done in Seamly to verify the fit. If it prints and plots close enough to your existing patterns the fit should be OK, and you wouldn’t have to be making mockups.
That being said… once you have gained some experience with Seamly I could explain a method I came up with to enter existing or draped patterns to sort of digitize the pattern along the conventional means.
3 Likes
Hello and welcome to the Seamly2D forum, @Gennyg
I did follow the training from Gina Renee and learnt a lot from her. And I created my moulage in Seamly, but I didn’t go any further than the basics. And yes, it is possible to create your moulage in Seamly and you only need to do this once.
The magic happens in the measurements files, so these you will need to do specific to each person - in your case, 2 measurement files (.vit) for yourself and your daughter.
However, once you have made one measurement file, you can save it under the 2nd name and just change the measurements - so the work on future measurement files is cut down to about a 3rd.
Gina Renee uses certain formulas to achieve certain specific measurements which I put into the Variables, rather than than the measurements.
Other than that, you will need to be slightly creative in interpretting the hand drawn instructions into the digital instructions, but this is the case in every flat pattern making system, and it’s totally possible.
To change the size, all you need to do is to change the measurement file in Seamly2D. The whole pattern will resize accordingly.
I had no problems creating my moulage on Seamly, and, as @Pneumarian said, you can compare the paper patterns before even attempting to pin pattern to fabric.
Once you have your basic moulage, you can save it under a different name & start adding and editing things according to the design that you wish to create.
It’s really magic. Have fun ![]()
1 Like
Thank you for this. I guess I’m just going to have to give it a go to help me get my head around it. My main worry is the drafting from measurements is just the beginning with Ginas method, there’s multiple fit adjustments and tweaks to the moulage after that to get the final product. I was hoping that I’d be able to avoid all that again and ‘copy’ the finished measurement of the sloper.
First off though i need to get my own laptop, can’t see work being happy about me downloading this  (it’s not iPad friendly is it?)
Thanks everyone for your answers - great to know there is such a supportive community
(it’s not iPad friendly is it?)
Thanks everyone for your answers - great to know there is such a supportive community
2 Likes
LOL, no, not yet.
Yes. Most of those adjustments & tweaks can be added or deducted from the actual measurements in the measurement file (.vit), rather than on the pattern, to get the correct fit.
It would be best ![]()
Theoretically it’s possible… Qt does support iOS devices. If I had an iPad I’d try and make a build for it.
The only down side is since the iPads don’t normally have a mouse, the touch screen “gestures” may need some tweaking.
3 Likes
That would be great!!
1 Like
I do use a pencil with iPad …
1 Like
Thanks so much, laptop arrives Friday and so my weekend is set aside for giving this a go!
2 Likes
Ah… @Gennyg. May I wish you many, many, happy Seamly flat pattern making years 
Please don’t hesitate to ask, if you get stuck. We’ll all try our best to help.
1 Like
hello - i probably should have mentioned I’m a mac user I’ve just seen the thread about how Mac crashes when you use measurements via seamlyme (and yes it still does)
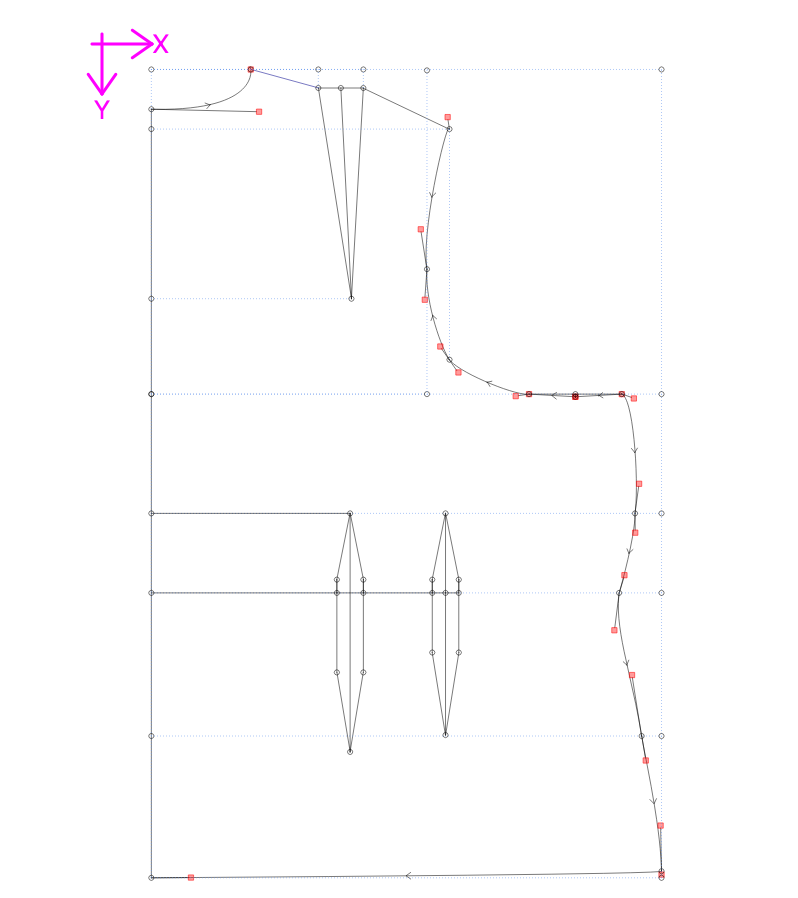
Anyway - for now I’ve drafted this block inputting measurements as I go per line which was fine. So much more left to figure out! Proper armscye curve, true-ing neckline and armhole seams, turning this into a pattern… figuring out dart manipulation… that’s my weekend sorted I guess!
Still it’s fun
2 Likes
You’ll get there. ![]()
One thing I noticed off the bat are the curves - specifically the control points. You should formulize the control points so the curves adapt to the pattern to create smooth curves. For ex: Generally you would want the control point of the endpoints to be at a right angle to the seam it intersects. Also the length is important.
I’m currently on my phone, so maybe @Grace could illustrate what I’m referring to, and I suggest you read the thread of Keith’s on smooth curves - it helped me a lot.
Could you be more specific? Ate you referring to the Fx button → dialog?
1 Like
Yes exactly that, using the Fx button to launch the measurements pop up from seamly me for inputting stored measurements crashes seamly 2d. I’ll take some screenshots later if you need.
1 Like
Yes the curves are very “just do it” over do it well! I’ll read that thread and try again. I just wanted to see if I could approximate the physical block ( I did) and identify my areas of learning needed so I could focus on finding those videos ( I did) so all up a successful evening and looking forward to playing more later.
It feels frustrating spending so much learning time again, but i can immediately see the benefits for future use and efficiencies I’ll gain.
2 Likes
Trust me… it does get easier.
1 Like
Oh, wow! Very well done! @Gennyg It looks very similar to mine - we’re having power issues at the moment, so the PC is off & plugged out, but as soon as I can, I’ll go in & have a look for it & send you a pic.
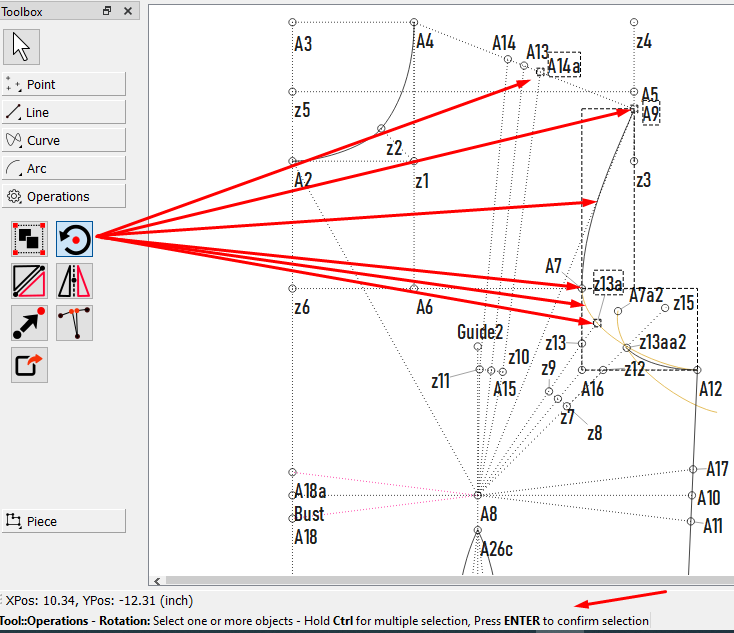
Dart manipulation is using the Rotation tool in the Operations section. A small tip that you may have already picked up on… Once you’ve picked up a tool, as small Help text appears in the bottom left of your screen, outside of the drawing board that can be really useful when using the tools. Otherwise, just do the best you can and then right-click on the item just created & go to Options where you will be able to fine-tune and make changes.
![]() I’m so glad that it’s fun for you, too. Almost 6 years later and it’s still fun for me.
I’m so glad that it’s fun for you, too. Almost 6 years later and it’s still fun for me.
1 Like
Here’s an image of mine where I put all the lines in for the dart rotation, etc.:
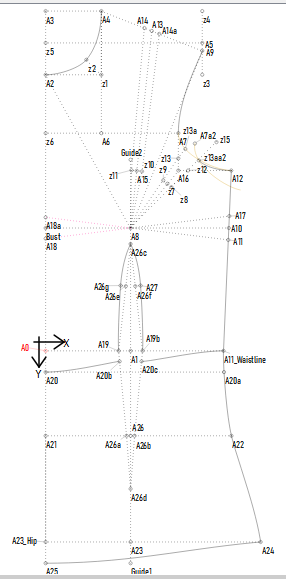
![]() I see that I only did the front
I see that I only did the front ![]()
I’ve made some progress with converting draft into pattern, and figuring out how to copy over internal darts etc. So yay for that.
I’m trying to now take that block and apply design elements to it, and i’m struggling on how to think about doing that.
A simple for instance using that back piece is how to split it into a yoke and back piece. I’ve drawn a line across the bodice at the base of the dart. I can select various points to ‘group’ or ‘rotate’ but as to what happens after I hit enter, i’m not figuring it out.
In my head what I’d like to do is select the ‘yoke’ part, copy it and move it to the side. Then select the right section and close the dart. Leaving me with two new drafts. Please help
2 Likes
Ok, that’s really good. You’re doing very well
Before adding any design elements, I would place the back & front into groups of their own so that while doing any further work, the groups can be hidden.
Then save your master pattern and Save As under a new name. This way, your original ‘Master’ will always remain intact and you won’t need to keep creating it, but you will be able to edit it as you learn new ways to do things, and you can make the design changes and rotations on top of the existing draft thereby removing the need to copy the pattern over to the side.
Do do the rotation, pick up the Rotation tool and note the help message at the bottom left of the screen. Select the nodes and curves that you need included in the rotation while holding the Ctrl key:
Hit Enter. Select the point from which the rotation will take place, and hit Enter again. The following fine-tuning box will appear where you can enter the formulas:
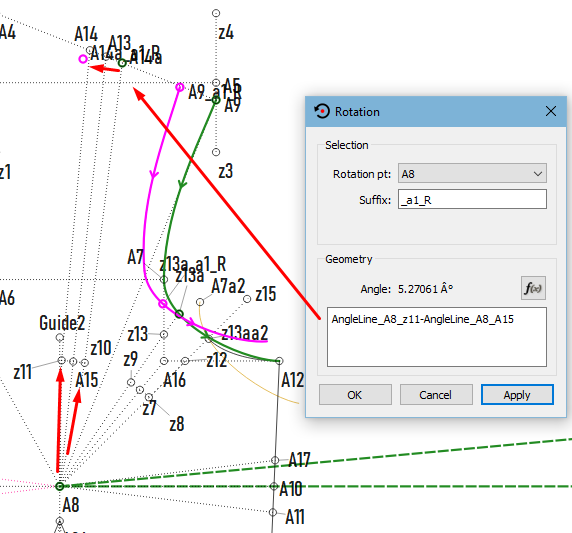
Click on OK and your rotation is done. Now you can add the lines between the nodes that don’t copy over, hide the original part and you will see the result.
1 Like