Thank you very much for this, @Scholli. I am definitely going to try this in depth.
Hallo @KeithFromCanada. Die Kolson-Methode kenne ich nicht. Habe sie gerade mal aufgemacht, kann sie aber auf die schnelle nicht durcharbeite, da ich nicht so gut englisch kann. Werde mich aber mal damit auseinandersetzen und dann Rückmeldung geben.
1 Like
Dann habe ich aber noch mal eine andere Frage: Wo kann man solche schon erarbeitete Methoden finden? Bis jetzt habe ich alle meine Abläufe selbst erarbeitet - ist sehr zeitaufwendig und führt auch nicht gleich immer zum Ziel
1 Like
The idea is to make each curve as smooth as possible, with each curve joined smoothly to the next curve. The formulas in the last three “Curved Path” pictures are the important parts. (’#bz’ = 0.55.) I hope that this makes sense because I am depending on Google Translate. 
Die Idee ist, jede Kurve so glatt wie möglich zu machen, wobei jede Kurve glatt mit der nächsten Kurve verbunden wird. Die Formeln in den letzten drei "Curved Path" -Bildern sind die wichtigen Teile. ('#bz' = 0.55.) Ich hoffe, dass dies sinnvoll ist, da ich auf Google Translate angewiesen bin. :Grinsen:
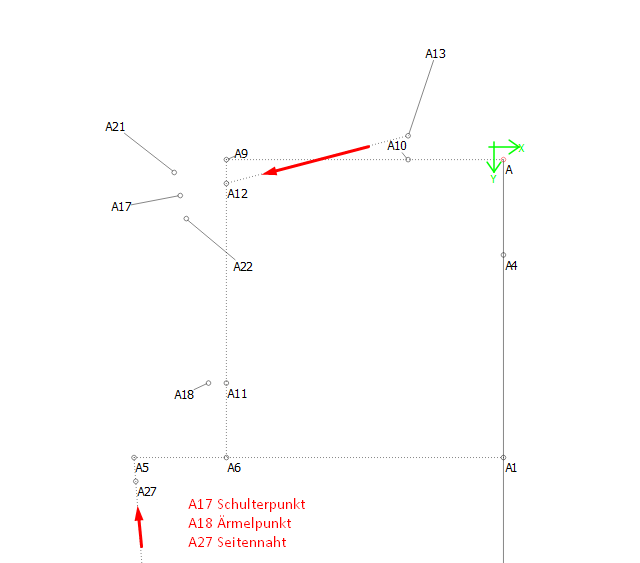
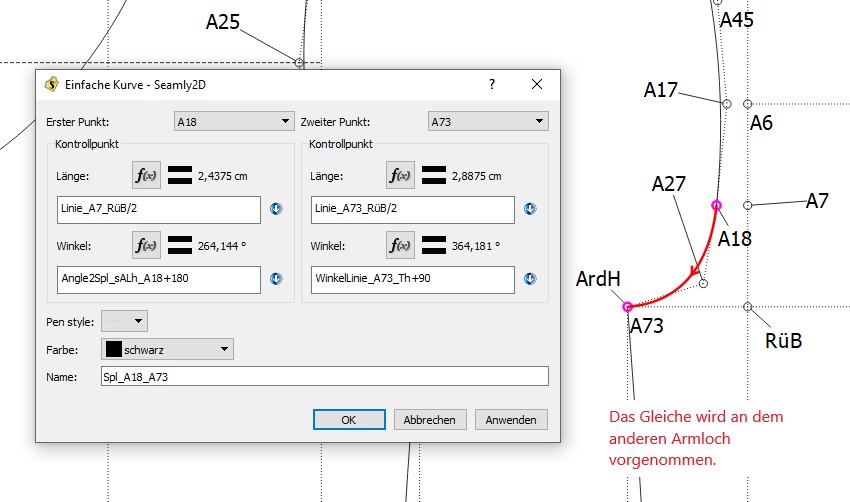
Hallo @KeithFromCanada: ich bin die Kolson Methode einmal Punkt für Punkt durchgegangen. Mit meiner Methode habe ich es mir erspart eine Konstruktionslinie zu ziehen, indem ich mich jeweils auf die Winkellinie des Bogens oder der Kurve bezogen habe die fortgeführt werden soll. Ich habe versucht diese Methode bei einem Armloch anzuwenden. Ich bin zu keinem brauchbarem Ergebnis gekommen. Meiner Meinung nach liegt das daran, dass beim Armloch die Schulterschräge und eine mögliche Schräge der Seitennaht mit einbezogen werden muss. Siehe folgende Zeichnung:
Mein am 30.10.2019 gezeigtes Model basiert auf zwei Kurven, so dass beide Kurven aufeinander abgestimmt werden können. Beim gekrümmten Pfad kann ich dem Punkt 18 keinen Winkel und auch keine Länge zuordnen so dass sich ein schöner Verlauf der Kurve bildet. Immer mit dem Hintergedanken, dass beim Gradieren der Verlauf der Kurve schön harmonisch bleibt, da sich die Längen A11_A6 und A5_A6 in der Gradierung unterschiedlich zueinander ändern.
2 Likes
Ich habe am Thema Armloch weiter gearbeitet und einen Bericht dazu verfasst. Ist für mich eine Hilfestellung, wenn ich an neuen Modellen ein Armloch arbeiten muss. Vielleicht hilft es ja auch anderen:)
3 Likes
Ah! Thank you very much, @Scholli, for you continued research in this area. I’m actually sitting here doing exactly this and got stuck, so came to find your posts on it 
Now to find a translator
Once again, thank you very much
1 Like
geht es nicht mit dem Google Übersetzer? Ich habe auch gesehen, dass der Text teilweise abgeschnitten ist:(
1 Like
First the images need to be put through an OCR (Optical Character Recognition) to get the text out of them & only then can it be put through a translator. I don’t think my little pattern warrants the time I’ll look into it another time
quote=“Scholli, post:49, topic:1820, full:true” subtitled manually via google/translate @Grace I have heard that the Google Translate app paired with a camera automatically OCRs & replaces the text with the target language, but as I don’t have access to that at the moment, I transcribed this manually into it.
Ich habe am Thema Armloch weiter gearbeitet und einen Bericht dazu verfasst. Ist für mich eine Hilfestellung, wenn ich an neuen Modellen ein Armloch arbeiten muss. Vielleicht hilft es ja auch anderen:)
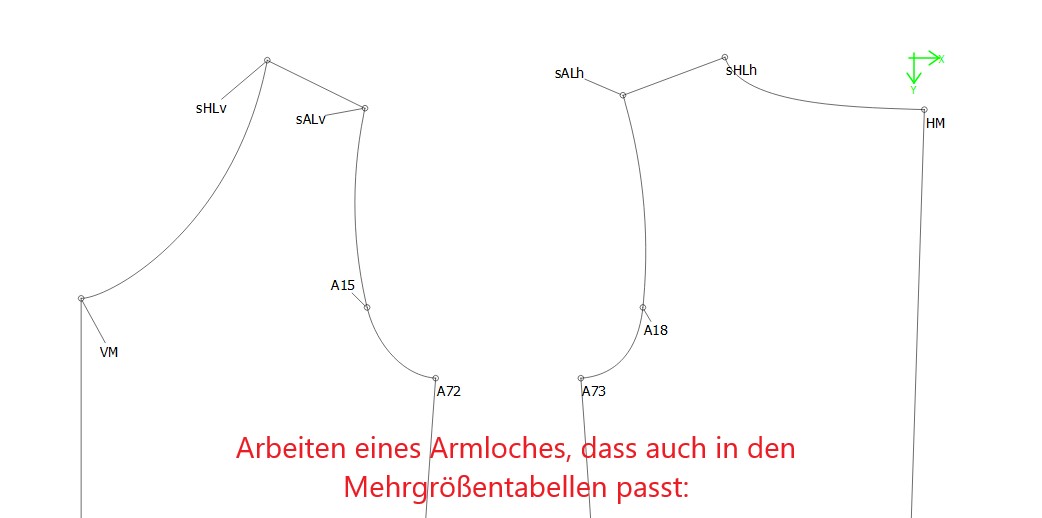
Working on an armhole that also fits in the multi-sized tables:
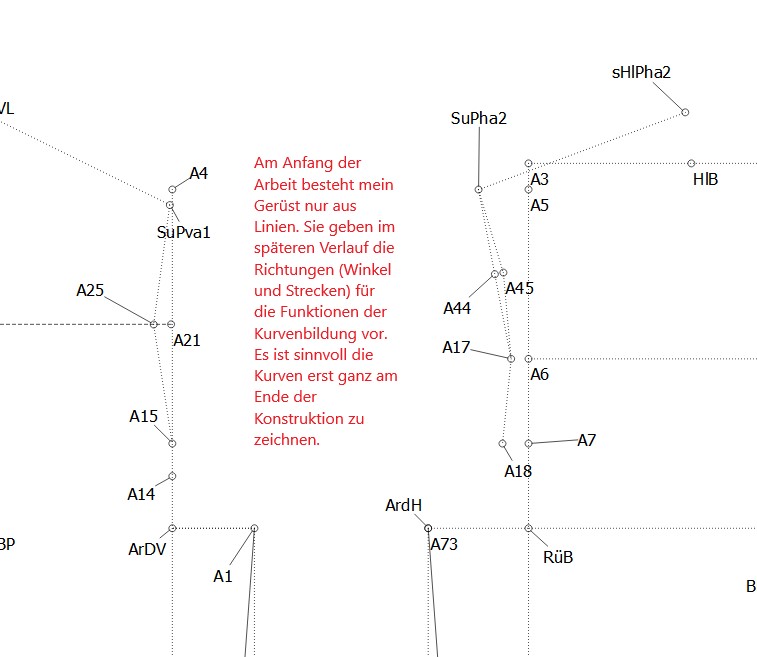
At the beginning of my work, my scaffold consists of lines. They later specify the directions (angles and distances) for the functions of curve formation. It makes sense to only draw the curves at the very end of the construction.
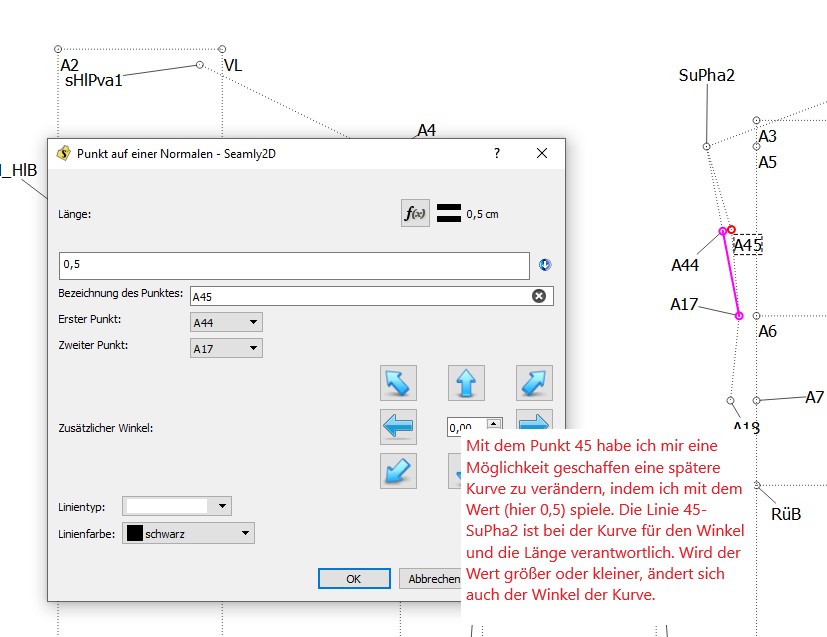
With point 45 I created a possibility to change a later curve by playing with the value (here 0.5). Line 45-SuPha2 is responsible for the angle and length of the curve. If the value becomes larger or smaller, the angle of the curve also changes.
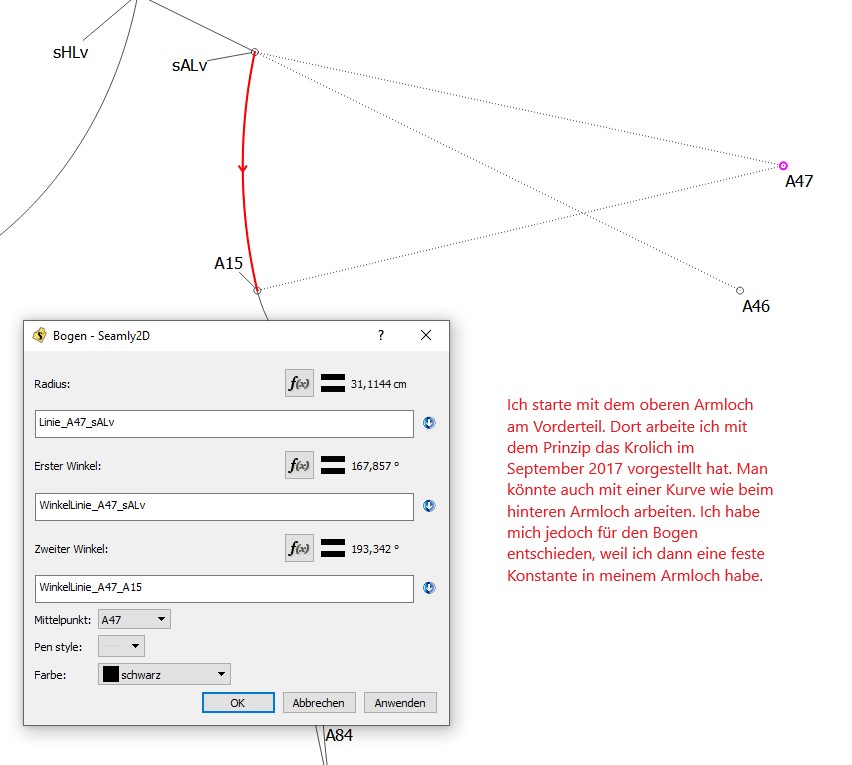
I start with the upper armhole on the front part. There I work with the principle that Krolich introduced in September 2017. You could also work with a curve like my rear armhole. However, I chose the arc because then I have a fixed constant in my armhole.
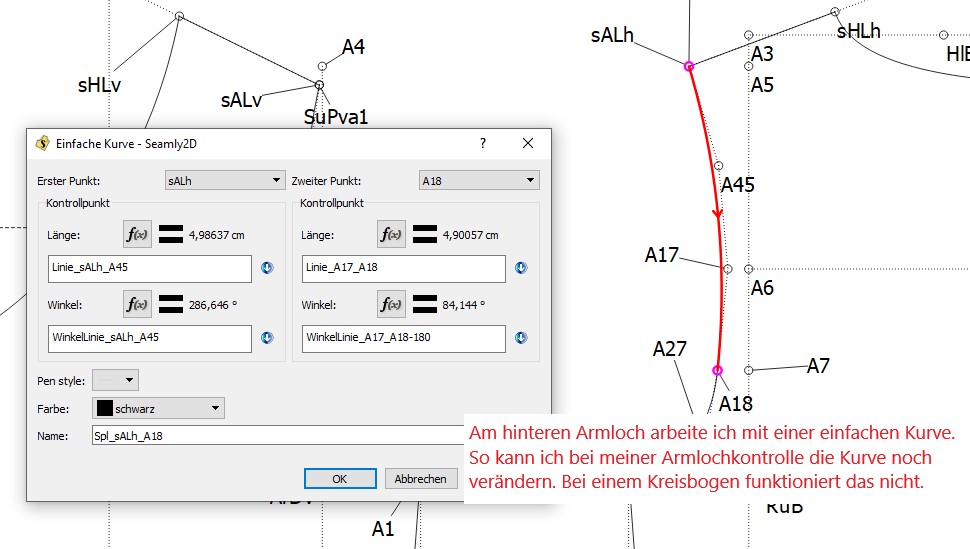
At the rear armhole I work with a simple curve. So I can still change the curve in my armhole control. This does not work with an arc.
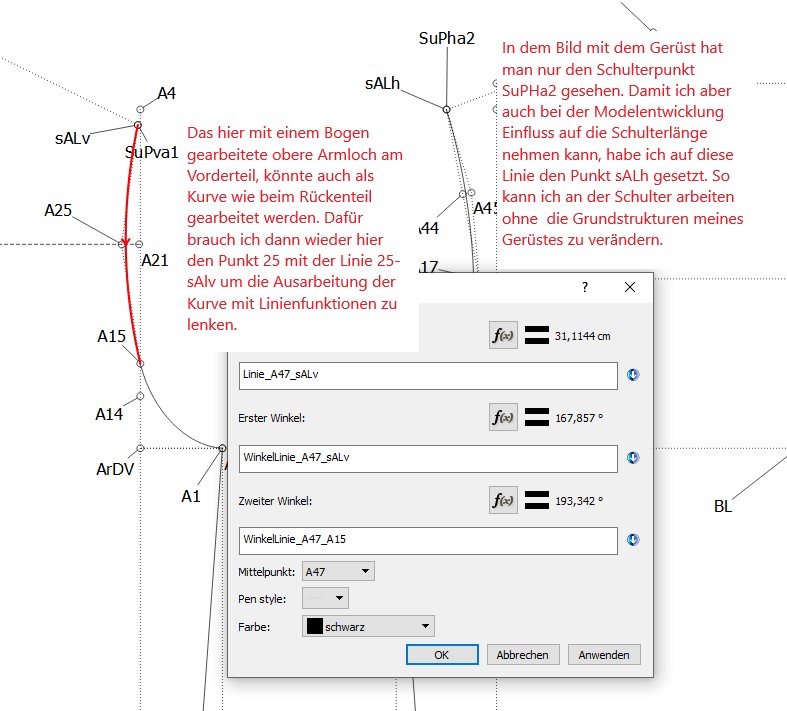
The upper arm hole worked here with an arch on the front part could also be worked as a curve like the back part. For this I need point 25 with the line 25-sALv again to guide the elaboration of the curve with line functions.
In the one with the scaffold you only saw the shoulder point SuPHa2. So that I can also influence the shoulder length during model development, I have set the point sALh on this line. So I can work on the shoulder without changing the basic structure of my scaffold.
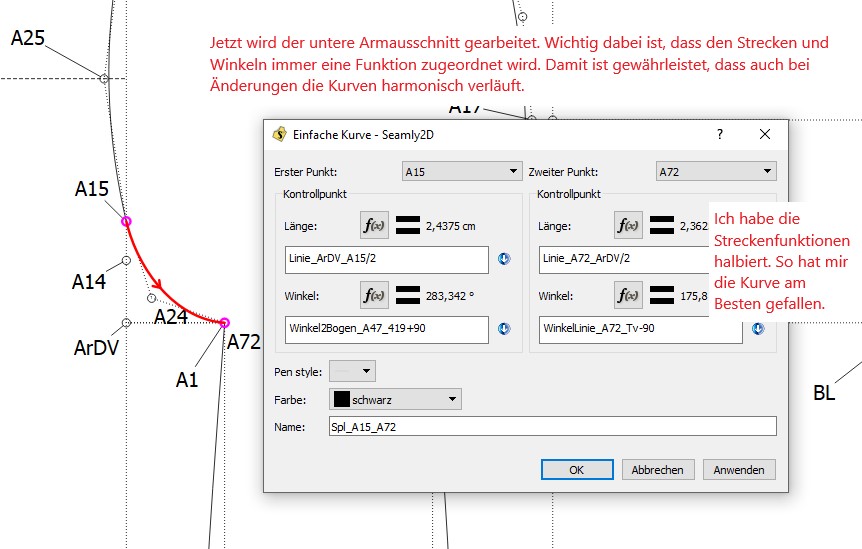
Now the lower armhole is worked. It is important that the distances and angles are always assigned a function. This ensures that the curves are harmonious even when changes are made.I have halved the route functions. That was how I liked the curve the best.
The same is done on the other armhole.
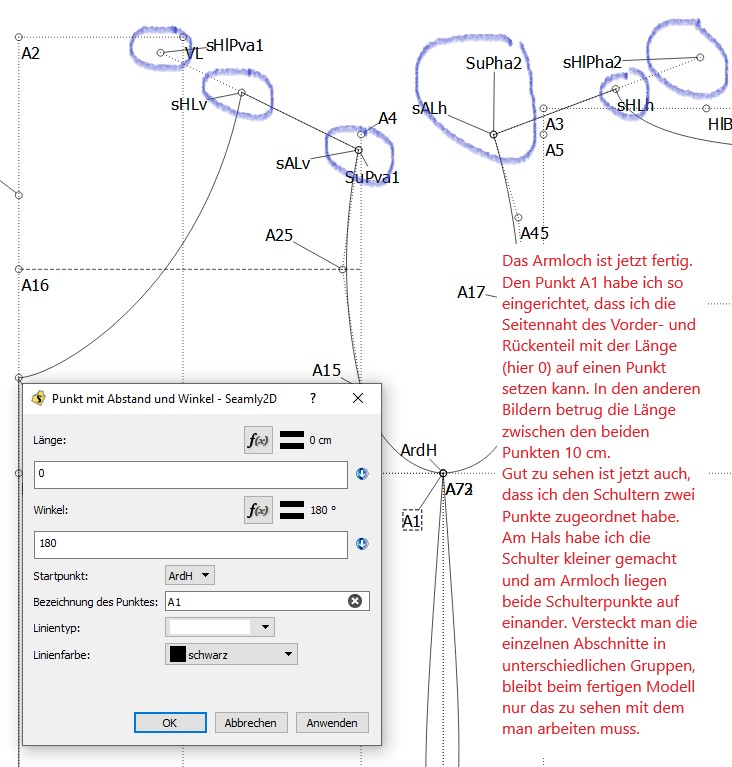
The armhole is now finished. I have set up point A1 so that I can set the side seam of the front and back part with the length (here 0) on one point. In the other pictures, the length between the two points was 10 cm. It is also easy to see that I have assigned two points to the shoulders. On the neck I made the shoulder smaller and on the armhole both shoulder points lie on top of each other. If you hide the individual sections in different groups, the finished model only shows what you have to work with.
[/quote]
4 Likes
Oh, wow! Thank you very much, @Pneumarian. This will really help me. I think we should all collaborate and write a new tutorial for this in the User Manual, but that’s for later. At the moment, my head isn’t with me due to nasty summer flu. So let me get down to trying this out
2 Likes
One issue I note is that the angles at sALv, sALh, A72 and A73) should be 90 degrees to the adjoining lines, so that–once sewn–the front and rear curves will join in a smooth line, instead of at an angle. Does that make sense?
1 Like
Ja, das ist insofern sinnvoll, das mein Arm immer in einem schönen Verlauf über die Schulter gezeichnet wird. und zwar immer im Winkel von 90° zur Schulter. Die Länge dieses Ankers kann man variieren und somit den weiteren Verlauf des Armloches gestalten. Ich habe bis vor zwei Jahren meine Schnitte ausschließlich auf Papier gemacht und dort kennt man es, dass Linien ausgeglichen werden, wenn zwei Punkte aufeinander treffen. Da es hier im Seamly doch sehr aufwendig ist zwei Punkte aufeinander zubringen und über diese Punkte eine schöne Kurve zu zeichnen, habe ich für mich diese Methode entwickelt. An der Schulter ist es relativ einfach, weil das Armloch am schönsten aussieht, wenn es im 90° Winkel zur Schlter verläuft. Beim Halsloch sieht es oft anders aus. Dann bringe ich in der Tat, nach dem die Kurven gezeichnet wurden, das vordere und hintere Halsloch zusammen. dann kann ich die Kurven so bearbeiten, dass mir das Halsloch zu sagt. Diesen Vorgang verstecke im am Ende in einer eigenen Gruppe. Bei einer Änderung am Halsloch kann ich in dieser Gruppe dann wiederum das Halsloch bearbeiten.
2 Likes
FYI, I have discovered how to increase the text size in Lightshot. Just scroll down with the mouse wheel until the cursor shows a size that’s readable ![]()
Hallo Liebe Scholli, als ältere Frau und Anfängerin bin ich zwar noch nicht so vertraut mit der Software, denn bisher zeichnete auch ich meine Schnitte auf Papier. Durch solche Talente wie dich, fühle ich mich zum ausprobieren ermutigt. Toll wie du dir das “erarbeitet” hast.
Freundliche Grüße Carine
Hi All Thank you for sharing this curve procedure, looks great
4 Likes