Hello, I am french but can speak english which may be easier here maybe?. I am trying to create a pattern for a cape. I have two issues which I hope someone can help me resolve. I would lie to duplicate a curve but in the other direction. I have understood that in order t create a pattern piece, the curve has to be in the right direction. But what if he following piece uses the same curve but in the other direction? I am not sure I am being very clear I apologize. Second question, about this d*** curve. I have taken several control point on the width of the front piece ans I have elected the “spline” tool to connect the dots. But I don’t know how to make a smooth curve out of that, it just seems a bit rough…I am sure this tool could do wonders for me but I just downloaded it a couple days ago and I am trying to figure my way around it. thank you very much! Justine
Bonjour Justine.
English or French is fine. Most of just use Google to translate if need be.
Don’t worry. There’s 3 options… option 1 - with the recent update to the pattern piece tool it’s likely the app will automatically reverse a curve when you select it and it’s not going clockwise. In the event the app can’t do so automatically - like with previous app vers: Option 2 - hold the Shift key while you select a curve - it will reverse it. (Note: in the recent update if you hold the Ctrl key down it will prevent the app from auto reversing a curve) . Option 3: Once you’ve created a pattern piece, you can switch to Piece mode, and by editing the piece properties you can change a curve’s direction by using the right mouse button menu in the Paths-> Main Path list of object nodes. With the menu you can select reverse to reverse a curves direction.
BTW, for future reference, when you end up using the Insert Node tool - and you will - you will need to enable any nodes you have added with the same path context menu, as they are inserted disabled at the bottom of the list. You will also need to move them to the proper path order.
Hope this helps. ![]()
Thank you very much for your prompt reply Douglas! I will try that! I have watched a French tutoriel but it might be from a previous version. Last question if you don’t mind ![]() . What about the smooth curve? I am making the curve for the shoulder of the cape. I have made several points to make sure that the width is good (I am copying a cape that I own and love). I used the spline tool to « connect the dots » but the curve is very rough. I’m am using the max version of the software I don’t know if it matters or not. Best regards!
. What about the smooth curve? I am making the curve for the shoulder of the cape. I have made several points to make sure that the width is good (I am copying a cape that I own and love). I used the spline tool to « connect the dots » but the curve is very rough. I’m am using the max version of the software I don’t know if it matters or not. Best regards!
Welcome to Seamly! It sounds like you’re already making good progress!
It sounds like your curve needs its control points adjusted. You could right-click & choose Properties in order to manually adjust all the control-points, but it sounds like you may be better off deleting your spline & remaking it, so this is the process which I will explain. The explanation will hopefully also be helpful if you decide to manually adjust it. With the Spline tool active:
- Mouse-down on the first anchor point.
- Drag the control-point out to a vector which will shape a smooth curve to the second anchor point. (You’ll likely want to manually adjust this later)
- Mouse-up.
- Mouse-down on second control-point.
- Drag the control-point out to a vector which will shape a smooth curve toward the next anchor-point. You will notice that at the same time another control-point is extending inversely as the second control-point for the first segment. These control points will always be exactly 180° apart, though you can independently edit their lengths in the Properties dialog.
- Mouse-up.
- Repeat steps 4-6 until the final anchor point has been set, then hit enter/return
I hope this helps!
![]()
Just to add to what @Pneumarian said… if for some reason you don’t want the control point angles to be 180 degs apart, you can always use a series curves
![]() to do the same thing as a spline
to do the same thing as a spline
![]() , with the difference being that you can independently adjust the angle of each control point.
, with the difference being that you can independently adjust the angle of each control point.
And for those interested - Not only do I have internet again Yea! I’ve been working on updating the tool dialogs - AGAIN after losing all the updates when the harddrive crashed. And yes I did a backup last night. LOL.
Here’s a sneak peek at the updated spline dialog… and @justine0633 notice the 180 deg difference between the 2 control points. If you change one, the other will automatically change.
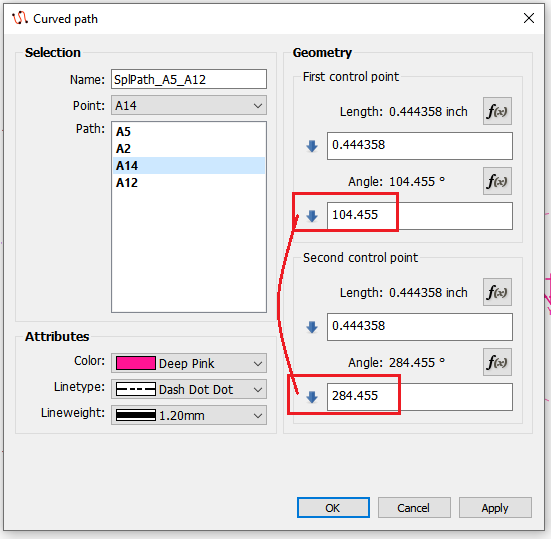
Some might notice that tools will now include a line weight. Hopefully this should help making drafts clearer, as you can customize the line weight like using a thinner weight for construction lines - kinda of like real drafting. ![]()
Hi Justine,
Were you able to duplicate your curve in the other direction?
And were you able to smooth out your Spline curve with Lengths & Angles?
If not, please upload your pattern *.val and measurement *.vit files so we can help.