Always! The research was conducted in other disciplines, but we can benefit from it.
2 Likes
Decided to add a dialog to control the alignment of an imported image. Should be able to recycle the code in the future for aligning other graphic items - such as labels, etc.
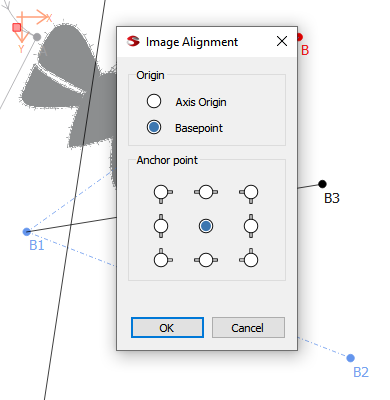
In this case for a background image you will be able to set the origin to either to the workspace axis origin (0,0), or to the draft block’s basepoint. I was able to recode an existing unused function to return the current basepoint’s x:y position. You can further refine the location by setting the anchor point for the image. Currently I will probably only implement using the anchor point for location. In the future I may make it a true anchor point, where rotation and scaling will revolve around the anchor point, rather than just the center. I will probably add a few prefs so a user can set a default for the origin & anchor points.
The dialog is accessible via the tools->Background Images menu item… which I moved up to group it with the draft block tools.
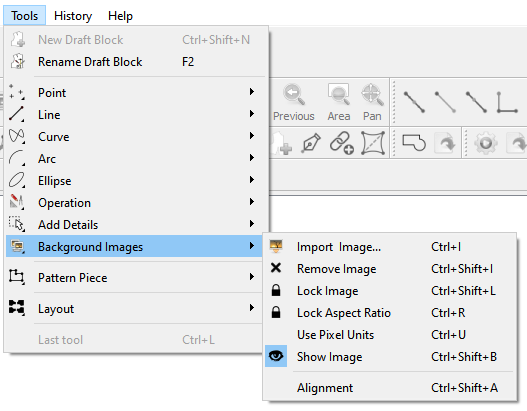
Grouping the images menu item now makes sense to me for adding a new tab in the toolbox - grouped with the other draft tools. A simple thing, but it didn’t make sense placing it after the Layout tools tab.
Will look something like this:
2 Likes
Added a few more items to the feature:
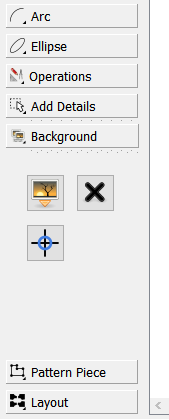
Created a new origin / anchor point alignment tool icon:

Added a tool button to the toolbar to open the Alignment dialog:
![]()
Added a new Background tab and the Import, Remove, Lock and Alignment image tools to the toolbox:

Updated the keyboard shortcuts help dialog:
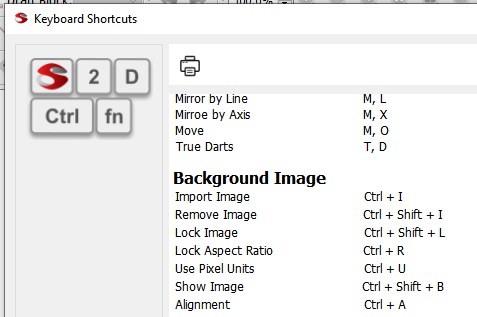
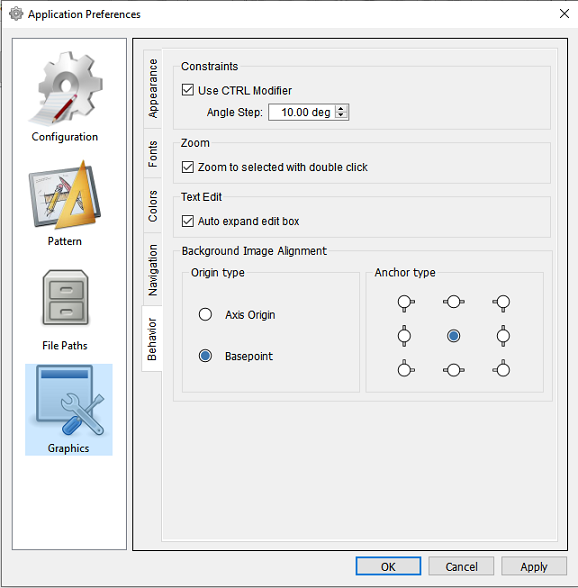
And added default seetings to the preferences for the image alignment:
3 Likes
Got the last wrinkle smoothed out and the Image alignment dialog for a new image import will be set to the default origin and anchor types. Yay!
I will now try and attempt to subclass the QGraphicsItem class so images will be selectable, which means they can then be manipulated via the mouse… that is moved, resized and rotated.
I also have the beginnings of an idea to be able to automate the scaling of an image to scene coordinates of the draft space. It would kinda of be the reverse of printing a reference square on a pattern - say a 4in x 4in square - to be able to verify that the pattern is indeed printing / plotting to the proper size. In this case there would be a reference square on the image, you import it, select a scaling tool, draw a square over the image square, and then tell the app what dimensions the square is supposed to be - and BINGO - the image is resized to the proper scale. Likewise there could be a locate tool to set the origin point. Import the image an simply select a point and BINGO - image moves to locate that point to the draft basepoint.
3 Likes
Nice idea with having a square of a given size and using that for scaling.
2 Likes
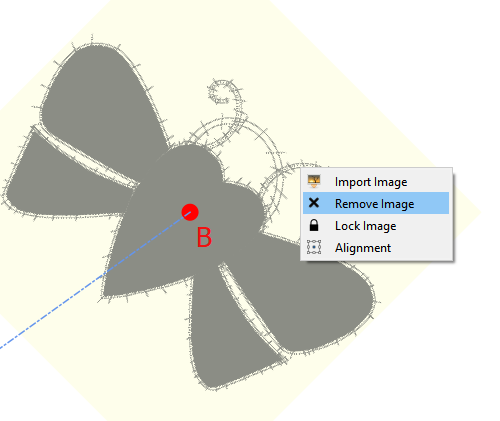
Making headway on subclassing the QGraphicsPixmapItem and moving some of the functionality from mainwindow to the subclass. Got it to select the image item & show the border & sizing (square) handle.
Also got the context menu added.
Some may see where I’m going with this… once the image item class works, it can be used elsewhere in the program to insert images into labels or pattern pieces.
I also discovered an minor issue that is not so apparent until you add a background image that gives more perspective… that is if you try to go to the piece mode before adding a pattern piece, the app stores the current draft block, switches to the 1st draft block, throws up a message box that you can’t use Piece mode yet, and upon exiting the dialog goes back to the saved draft block. I switched the order of a few lines and it no longer needlessly switches draft blocks back and forth if the message box is thrown.
3 Likes
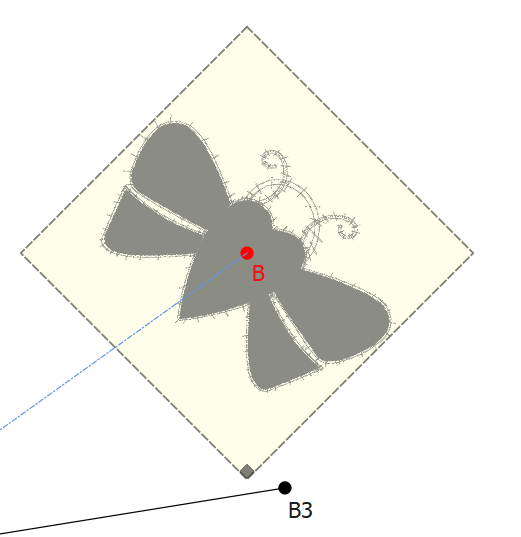
It Moves…
It Rotates…
It’s ALIVE!
6 Likes
Oh, WOW!!! That is beautiful to see… Very well done!!! 
1 Like
Can’t seem to get an image to resize yet though…the resize handle square is not being recognized? Or more specifically the image graphics item is not detecting a mouse button press within the square, which means it’s skipping over the resize code.
Probably a moot point anyways, as I intend to use the “square” graphicsitem I subclassed for the curve / spline handle points. That way it will make it easier to place a handle at the 4 corners, and mid top, bottom, left, and right to correspond the possible anchor points.
Once I figure out the resizing issue, it’s then a matter of connecting the image class back to the toolbar so the toolbar updates when a change is made in the image.
2 Likes
I’m a little late to the party (and this is definitely something to celebrate!) but probably the easiest way for users to both scale and rotate the image is to allow them to anchor two points on their pattern to two pixels of the image. This could be two corners of an included square, pattern marks on the image, etc. If it is an SVG, snapping to a point would be a good option to offer, too.
Does that make sense?
3 Likes
Yes. That’s why I suggested a few posts back using a reference square to scale to. Actually working out how to grab the selection points of the background image plus the draft block, and performing the transform on the image to match the draft block & scene coordinates is quite another.
That being said… since the idea of a background image is to trace over… there’s no need to have an existing draft block to anchor to. Assuming the image has a predetermined sized square in it, just need to select 2 (opposite corner) points of the square and scale it to the predetermined size. Like maybe you select the 2 points, a dialog pops up and asks for the size of the square… and maybe if you want to rotate to align to the horizontal & vertical. Voila. From there the idea would then be to select a point on the image and have it move to the draft block basepoint. Now you can start drafting a block over the image.
Although the topic title is SVG file… my feature allows the use of most common formats… .bmp, gif, jpg, jpeg, svg, tif, png, pgm, ppm, and a few others. What ever behavior the feature exhibits, it has to apply to any of the QPixmap image formats.
2 Likes
Just a follow up… I would expect the most common use of using a background image would be taking a jpg picture of a pattern, and tracing it. The easiest thing to do is place a precut square of a given size on the pattern, then snap a photo. Such as what I did here with a pattern piece from the jackets we recently worked on for the movie here. The square is 3in x 3in. I didn’t do it here, but I would use a photo editor to true up the image to correct any distortions in “squareness”.

3 Likes
I like the idea of having the test square to scale the image and rotate it. Brilliant idea 
The concept is easy… but like I implied to Keith, implementing it is going to take some work. It’s why I needed to go further than just adding a pixmap graphics item to the scene… it needs to a subclassed graphics item so it can contain the custom code to receive and act on mouse events.
That being said. I think there’s going to have to be a couple tools required to scale / rotate and set the basepoint interactively. For example you would import an image, then select the “scale” tool… a tooltip will say “select top left point”, then “select bottom right point”… dialog pops up asking size of square. Based on that the app can calculate the scale the image needs to be, and what degree to rotate if you want it to square up to the work space. The other tool would be locate basepoint… tooltip - “select basepoint”… locates that point to the current draft block basepoint.
2 Likes
Yes, I’m thinking that one should really keep it simple (KISS), I don’t know how a pattern designed this way would resize once a person adds measurements to the design, since you’re not starting with a basic pattern. So I’ve been looking at this concept as a background image that one can refer to while designing to keep me on track rather than something that needs to copied - like your image with the square which is just one panel for one size.
But I leave it in your very capable hands
3 Likes
While contemplating a way to actually trace a background, and be able to use formulas in the measurements I figured I read back through some of the old Valentina discussion on the issue. Susan had proposed this idea, based on using a radial method of scaling:
AND/OR …
We may come up with something entirely new. After importing the bitmap and the user starts defining a new pattern on top of it, and the initial point is created, the next point is created using a ‘Reverse Engineer Point’ tool which calculates the distance and angle from the initial point to the new point and autofills in the formula. All points of the pattern are created with the ‘Reverse Engineer Point’ tool, so they all ‘radiate’ out from the initial point. This pattern would be an exact vector copy of the bitmap image and would not require a measurement file.
Problem is there is no way to “grade” it based on measurements without getting into messy trigonometry using the length and angle of the radials. Skip to today - we already have a tool that uses length and angle. Which you could use to scale it, but that’s not grading. So my solution to solve this is to create a new “rectangle” tool, that would be based on width & height formulas from a starting point. The tool would snap the starting point to the basepoint, and then you rubberband to the second point. The tool would then set the width and height formulas in the tool dialog. In other words, it’s a tool to create a point XY from a given point. Based on a method of grading I’ve described elsewhere, you could then create and grade pattern pieces based on a measurement file. Besides… if you can’t use a measurement file then why use Seamly2D? You can trace a bitmap in any number of applications to an SVG.

A rectangle tool on it’s own would prove to be useful.
3 Likes
One concern is if the pattern doesn’t include a square. Being able to anchor to two arbitrary points and then enter the distance between them would be the next best thing. (…with the option to rotate the background image to match a declared angle for the line.)
Sorry if I’m reinventing the wheel, here. My brain isn’t processing well lately. Major depression is a b***h.
1 Like
Got that part covered so far. Working on subclassing the qgraphicspixmapitem class to allow for directly interacting with an image - which BTW can be used later to have an image tool to add images to pattern pieces. Part of the interaction with a graphic item is to be able to detect and act on mouse events within / on the item. So until I get that squared away, can’t do anything with an image like scaling to some reference.
2 Likes
Verstehe ich das richtig? Mit dieser Methode kann ich dann Grundmuster, wie z.B. Kaputze, Kragen, Saum uns Ärmelabschlüsse in einer Datei konstruieren und später in meiner Musterdatei an zwei oder drei ausgewählten Punkten andocken? Wenn es dass ist, wäre es eine Revolution:) Ich habe mir angewöhnt Grundmuster wir besagte Kaputze, Kragen, Ärmel usw. Punkt für Punkt der Konstruktion aufzuschreiben, damit ich nicht immer wieder von neuem das Muster durchüberlegen muss…
1 Like
I wish this was something a feature could do. The objective of this feature is to be able to load an SVG image (or other types like png, jpg, bmp, gif, tif) as a background… and then after getting it scaled / rotated properly to be able to trace over it to produce a Seamly pattern. The image would for example be an existing pattern piece.
So far I have it where you can load an image per draft block… some of the discussion has revolved around how to automate the process of scaling the image to proper real world size in the draft workspace. Right now you would have to scale the image manually by including a line (or square) of a known size, then by trial and error tweak the size so the image on screen is the real size.
2 Likes