Bonjour,
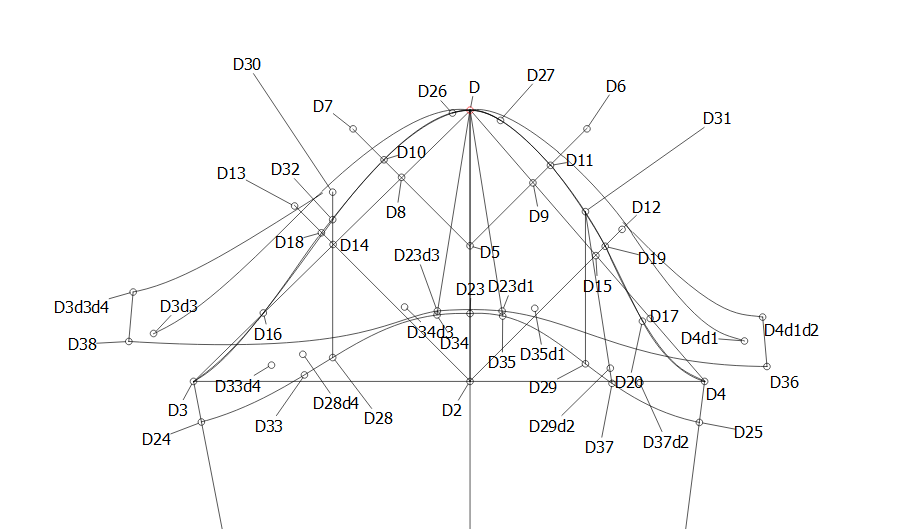
J’aimerai élargir une manche avec seamly2d svp? Est il possible d’ouvrir la manche au niveau de mes deux lignes D28 D30 et D29 D31 ? Ci-joint la photo. je vous remercie pour votre aide!
Bonjour,
J’aimerai élargir une manche avec seamly2d svp? Est il possible d’ouvrir la manche au niveau de mes deux lignes D28 D30 et D29 D31 ? Ci-joint la photo. je vous remercie pour votre aide!
Hello @Chareve
I’m not too sure about the purpose of widening the sleeve this way, but The 1st step would be to place node going to the left of D30 and the right of D31 that is the distance that you wish to move the outer sections.
Then, using the Move tool, select all the nodes and curves that you wish to move while holding down the CTRL key, press Enter and then move the section a bit. Right-click on one of the new nodes and open up the Options to change the length of the move and the direction to those of the new lines from D30/1 that you created before.
Draw in a new curve for gathers, if necessary, or draw in darts or pleats.
Ich verstehe auch nicht, was sie genau vor haben. Vielleicht können Sie das näher erläutern.

I can see a reason for widening (slash) at the 2 lines as pointed out, but would normally widen at the center line D-D2 as well… although I would tend to slash the sleeve into even more sections. Hmmm starting to hear sounds of that “slash and spread” tool. 
Je vous remercie pour la réponse. En fait je me suis mal exprimée ce n’est que le bas que je souhaite élargir au niveau de D23 D28 et D29.
Ah! ok. That is a whole different process. Firstly, you will have to create a node on the curve in line with the D30/31, that will be your swivel point. You can use the Intersect Curve and Line tool to do this.
And you will need to make a node at the bottom (wrist edge) where you would like to open up to widen the wrist edge and join it with a line to establish the current angle. It will also help to create a node to the left and right of these added nodes the distance that you would like to open up (this can be edited to be bigger or smaller later, if you wish). Then join the 2 sets of nodes with a line each to use for the angles that you wish to widen the sleeve.
Then using the Rotate tool, you will select all the nodes and curves that you want to rotate except the new one on the curve edge, press Enter, select the new node on the curve edge and move the select a little and press Enter.
Open the Options (as before) and add a formula that deducts the one new line from the other to move the selection to cover the outer line created.
Repeat on the other side.
You may want to redraw the sleeve cap curve and also create a curve at the wrist edge that passes through all the nodes created.
If you don’t manage, let me know and I will do some pictures of the process tomorrow.
Bonjour Grace,
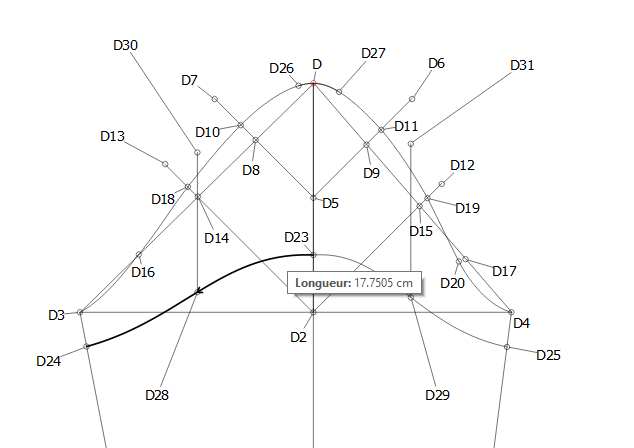
Jai réussi je ne sais pas si c’est de la bonne façon. Pouvez vous me dire si cela vous semble correct svp? J’ai également élargis au niveau de D2.
Merci
Hello @Chareve
It looks right to me, but let me show you on one of my test patterns…
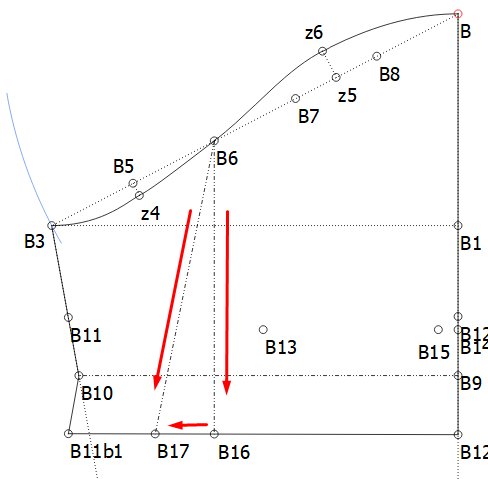
I created a line from B6 to B16, this is where I want to “cut” my pattern (if I was working with paper). And then I created a point (B17) 2cm to the left of that point (B16). This is where I want to rotate the outer section to. Both lines are connected from B6 down to these points (this is important, because it gives me the angle of the lines that I’m going to use in the formula for the rotation).
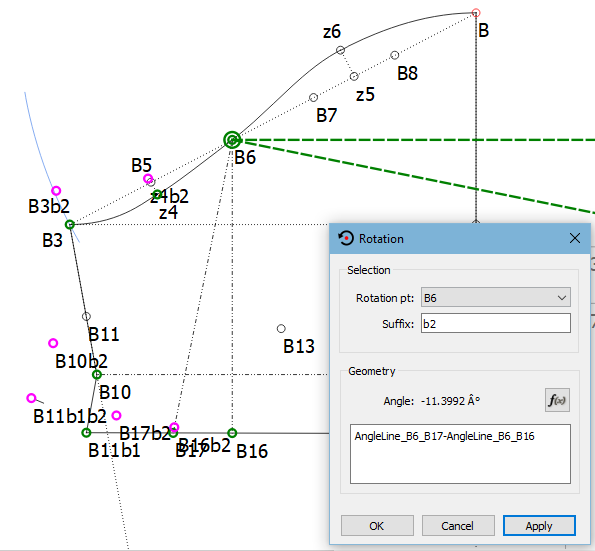
Next, I pick up the Rotation tool & select all the points that I want to rotate except B6, which is my axis point, and hit Enter. I move the selection a little to the left & hit Enter again.
Then I add the formula AngleLine_B6_B17-AngleLine_B6_B16. So by saying that the B17 line angle Minus the B16 line angle, will move the selection 11.3992° below 0°. In this case, if you look at the 2 green lines, the top one is at 0° and the bottom one is showing the rotation.
So now I can draw in new lines and curves (I did them in blue so you can see them nicely):
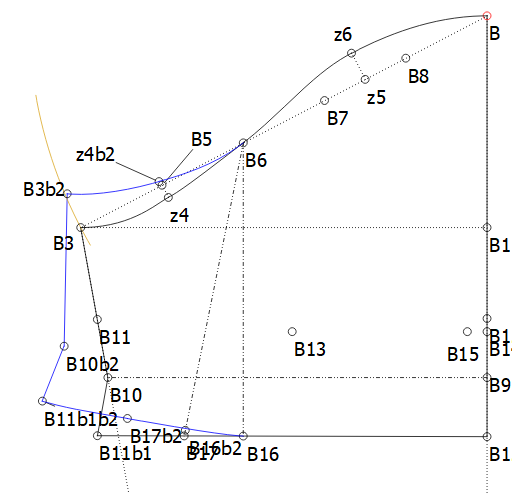
This is a men’s very casual shirt pattern so I’ve only done half of the sleeve, but you can do the same on the other half of your pattern just adding the lines on the right side and reversing the angle formula so that the bottom green line will go above the green line at 0°.
I decided not to rotate the curve but rather to just create a new curve to meet up with the existing curve at B6 and I curved the bottom edge to follow the points that were rotated.
I hope this helps you a bit, because you have so many lines on yours that I really can’t figure out if you’ve done it right, or not, but it is looking good.
ich habe bereits mit Grace schon einmal über Ärmel gesprochen. So wie ich es hier verstehe, ist es euer Ziel die Armkugelhöhe zu verkürzen. Das heißt die Strecke B1-B bei Grace und bei Chareve kann ich die Punkte leider nicht zuordnen - Die Armkugellänge bleibt gleich und der Saum und damit auch die Oberarmweite wird größer. Grace ich habe mal dein Bild kopiert.
Wenn das euer Ziel ist, kann man dies mit einer viel einfacheren Methode erreichen.
Im ersten Bild beträgt die Armkugelhöhe hier Punkt A52 70 % der Armlochhöhe und meine Armkugel sieht so aus:


Im nächsten Bild habe ich 55% der Armlochhöhe und meine Armkugel sieht viel flacher aus und auch die Oberarmweite ist größer geworden:

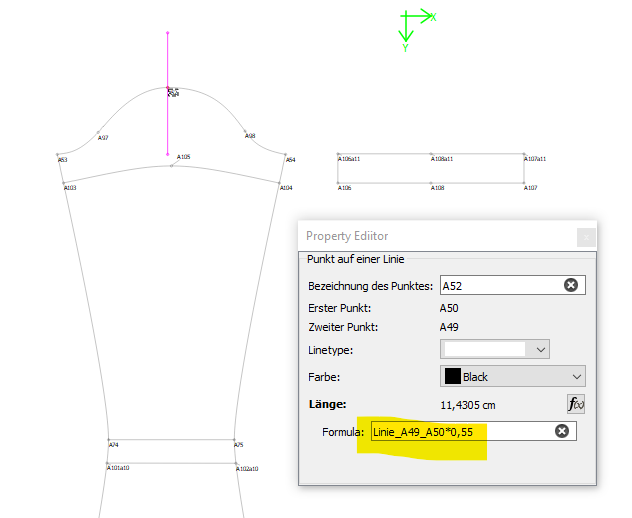
Diese Veränderung passiert einzig und allein, weil ich Punkt A52 verändert habe.
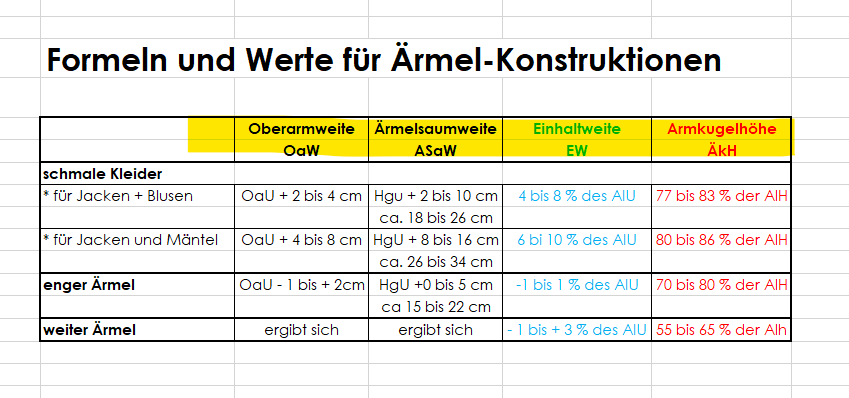
Ich stelle euch mal eine Tabelle zur Verfügung mit der ich arbeite:

![]()
![]()
![]() Ok. Translate has struck again. I was thinking that @Chareve wanted to create a bell-type spread of the sleeve pattern.
Ok. Translate has struck again. I was thinking that @Chareve wanted to create a bell-type spread of the sleeve pattern.