I really don’t mind if the notch is only on the cut line… I just forget to change the setting when defining the notch ![]()
Lacking methods to elegantly insert seamline markings, I’ve found that a square diamond notch placed on the seamline is a useful compromise. So I’m not ready for that capability to be removed yet.
For the pattern-seller, it also gives a method for the customer to choose whether they want to cut the pattern out on the cut line, or cut out on the seamline & choose their own seam allowance without having to manually move the notch markings.
![]()
3 Likes
After I get the “built in” SA working, I’m probably going to tackle adding symbols next.
What will be interesting to find out is if we would be able to designate a point on the main path as a notch and symbol. ![]()
Makes sense. That’s why I asked the question.
2 Likes
Baby steps… got the new schema saving, loading, and converting… and ta da - the 1st go at drawing an inset seam allowance - sort of.
Well… at least got the inset seam line working. ![]()
Now just have to sort out the rest of the painter paths, and um, move the node points to the new inset seam line - which I didn’t even think of until I saw this. Like I said, it’s not just a simple case of using a negative SA.
6 Likes
I ![]() ‘Inset’ and ‘Outset’.
‘Inset’ and ‘Outset’.
These are standard graphics terms, and they’re meaningful in exactly the same way as a SeamAllowance.
.
2 Likes
Well… to be honest I looked at a bunch of different applications - including all the big gun garment systems, and didn’t like anything until I found that Inkscape uses Inset / Outset when referring to a contour. While similar to internal / external, I think inset / outset better describes what we’re trying to do with the SA.
4 Likes
Well this was unexpected… I’ve been working a new Copy Pattern Piece tool with flipping - which so far is proving elusive… and then I got this:
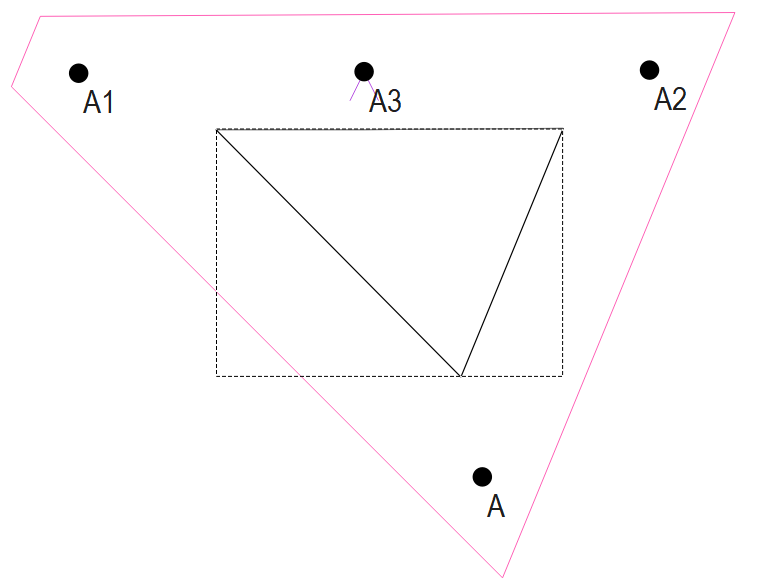
I got the piece path to flip… path is still in the same order A-A3-Spl_A_A3. . Anyone notice anything?
![]()
![]()
![]()
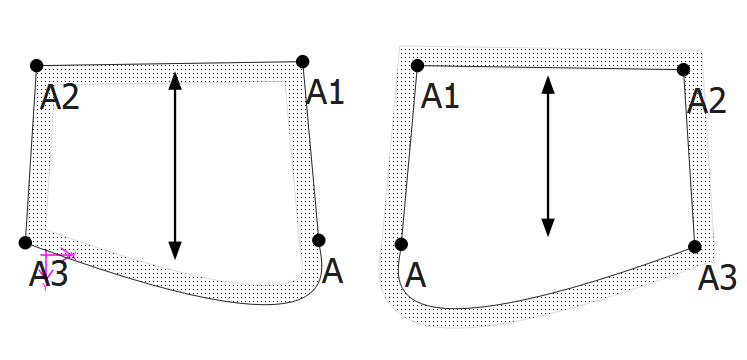
Well, it’s obviously a step in the right direction, however, the direction is also reversed and so the SA. Hmmmm… I have no idea how one would approach fixing that!
![]()
Yes… but not for the copy tool.
Yes… but that’s the interesting part that I wasn’t expecting - with this try. The path node order is same, but the path is reversed counterclockwise. Supposedly the path order was supposed to be reversed, and in a clockwise direction - not sure why it’s not, as it was reversed ordered in a previous try.
BUT the lightbulb that went off is the fact the Seam Allowance is now on the inside or what we want for the Built In option! Why does it work? Simple… the seam allowance is always drawn on the leftside of the direction you’re headed. So with the path order completey reversed going CCW it’s on the inside. ![]() Thing is I don’t think this would work for the Built In option, as it’s not going to draw the corner mitres correctly. It’s not taking into account the calculated cutline path that adds all those corners, based on the main path and the angle settings. With the Built In option, the main path has to become the cutline… or more specifically a new main path has to be calculated inside the existing main path, then a new cut line path calculated to create the new cutline with correct mitres. This is all complicated by the node points, notches, Custom SA, as they all affect the main & cutline paths.
Thing is I don’t think this would work for the Built In option, as it’s not going to draw the corner mitres correctly. It’s not taking into account the calculated cutline path that adds all those corners, based on the main path and the angle settings. With the Built In option, the main path has to become the cutline… or more specifically a new main path has to be calculated inside the existing main path, then a new cut line path calculated to create the new cutline with correct mitres. This is all complicated by the node points, notches, Custom SA, as they all affect the main & cutline paths.
What it may solve though is adding seam allowance to internal cutouts… such as a circle cut in the middle of a square sleeve cuff - where we would want the SA on the inside of the circle, not the outside.
3 Likes