Won’t work that way. It’s not a case of subtracting or adding the seam allowance . It’s way more complex than that. First seam allowance is ALWAYS added. What I have to figure out is if the seam allowance is included, then a new main path has to be created inside the current main path WITHOUT the corner miter type included. Then that path has to be used to as a new main path and add the seam allowance in the normal way. Plus the seam and cut line Qpainter paths have to be changed accordingly.
If negative SA’s allowances were allowed there is no rational way to accomplish that. If it were that easy I could just change the formula fields to accept negative SA.
Plus… like I previuosly mentioned there has to be accommodation for makeup seam allowance so the seam line is place on the correct place. Simply allowing negative SA does not address that issue.
And to make the issue even more complex there’s the whole “custom seam allowance” thing that’s all wrapped up in creating the final seam allowance path.
Then it would be safe to assume that it would be too much trouble for the engine to read a “-” as a “switch to included seam allowance mode” rather than a “minus,” yes? Otherwise I suppose the cut line would be inside the seam line, which might look passable for a minute, but in the long term it would just be a pile of trouble, like the non-implemented pattern-drafting systems, or worse.
Yes. And I haven’t checked, but I wouldn’t be surprised if the schema is validating for only positive SA… which then means the schema also has to be updated and added code to convert old patterns.
That being said… it will be simpler to just check for 3 states.
None - do nothing. No SA, no seam line, and the main path IS the cutline.
Included. Recalculate a new main path inside the current one . Add SA with current “engine”… taking into account we need to add for makeup SA.
Add SA using current engine.
Hope to be able to eliminate some of the if this state and this state and not this state stuff going on.
Well that’s why there’s the option to show the seam line or not. BTW… as well as being able to color seam and cut lines and other details. Many cutters will cut by color, so if the seam line is set to a non cut color it doesn’t matter if the seam line is shown or not.
You’re not the one who insisted on using “Passmark” for “Notch”. I was under the impression that you wanted Seamly to be accessible to everyone, only changing terms if it would clarify what was happening, even if it left humble insiders going, “Huh. That does make (more) sense,” not changing terms just because you couldn’t be bothered to consider if the industry standard had merit.
ETA: But on the current question, “Internal” or “Included,” Douglas has expressed reasons why “Included” is better; you have not given any reason why “Internal” is the better option. I for one would love to see your reasons.
I’m just having another look at this… Perhaps one should look at this from a different perspective…
If one is adding a seam allowance, then it goes on the outside of the stitchline. The added seam allowance becomes the cut line. I think this is the norm and should be the default unless #3 (add stitch line) is checked, so no checkbox needed.
If one doesn’t require a seam allowance, then the stitchline and the seam allowance are one and the same. The pattern outline becomes the cutline. This can be handled by #1 by setting the default SA size to 0, so no checkbox needed.
If the seam allowance is built into the pattern, then one is no longer adding a seam allowance but a stitch line. The pattern outline becomes the cutline, but an internal line gets created for the stitch line. This one should automatically set the SA set to 0 and an internal line added for the stitch line and should have a check box added that will remove the options to set the SA and replace it with exactly the same thing but for SL (Stitch Line).
Bleh! I’m guessing this is the long way around and heavy in new programming, but that’s how I’d view it.
The problem with your second point there is that, even with a SA of 0, the resources still need expended to render & record a SA.
I do wonder if just having two checkboxes, one for showing a SA via adding a cutline, one for showing a SA via adding a stitchline, & “none” as the default would be neat in the code.
Sort of… except there is no seam line, and all the SA options should be greyed out as they are NA. Also since the existing main path is used, as such there are no corner types created. I should note that from my experience, some costume shops the pattern maker doesn’t add any SA… they let the cutter add whatever SA.
No. You’re still adding a SA, but not from the existing main path (which in case #1 is the seam line). Remember the SA includes additional points that make up the corner type. Which is why we can’t just plug in a negative SA, or you’d be trying to add the corner types on the seamline inside of the main path. In other words creating the SA is creating a new cut line. a built in / included / internal SA, the allowance needs to be added to a new main path (new seam line) - without any corner type points added - created at the default SA width inside the main path.
Which BTW I’m happy to report I figured out a routine to create a new main path. Now I just have to figure out how & where to swap the 2 main paths, and I should have a working example.
It should be noted the 2 reasons why we need
to implement an included SA is:
To be able to print the proper seam line when drafting with an included SA.
To be able to add corner type miters with an included SA.
Whatever we decide I just want to make sure the naming in the code matches what’s in the UI to avoid the current state of reading through the code. Currently the 2 main routines that create the SA and the corner mitres are named Equidistant() and EkvPoints()… huh? That’s the problem with using esoteric names… which IMO is what internal / external kinda are. Might make sense to seasoned users, not sure about new users. Even then, after 42 years in the business I have never heard or used the term internal seam allowance. It’s always been the seam allowance is included OR you have to add seam allowance.
Just to throw in some extra complexity - which is never a problem with me :). When following Aldrich’ recipe to design a suit jacket, the resulting line was neither a seamline nor a cut line. Seam allowances had to be added to the neckline and to the hemmed parts. I am not sure if this complexity can also be handled. Maybe it is a better option to add them manually in draft mode, after which a complete cut line is produced?
Right I’ve already mentioned this. I’ve referred to this as “makeup” allowance, or that which needs to added in addition to the included SA.
For now I just want to get it working with showing a seamline with included allowance - which is generally a global width, and then deal with providing a means for adding makeup. Which has to be seperate from the node to node SA, as for example it’s common that a suit may be drafted with a 1/4 " SA, included, but a user may want say 3/4 “… plus there are places that require an additional 1/4” makeup… so the user needs to be able to set the default width to 1/4", the node SA’s to 1/2", and another field to be able to set a node makeup to 1/4"… which will produce a pattern with a 3/4" SA… with the seam line 3/4" all around the pattern.
OK… as I’m trying to unwrap more of the SA - I’m trying to make sense of the Custom Seam Allowance workflow which is just more confusion. So, using the “Insert Internal Path” tool you can add nodes as an internal path or a custom seam allowance. Hmmm. Then in the Piece Tool → SA tab the Custom group which is now enabled, you can now set that path as a Custom Seam Allowance or a Main Path. Double hmmm. What happened to Internal Path? I don’t
get it… why can you take the same points and handle it in 2 different fashions? Why can those exact same points have a CSA, but not an Internal Path SA? Why can the Internal Path tool create a CSA that can then treated as part of the Main Path??? ARRRGGGG It never ends. Spaghetti I tell ya.
What a PITA the whole SA is… BUT I think I’m almost there with having a working “built in” SA. I first need to futher address the dialog options so I can test whether it works or not.
I’m thinking of making these changes to the seam allowances to simplify things. Currently there are 3 bool attributes in a piece tag… “seamAllowance”, " seamAllowanceBuiltIn", and “hideMainPath”. The hideMainPath is used to show / hide the seam only if there is seam allowance. I will switch this to showSeamLine.
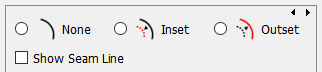
Here’s where things get simplified… instead of having to check the 3 boolean combinations of seamAllowance and seamAllowanceBuiltIn… this will switch to just seamAllowance = “none” / “inset” / “outset”. That will make it easier to get & set the radio buttons in the dialog.
Since the showCutLine was only there to deal with the fact the builtin SA doesn’t exist, we can remove it, as we always want to show the cut line. Which for the none case it’s the main path. For inset it is also a modified main path, and for outset it is the added SA path.
Show seamLine will only have an effect with the inset or outset SA options.
Does everyone think the “second” notch on the seamline is necessary? The main reason it’s there is because the builtin SA is not implemented per se. That is no SA is added, so there is only the main path which is normally the seamline, so to show the notches a second one has to be added to the seam line. Which if showing the seamline, it’s is not a standard practice, as notches are only shown on the cut line.
I can simplify things (for the user) further by eliminating the second notch option, and just place notches on the cut line - as determined by the SA type selected. Of course it complicates the conversion from existing patterns.