still trying to understand how to make smooth curves. i think i finally understand the length, etc but can’t understand what determines the angles. especially on the cap of a sleeve. have a smooth armhole curve.
I don’t fully understand your question. Do you want to know what determine the exact shape of the sleeve cap curve?
I rarely sew in real life, but from 3D simulation, I came to learn that the exact shape of the sleeve cap does not matter much as long as it is bell-shaped with the curve inverted near the bottom, and the top is flat, or near flat, (horizontal bezier handles).
Most textbooks also instruct that the lower section of the front curve dip a bit more than the back, because the back has more muscles. However, for knit fabric, or wide sleeve such as your, the front and back can have the same shape.
What more important is the length of sleeve cap curve in relation to armhole, sleeve cap height and the width of biceps line. All these are determined by your design, mobility, shape and comfort.
I saw that you use spline instead of curve to draw the sleeve cap curve, which I often did too. But you may want to consider using curve, but you have to draw the front and back curve individually. The curve doesn’t have to exactly connects the guide points.
The problem that I have with spline connecting the guides points is, they always become crooked after if I change my body measurement. It is not hard to adjust afterward but a curve is easier and smoother.
The only reason I use spline is so that I can easily mark my notches.
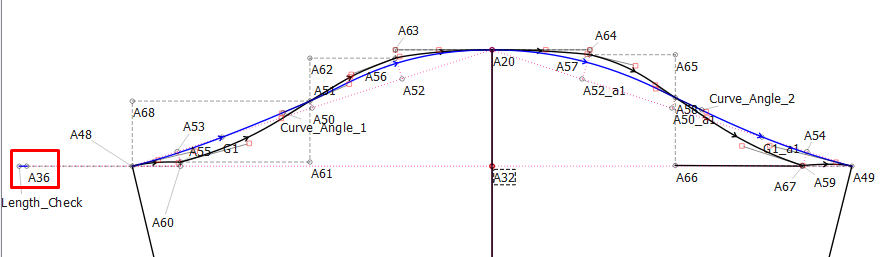
I see that you have removed the downward dents at G1 and G1_a1. I suggest that you also remove or shorten the upward dents at A56 & A57, as well. Your sleeve cap is very low to allow for a large range of movement in the sleeve, so the curve is also very gentle and doesn’t need much shaping.
No, if you want a shallow sleeve cap, then just bypass those nodes. You need to learn how to accommodate a shallow sleeve cap and a deep one So it depends on what you want.
You may need to angle the handle a little, but I don’t think it will be necessary.
Depends… What you have now is like a T-Shirt sleeve. If you wanted a more fitted sleeve, then you’d probably need to reduce the width from A48 to A49… and raise the cap. Unless of course you want a fuller cap, in which case you’d raise the cap.
Are points A56 and A57 in the pattern draft? It’s these points that are forcing the cap to flatten out. If it were me I’d just make the curve go from A51 to A20 to A58… and skip A56 and A57.
Ok, I’ve just done the same on the previous pattern that I downloaded and I put in a check on the length of the curve to see that the armhole & sleeve cap curves will fit and it seems that there’s 1/4" difference in length of the curves where the sleeve cap is a little short, so one can try to lengthen the curve handles slightly to make up the difference or to add a bit more angle to A51 & A58.
I’ve also added a bit of an angle line to A51 & A58 that I’ve used in the formulas, so if you adjust them to get the extra length then you don’t need to adjust the formula in the curve.
So here’s the old pattern back with my changes on for you to have a look and perhaps pick up a few tips:
It is looking much smoother, but if you’re eventually going to use this pattern with different measurement charts, then you really do need to use formulas so that, when the measurements change, the whole pattern will change smoothly and neatly.
Another thing that I’d like to mention, just for interests-sake, is that things (like the sleeve cap height, trousers width at the hemline or ease) can change with the type of garment that you are making, so this is the type of measurement that I normally put in the Variables Table where they are available inside the pattern for quick editing, then you won’t need to open the measurements chart to adjust them and it keeps the measurement chart neat & tidy.
thank you so much! i am going to study it and hopefully i will get closer to understanding… i just started doing the length check while i was waiting for your response and started angling out a49.
A48 & A49 are normally angled to the underarm seams so that they don’t make a point at the armpit once the seams are sewn together, so you really can’t change them. The formula is normally underarm seam plus or minus 90°.
A20 (at the top of the sleeve cap) is normally 180° on the one side & 0° on the other, so it can’t really change unless it’s part of a design.
That leaves the points between those mentioned. So it’s best to find something that will adjust when the sizes change, that will change accordingly.