Hi, I wonder if anyone can help please! I have separate draft blocks for my front and back bodice, and I would like to rotate by back whole bodice so the side seam is at the same angle as the front bodice side. But, when I go to the formula box to find the angle of the front side seam it’s not there! I drew a new line on the front side seam to make sure it’s not something to do with the timeline, but still not there. Any ideas?!
2 Likes
File and measurements here if anyone feels like taking a look! Thanks guys
Strappy Dress.val (98.2 KB) RIR Bodice Sizes 6-22.vst (7.0 KB)
2 Likes
 And this is exactly why I advocate drafting everything on one board.
You drafted the back in the 1st board which is listed 1st in the order of the pattern file. The front is 2nd, etc. etc.
You may be able to rotate the front to match the back, but not the back to match the front.
I hope this helps 
2 Likes
And why I advocate the use of groups to help hide items you wish to hide.
Yup… the timeline also applies to which block was drafted first.
3 Likes
Oh nooo, I thought I had drafted them all on the same board! I thought if you could see them all together and save them all as the same file that meant they were all on the same ‘board’, I didn’t realise it was a different board each time you started a new draft block. I’m devastated! Hope it doesn’t mean I’ll have to re-draw them all when making future patterns.
So, when you’re drafting all your blocks on the same board are they each connected to each other by a random extraneous line? Or is there a way to draft each block separately by making a new separate starting point?
Thanks for getting back to me guys. I just checked and yes I should be able to rotate the front piece using the angle of the back side seam so hopefully I’ll still be able to achieve what I wanted without starting it all again!
2 Likes
That is one way to do it. You can set the line type to invisible so that there is no extraneous line showing.
But you can also draft on top of your existing piece using the Group tool with the “eye” function to hide your previously worked on piece & have a clean workspace. Since they share most of the same basic measurements, I generally have drafted the front & back of a bodice with the same centerline, (it’s fairly typical among the paper drafting youtubers I watch.)
Of course, you can also color-code the points/curves for each separate piece, eg: default black for the multi-piece nodes, Blue for the Back, dark Red for the fRont…, but I recommend leaving “Light Salmon” & “Yellow” for lines that you want to be able to see, but don’t want to notice.
![]()
2 Likes
Most systems I’ve used for drafting mens jackets, draft the front and back together, side by side, with the front generally overlapping the back section towards the bottom of the jacket. The collar is also drafted on the front section. Since there are some common seams, the sleeve is usually drafted with the under and upper pieces drafted on top of one another. Like:
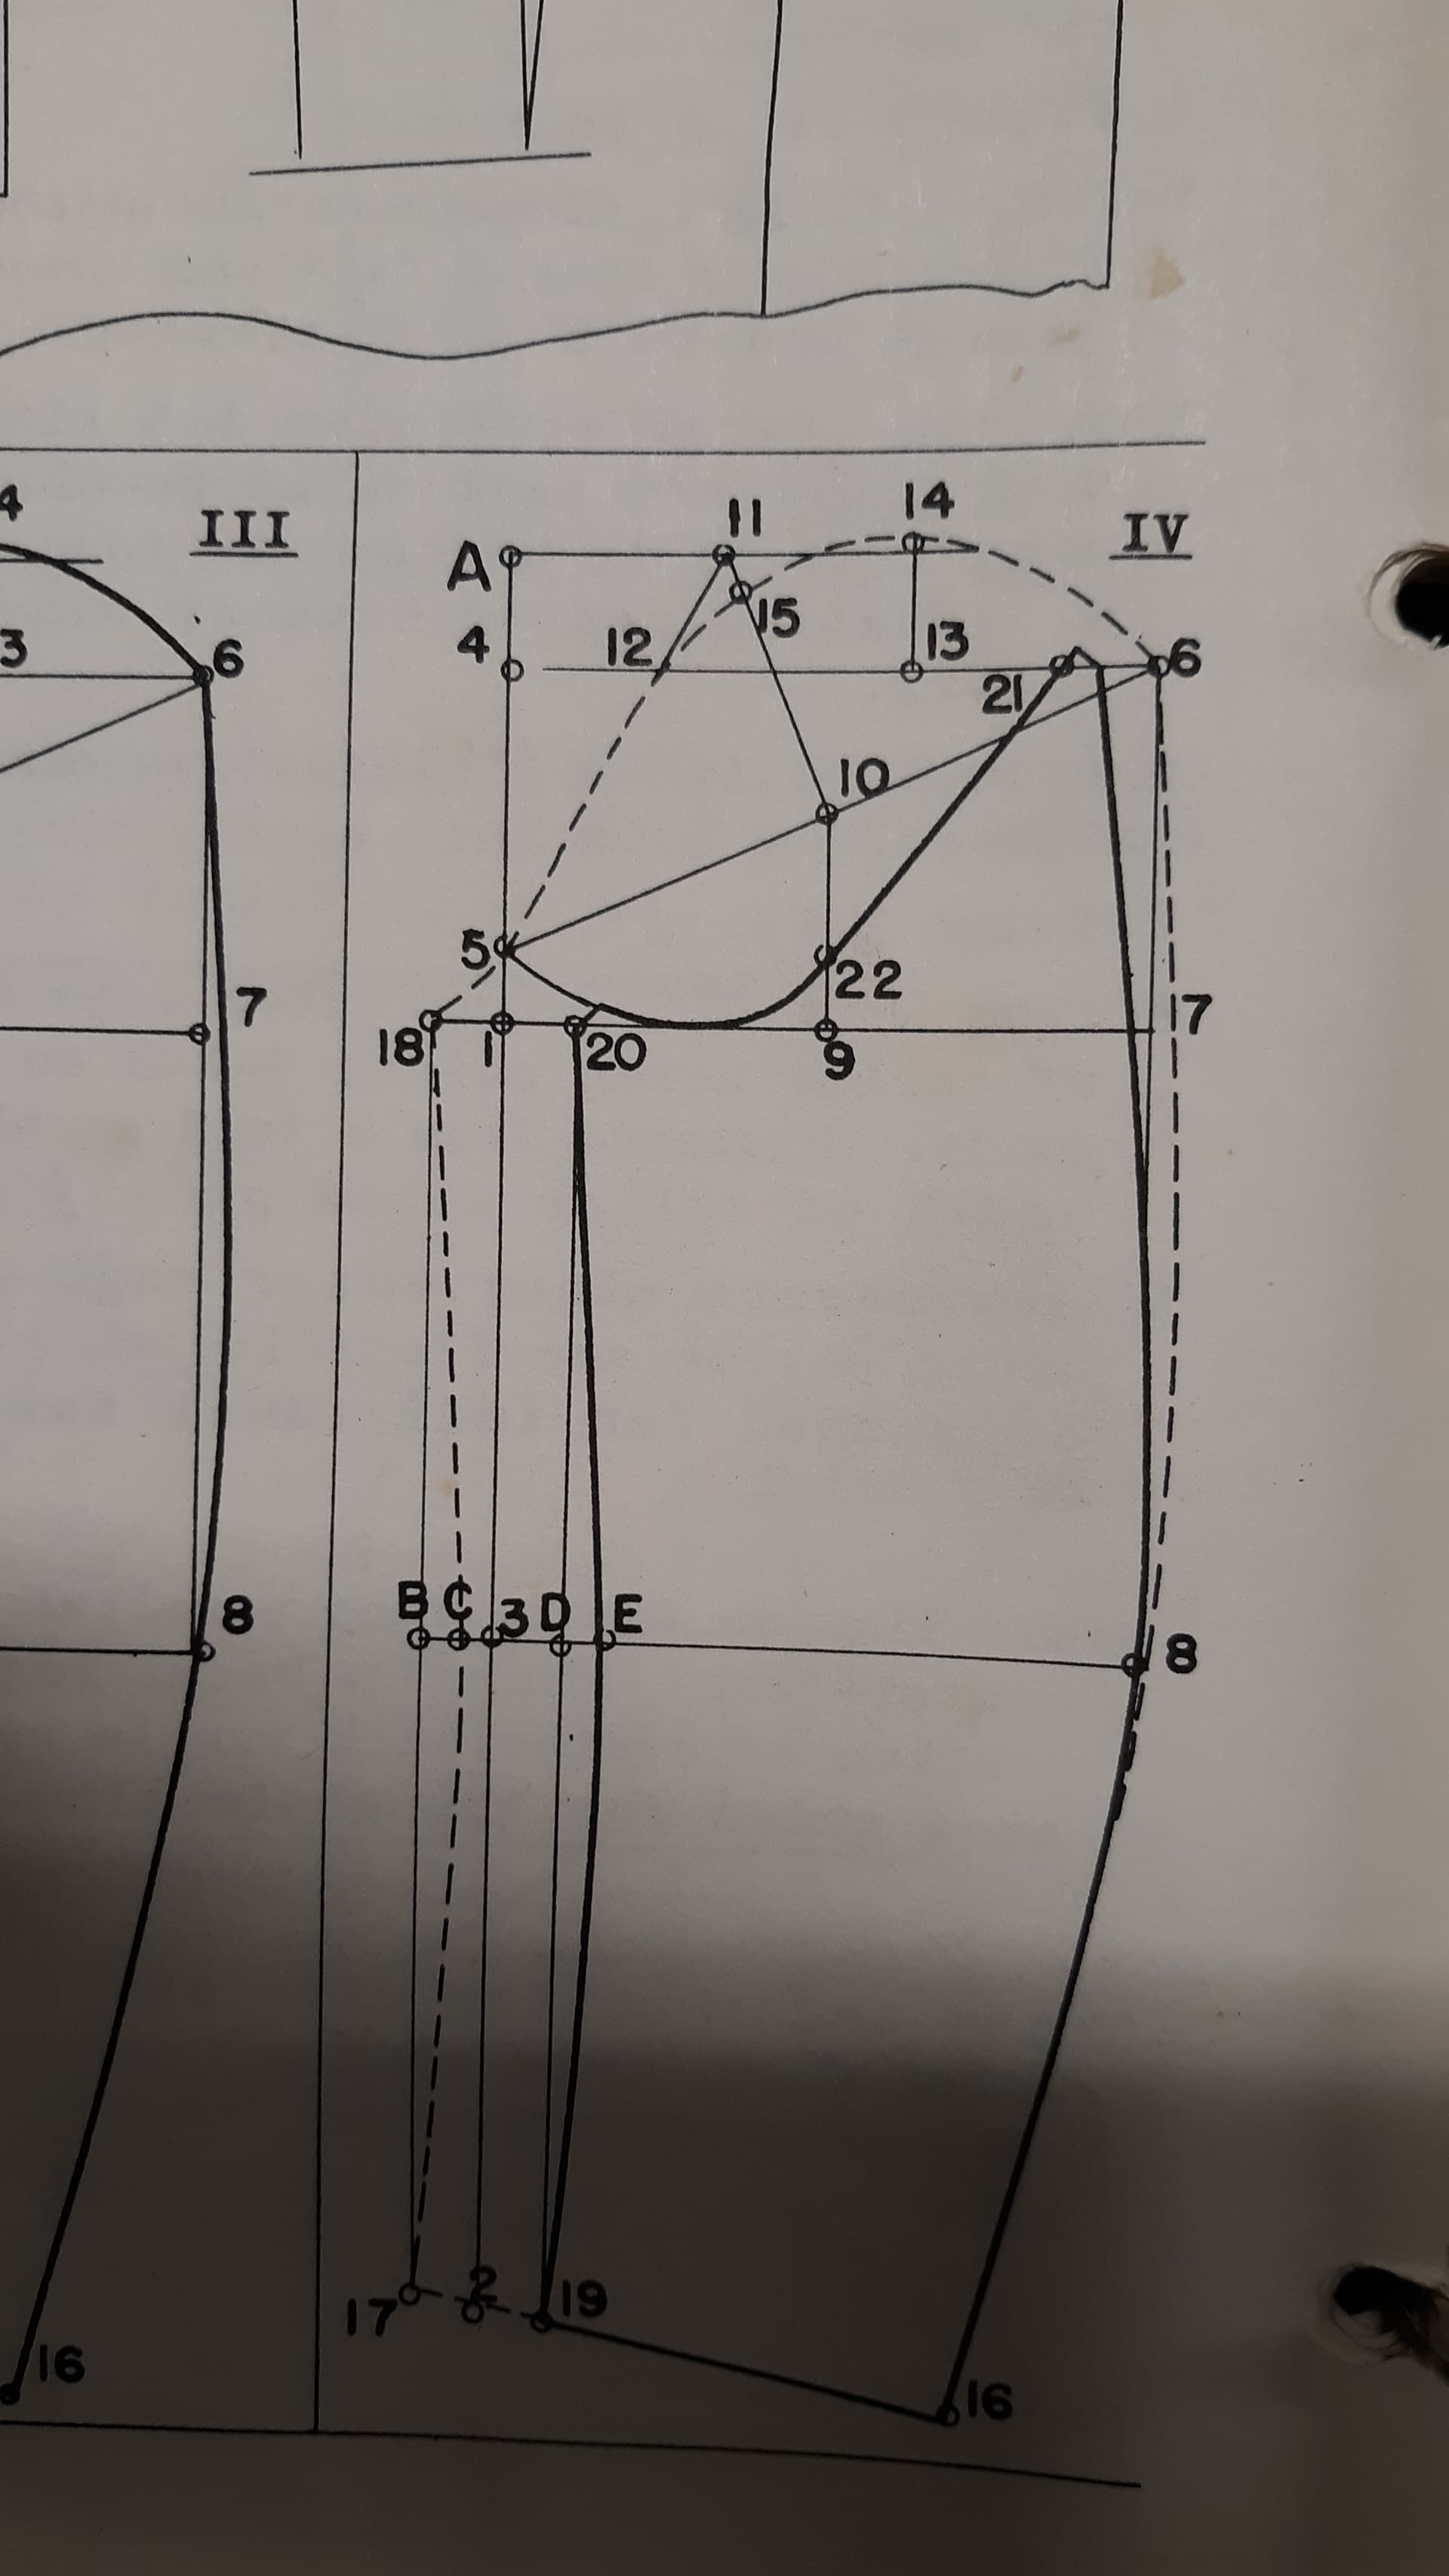
Pants are generally done the same way with the front and back on top of one another. Since I’m used to drafting this way on paper, its natural for me to draft in one block with Seamly. Using a tracing wheel I’ll transfer one part to another sheet of paper… then add seam allowances. Or… like I’ve been doing a lot for the Annie show we’re working on - to save time I just use one pattern and trace with wax paper to the fabric.
Which BTW, this is another way to look at a new draft block… it’s just another sheet of paper. ![]()
3 Likes
Actually, you didn’t do anything wrong. The way you created your pattern, is the way the software is designed to work. And, even if all of your pieces where on the same board, you would still have the same problem, because the front was created after the back, so the front side seam would still not be available as a point of reference to rotate the back.
Yes, I normally make this line a pale yellow and dotted, so it’s not too much ‘in my face’, but still visible, from the nearest node to where I want to place the next piece. This way, I can lengthen the line or shorten it to join onto the previous piece later - like with a trousers, I may want to join it to the bodice to make a boiler suit (I’d add the line going down from the centre line of the bodice front/back by 10 or 15cm).
This can still be done in Piece Mode after you have created the pattern pieces and you can use the Union tool to join the pieces, but I avoid the Union tool like the plague.
2 Likes
Thanks so much for the advice, really appreciate it!
1 Like
Thanks as always for the advice! Just out of interest, why do you avoid the Union tool? I’ve used it once and it worked fine (although it was a pretty simple pattern), but you’re making me very wary of ever using it again, ha ha! Does it just not always work properly?
2 Likes
That’s one way to put it. In addition to not always working properly, it occasionally makes one’s pattern file unreadable. Of course, it’s relatively easy to fix, or remove, in XML, but it’s still traumatic.

1 Like
Over & above what @Pneumarian has said, @Douglas has been working on it, so I’m guessing that it does work better. But it also tends to join the parts at an angle and sometimes, when you change the measurement files, the parts ‘go out of whack’. For me, it’s much easier to create the whole file in draft mode, rotate it as I wish, join pieces and do my tweaking while I can actually see the pattern piece coming together, and then create the final pattern piece with its seam allowances & notches, etc…
Much easier for me, but everyone is different.
1 Like
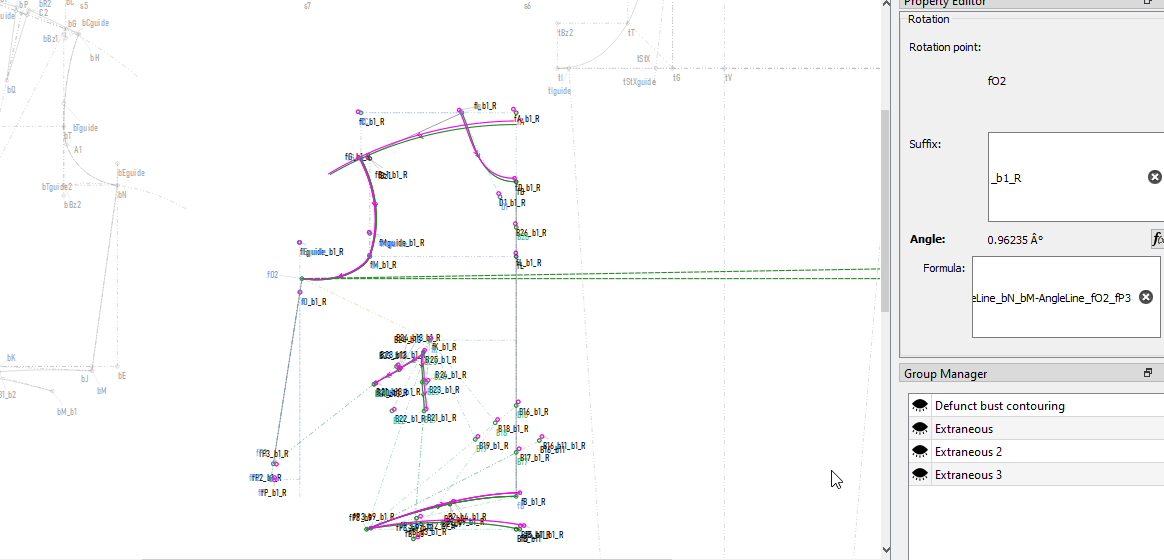
Hi again, @hayleyneil
I managed to place all of your drafted pieces onto 1 drawing board. Unfortunately, I deleted all of the pattern pieces in piece mode to make things easier for me, so you’ll need to redo them. I placed all the main pieces into their own groups, which will make it easier to close the eyes on the ones that you are not working on while busy with another piece.
Strappy Dress B.val (98.9 KB)
I placed the .vit & .val into the same folder, so when you do open this pattern, you will need to point to your measurements file.
I wasn’t able to place the pieces from the nodes that I normally use, so I did what I thought best for your pieces.
Hmmm… I’m just thinking that I think there was a square somewhere that I didn’t transfer over… You may need to add that, as well.
Anyway, the bulk of the pattern is there 
1 Like
Oh my GOD this is amazing, thank you so much! I’d buy you a bunch of flowers if I could 
1 Like
So incredibly kind of you to take the time to do that for me! Out of interest, how was it done? I’m not particularly great with computers but if you could let me know what method you used I’m sure my husband could help me to do it if I need to do something similar again. THANK YOU!
2 Likes
The .val is an XML document. As such it resembles HTML with extra tags & less paragraphs. When not using the dedicated software, it may be most effectively edited using a plain text editor. It is very logically organized, which is how Grace was able to figure out what to do to it, but somewhat complex, so it’s not simple.
I hope that tells y’all what’s needed.
1 Like
Yup. Similar, but 2 different animals. Although the val files can get complex the more an object is used, I find it easier to read than “modern” HTML, where many editors want to wrap every piece of text in useless font and fomatting tags - including Qt’s HTML editor in Creator. Also Creator doesn’t produce nicely tabbed tags. Makes code with a < tag>… < /tag> all strung together and word wrapped. Uggh. Although, on the other hand, all the UI forms used in the apps are also XML .ui files, and are not easy to edit, as the data can get highly nested, where you can scroll like 20 pages just to find the end to a given tag. I hate when I have to resolve conflicts during a merge commit on ui files like the mainwindow.ui. Gets really squirrelly when you need to rearrange or add items in that darn toolbox… In Creator it will automatically renumber rows and columns, not so when you have to do it manually. And if you dont get the row and col numbers correct, the file will then fail to buikd, or even open in Creator.
And backup a pattern file before making changes and saving.
3 Likes
You’re very welcome, and thanks for the flowers
Essentially, I’m very lazy, so this pushed me to fiddling in the xml files to find easier ways… Like transferring a particular sleeve to a different pattern… so that’s how I learnt how to manipulate things in the method that @Pneumarian mentioned.
The best way is to gain experience in the program and stick to a certain way of working, like saving the basic patterns as a master so that you don’t need to recreate the wheel each time you want create a new design. As @Douglas says, save it as a master which will become the point that you start from with each pattern.
Anyway, have fun
1 Like
Okay, so you all lost me at XML! I have no idea what you’re talking about, ha ha. Which makes me even more thankful @Grace!
I do have a master set of blocks which I’m using as a starting point for everything, but I inadvertently made them all on different boards. So what I’d like to do is put these basic blocks all on the same board (i.e. do exactly what you did for my Strappy Dress pattern @Grace ).
It’s this file: Basic Blocks - Final Version.val (84.6 KB)
with the same multi size measurements as before: RIR Bodice Sizes 6-22.vst (8.1 KB)
Is there any way someone could give me a pointer as to how to repeat what @Grace did with my strappy dress file and transfer them all onto the same board please that would be amazing; I’m sure my more computer-literate husband should be able to work it out for me!
Honestly this forum is reinforcing my faith in the basic kindness of humanity, thanks so much for all the help everyone 
2 Likes
We’re still without electricity and it will be another week or more before it’s restored. Now the whole sub station has burnt and needs to be replaced. 
I’ll do your pattern for you in the next day or so, but if you’d like you hubby to do it, you first need to add the lines where you want to join in the pieces, and then go to the xml file and start juggling the pieces into position and then change the ID to the number of the initial node on the other board and then delete that initial line.
All the way through, you need to test the pattern to see that it remains true and opens up nicely.
1 Like