Hi,
In the past holiday I have finished my first patterns and tried them in a muslin. Aldrichs pleated trousers was a great success - ready for the real garment to make. The jacket is not yet there, but it advances…
In doing all this I had a few small technical issues for which I could find workarounds, but no real solution.
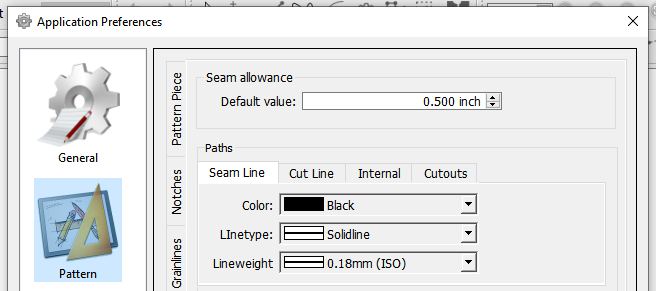
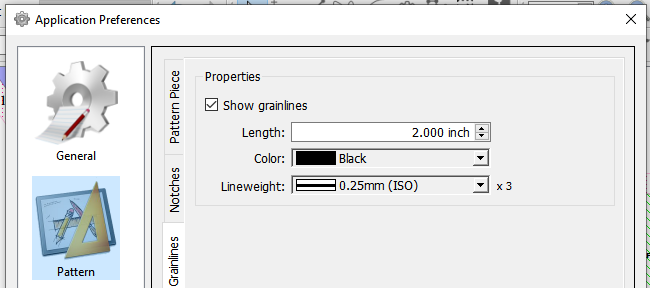
Line weights in layout. The default lines in the layout were very thick. I do not like that in a pattern. However, I could not find how to adjust the layout for that. The workaround is to change line weights in the application preferences, that does the trick for the layout, but the pattern almost disappears from the screen in draft and detail mode because the lines become far too thin. So after producing the layout I returned to default line weights. Is there a better way to do this?
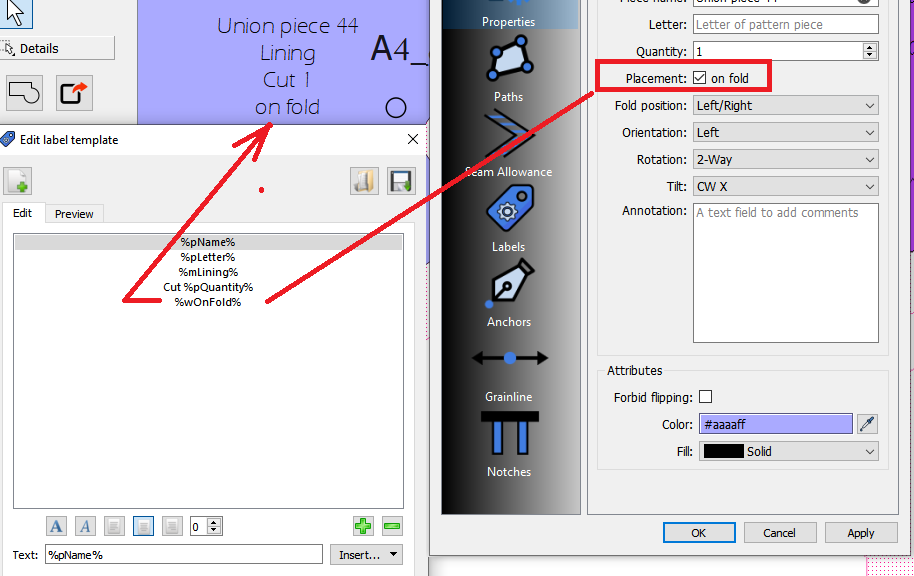
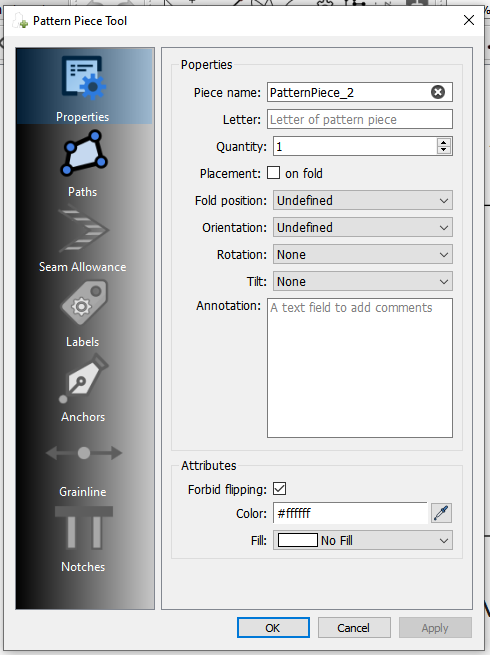
On-fold marking In the label text field, I find a check-mark for ‘on fold’ but it does not appear to do much, or at least I did not find how to make it work. Workaround is to draw an internal path with the on-fold symbol, but maybe there is a better way to do this?
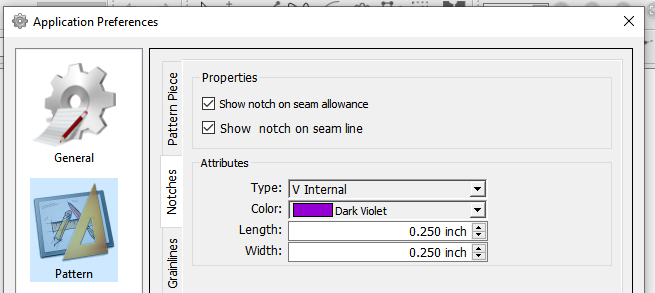
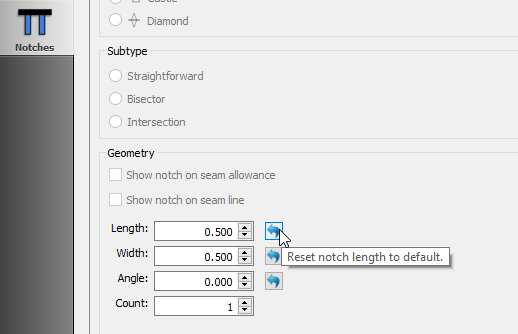
Notch size. I changed the notch size in the application preferences from 0.25 to 0.75, but all pattern pieces keep 0.25 cm notches unless I change the size notch for notch. Is there something I might be doing wrong, or is this a known phenomenon. I have not yet found a workaround for this one.
You can set the linetype, lineweight , and color for the seamline, cutline, and internal paths in the Application prefs. These apply to the pieces in Piece and Layout mode, and are seperate from the line attributes in draft mode - as there is only an indirect correlation between the draft blocks and pieces.
This is another one of those what does it really do legacy features. It’s really only for the piece label data… so it will show in the label On Fold if checked. I’m just finishing up overhauling the Pattern Piece tool and dialog, so it’s more organized as to what’s going on. I’ll post some screencaps when I get a chance.
There is also Notch pref settings in the App prefs → Graphics. You can set a default size here that shows up when you create a new tool. If you change a tool’s notch attributes, it’s only for THAT
notch. I suggest to take a look through the prefs, as there’s probably a few other items you might want to (re)set based on your needs. I usually try to maintain the existing behaviour, but in some cases - like the notches - it was a new feature I added so I trief to pick what I think is the best default. I may also have to take a look and see if some of the prefs are taking the pattern units into account., and convert if neccessary. For ex: .25 inches is normal for a notch - .25cm not so much.
There’s some other changes / additions I made to the Pattern Piece dialog and default settings. I’ll post about all the updates with screencaps, so you’ll probably want to read that when I post.
Again, the draft mode lines have nothing to do with the piece & layout lines. In fact, currently the draft mode lines do not have a line weight. BTW… the line weight and color is needed for some in the layout for cutting machines.
Notches:
On Fold:
If the On Fold checkbox is checked, and a label template contains an On fold text placeholder… the On fold text appears in the labels. Yes, I know, it’s rather convoluted, not my doing.
As part of implementing the insertion of symbols, an “On Fold” symbol with arrows will be included.
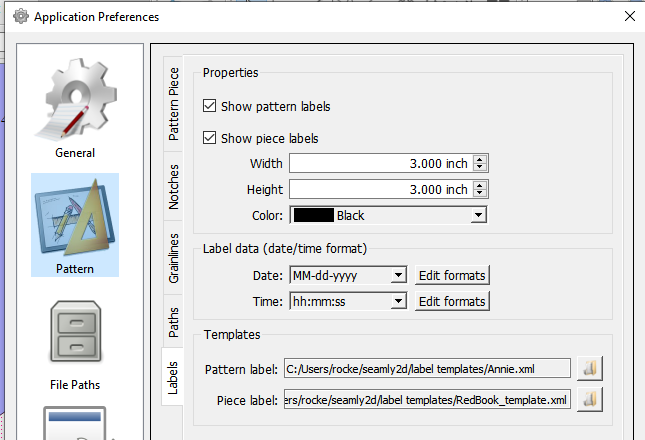
I should also note… that the updated Piece dialog will now use a default size and templates for labels and size for grainlines which can be set in the Prefs. Yea.
There will also be a Properties tab (the properties group box containing the data fields that are used to fill in piece labels), which will be available for editing after you select new pattern nodes and prior to switching to Piece mode. Therefore you will now be able to edit the name of piece as you create them, and not have to navigate down to the “Seam Allowance->Labels” tab… which I could never understand the logic on that.
You may also note some other label options are now drop down choices,
At some point I may figure out something to actually do in the layout with some of the options - like limit how much a piece can tilt.
You will now also be able to set a color and fill for pieces… the eventual idea here is to be able to set a color by fabric type or set a hatched fill to be able to create scaled instructions indicating pieces that are to be flipped.
If you click the arrow next to the value, it will put in the default size for you - set in preferences:
I add seam allowances as soon as possible so that I can see the lines when I zoom out, but I think @Douglas is now onto this (and all the other things you mentioned).
As I get the chance I’ll probably add more reset buttons to restore default values in the various dialogs.
I think though what Peter was getting at is that changing the notch size in one tool dialog does not carry over to other tools.
What do you think of being able to edit the SA’s immediately after selecting the piece nodes? Currently only the Properties and Paths are enabled. I think this would be possible. The SA’s are now a seperate tab. Setting anchor points and notches is not possible until the piece is created.
@Douglas and @Grace , thanks for your extensive answers. With respect to the notches, my problem was not to find how to change the default in the Application Preferences. I did that, but the changed value (0.75 cm) was subsequently not used in the pieces I created. I think something (or someone, in this case me) is not working properly there.
I understand my workaround for the layout line weights is the proper way to do it. It would be nice, if possible, to have the option to change line weights and possibly other attributes before writing the layout to the svg file. This would avoid the choice between seeing something on your screen and having nice output. Or alternatively, to use a minimum line weight for the on-screen representation so that the lines never disappear.
I will take a look latter. In the mean time… try creating a pattern in inches and set the notch attributes , and see what happens. Maybe there might a units conversion issue?
Not sure what you mean? … you can change the “piece” line attributes in the prefs. Prefs->Pattern->Paths-> Seam / Cut / Internal / Cutout. Again this (globally) changes the line attributes only for pieces in Piece and Layout mode.
If your’re asking if there can be a different setting for pieces in Piece vs Layout mode - that’s another level of complexity I don’t see a need for.
If you’re asking if the piece line attributes can be set in the Export dialog- that’s another thing altogether.
Other than zooming way out in draft mode, I don’t have any issue with seeing or exporting the lines.? I haven’t changed the line settings since I implemented the line attributes, and I could see on screen just fine, and as you can see in the pic it prints fine… even though most of that project I used a plotter in which case the line weight is irrelevant as it’s dependent on the plotter pen width.
And unlike the notches, there is no units conversion difference between an inch or cm pattern - the mm line weight is converted to pixels in either case. Maybe if you could screencap your line attributes prefs I could try those setting on my end to get an idea what your looking at.
I should note that until recently there was 1 choice of line weight - hairline, and 1 color - black.
I found out where the issue is appearing. In a nutshell - if an element is not found in a pattern dom doc, a default value is used… I happened to hardcode the value as .25. I need to replace that with getting the value set in the prefs. Easy fix. I’ll also see if I can have the unit suffix adapt to the pattern units… it appears as inches in the ui form. Have to override that in the dialog constructor to use the pattern units. Again, easy fix.
@Douglas, Great that it can be easily fixed. Thank you!
As for exporting the layout, my question was indeed to set the line weights in the export dialog. That would make the line weights in the exported file independent from what is used to make a comfortable screen display. Not urgent if it is difficult, though!
Hmmm… I’ll have to give this some thought. It’s possible we may be able to render the screen with different (pen) line attributes separate from an export. Maybe the export dialog could initialize with the screen pen settings as a default, which can then be set in the dialog before rendering the export. Or maybe to make it even easier, to just store the last used export pen settings in the Prefs… using the screen pen as a default if it’s the1st time through the export dialog. Yeah… I think this could work.
Yeah… it’s going to be a big PR - probably tomorrow. Don’t hate me… but by overhauling the Piece tool it fixes a lot of issues, will improve the workflow, and cleans up a bit more terminology.