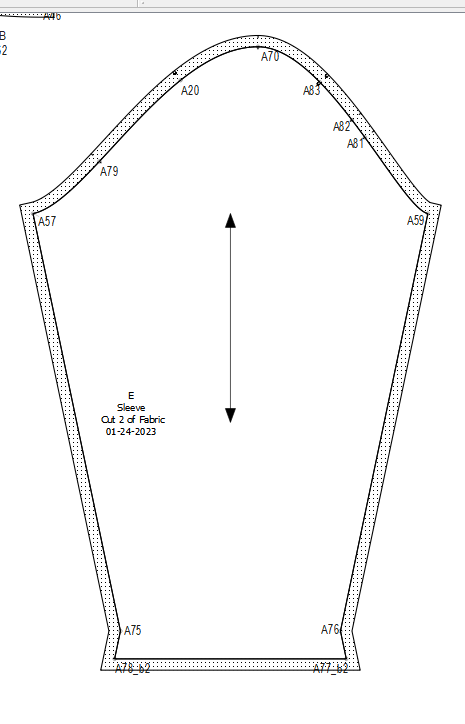
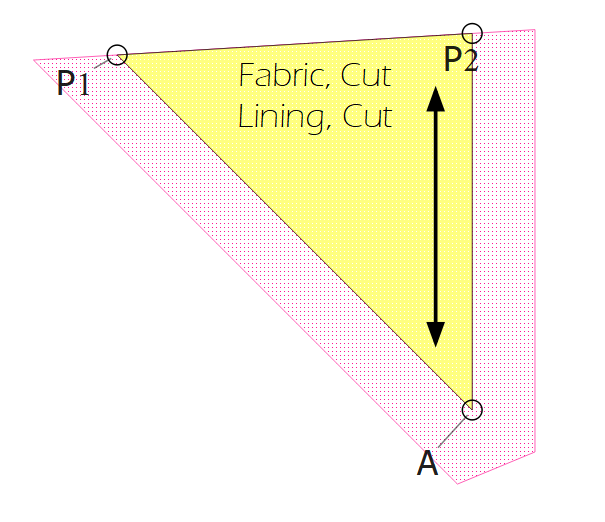
Sorry to come again with a problem, but this happens when you try the cutting edge… A bug appears when I do the following. I make a Piece, select to show seam allowances, make the default seam allowance zero, but then add a seam allowance between two (or more) selected points. I have done this in the pattern included (based on the group_test.val file). After doing this the piece is correctly shown, but its bounding box has shrinked to encompass only the points with non-zero seam allowance. The grainline jumps trying to sit in the bounding box, and when trying to move the piece only clicking on the P1-P2 line works (the line with nonzero SA), and graphical representation goes astray. The problem can be worked around by setting a very small non-zero standard seam allowance. As far as I can see, the behavior is predictable on different patterns. group_test_with_piece.val (3,9 KB)
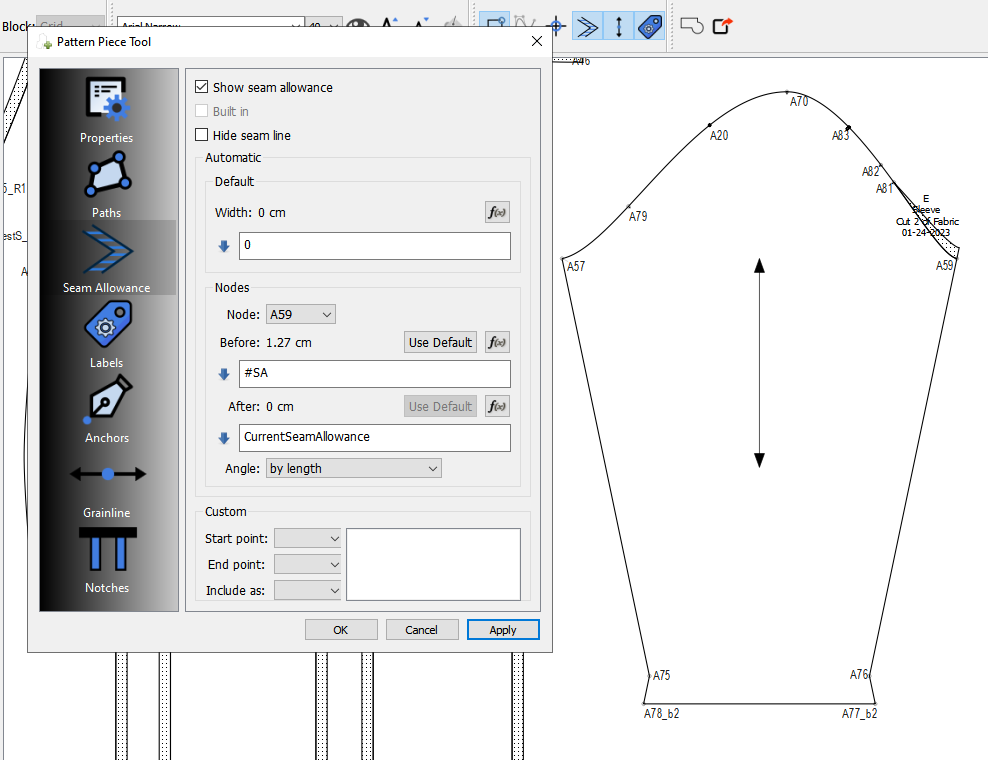
Addition: when I do the reverse, i.e. setting a currentSeamAllowance of 0.4 inch, and then manually change it into 0 between P2-A and A-P1, the result is the same. Bounding box also restricts to the P1-P2 zone in this case.
Peter… I’ll take a look later.
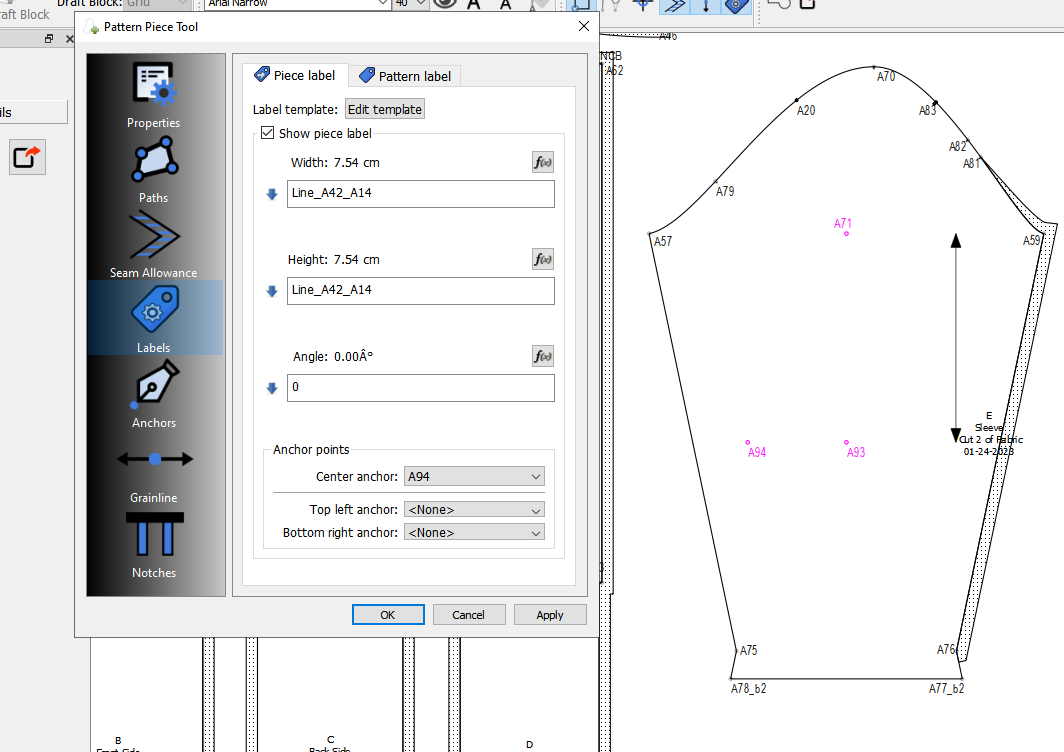
Just a note. When using labels and grainlines you really should use anchor points to anchor them so they stay in the same relative position when measurements change.
@Douglas, thanks and no hurry - there is an efficient workaround! Thanks for the suggestion about anchor points. I know them and have tried them successfully. My reference here was to the grainline that appeared by default and strangely jumped when the bounding box unexpectedly shrinked.
Yeah… I have to check if this was an existing behavior before I added the temporary centering of the labels and grainlines with new pieces. Before they always got bunched up in the corner(s). I’ve always anchor points, so I’m not sure what the free floating labels and grainlines do when the bounding box changes - as with zero SA. Theoretically the grainline shouldn’t move after creating a piece and then editing it - unless you specifically move it.
In any case I’ll fix it. ![]()
Testing this I don’t see anything weird in my 2022Dec27, but do in my 2023Jan16 AppImages
Thanks @Pneumarian… it’s probably related to trying to initially center the labels & GL’s.
The Piece Tool and dialog is a bit unique in that programmaticly you have to be able to distinguish whether it’s the 1st time through (in draft mode) or whether you’re editing (in piece mode) a previously created piece. Plus the labels and grainlines are one of these features crammed into the existing tool structure, so it’s rather circuitous to give the labels and GL’s a default mx, my position. They default to like 0,0 because they’re not initialized to any pos, but when the classes are constructed we don’t know yet what the piece path is because it hasn’t been created yet, so you can’t initialize those graphics to a position. The trick is trying to center them after the piece path is created, but then not change when editing after 1st time through. So… I must have missed something.
I’ll figure it out. ![]()
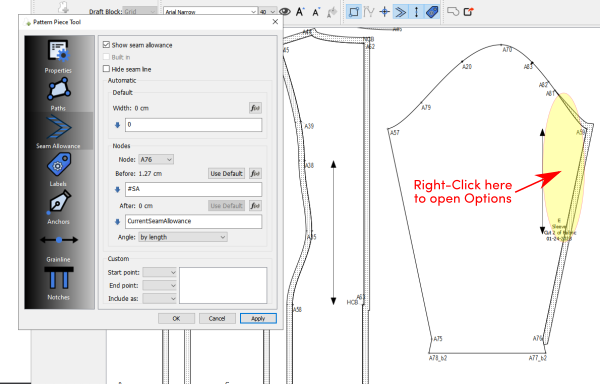
@Douglas The problem occurs even if anchor points are used. I set the seam allowance default to 0, then started adding a seam allowance and the grainline and label started moving about. Something else happened I didn’t expect: The area where I could right-click on the piece to open the Options dialog was reduced to a small area on the right side of the pattern piece.
-
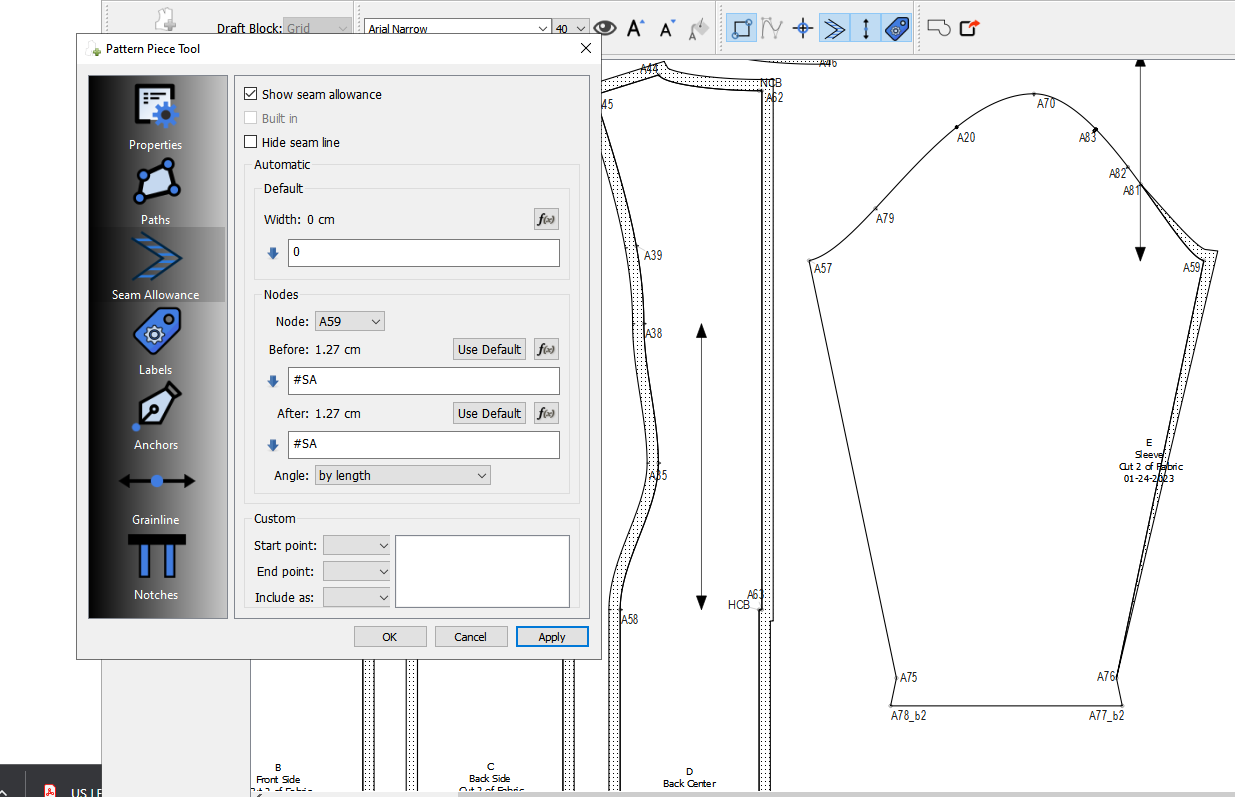
Initial seam allowance. The grainline & label were defined using anchor points.
… -
Set default seam allowance to 0.

… -
Added seam allowance to one point.
The label moved, the grainline did not move.
…
- Added seam allowance to another point.
Label & Grainline moved but in different directions.
…
- Added seam allowance to another point, the grainline moved, the label didn’t move.
The area where I could open the Options dialog was very small.
…
- Here are the anchor points that should control the placement of the grainline & label.
I know what the problem is. Has nothing to do with the labels or grainlines.
Has to do with separating the seam line path from the cut line path so they can each have their own QBrush.
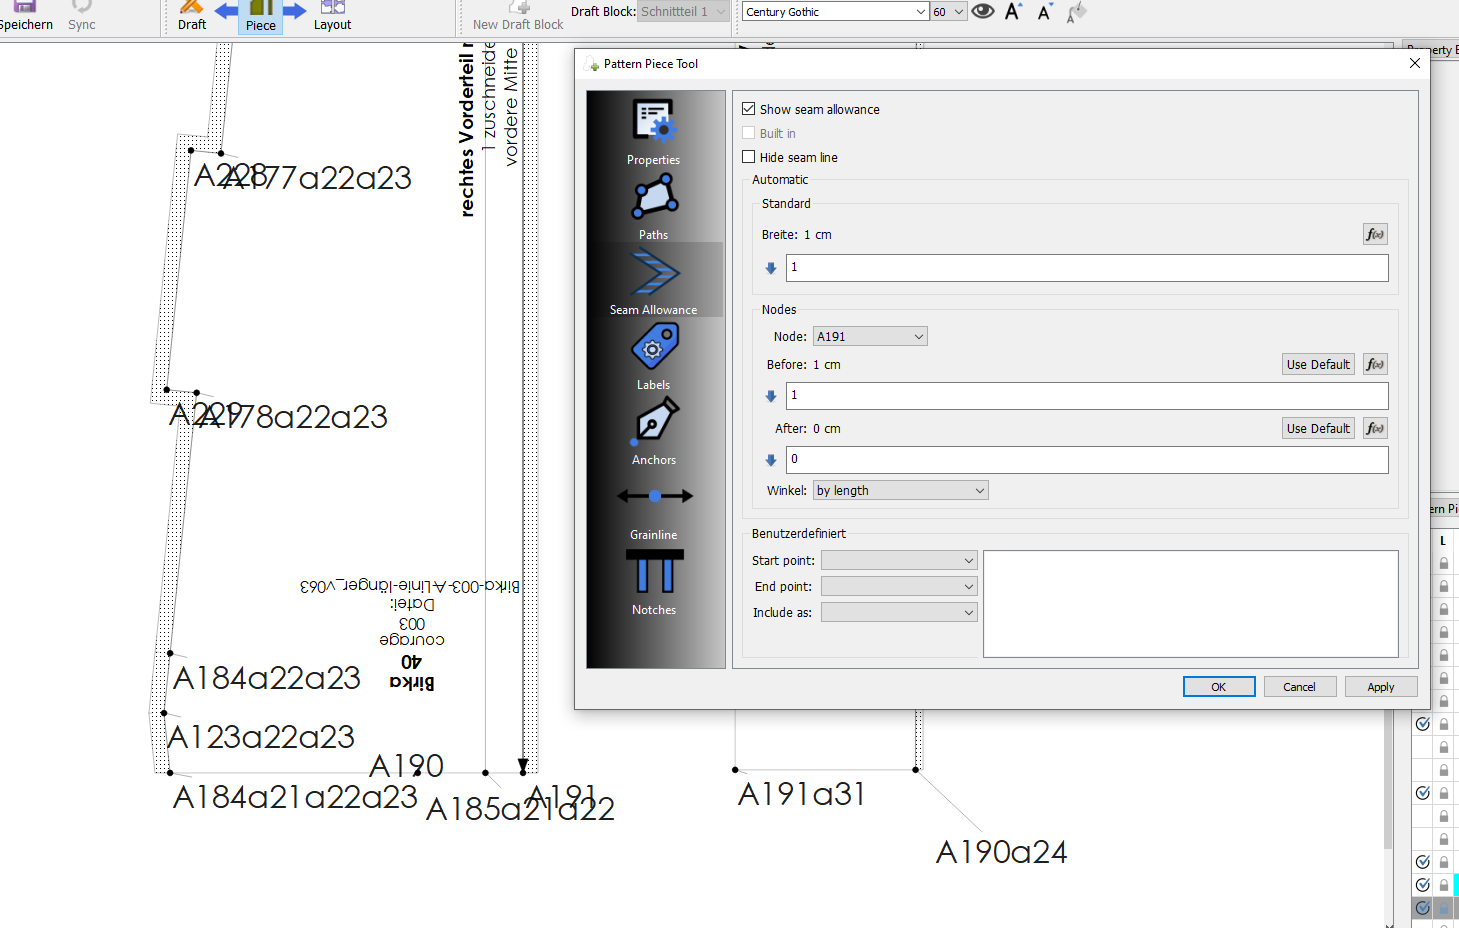
Didn’t account for setting the default Seam Allowance to zero (I would just toggle the SA off) which causes the bounding rect to be what ever the seam allowance path is… if there’s no SA, there’s no bounding rect… if in the example just SA between P1 and P2 exists IT’s the bounding rect.
Due to two things (not my doing) 1) Only clicking “within” the seam path && bounding rect will trigger the Context menu. 2) The labels and grainline are programmed to always resize and move to bounding rect. That’s why the GL is moving.
That being said I just need to make the bounding rect the size of all of the piece’s items not just the cut line path. I might try to include the seam allowance for the context menu - I find it annoying when you forget - Oh yeah, I have to click within the seam path.
One could use a ridiculously small value instead of zero… like .00001 as a work around.
BTW… double clicking a pattern piece name in the Pattern Piece dock will open the Piece properties dialog.
Ok… I fixed the bounding rect() issue.
I fixed extending the piece selection shape to include the seam allowance. So clicking or hovering on the SA will now select the piece.
Need to check some of the node angle options as they don’t display properly when zero SA’s are used in some cases. Not sure if this was pre-existing or related to separating the seam and cut paths.
Also as an aside, in figuring out extending the selection area of the pieces, I believe I should be able to fix in the future another annoying issue - trying to select really thin lines. I should be able to extend the selection width of lines - by a couple pixels - while keeping the drawn width the same.
Update: After looking at the angle issue, and aside from needing to fix a few options… when using a zero SA some options don’t make sense, or return the same geometry as another option. For ex, if a node’s after SA = 0, the right angle by second makes no sense as there is no SA to extend the SA at a right angle.
For future reference - Does anyone think in such cases it would make sense to disable that option given it doesn’t produce any result different from other options?
Seam allowance is all fixed… with keeping the SA separate from main path so it can be color, styled, or transparent.
The good side effect of having to fix this is I now fully understand how all the various piece element painter paths work together… meaning I now know how I can add symbols, text, and buttonholes. ![]()
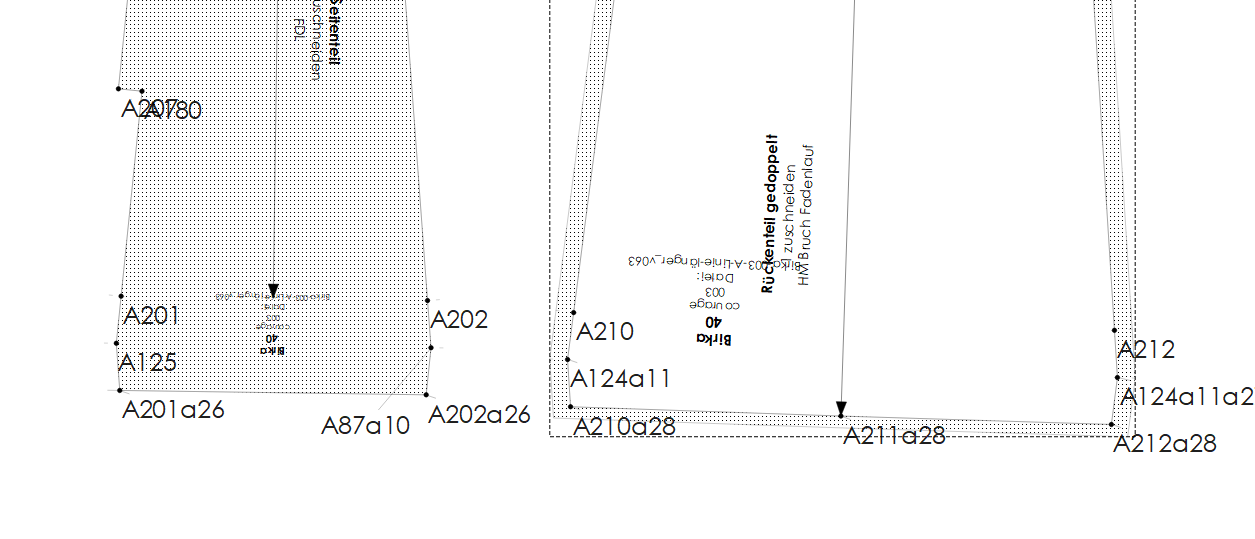
Ich habe mal wieder einen alten Schnitt hervorgeholt, um daran weiter zu arbeiten. Ich habe ihn bereits für Kunden genäht und die Nahtzugaben waren überall ok.
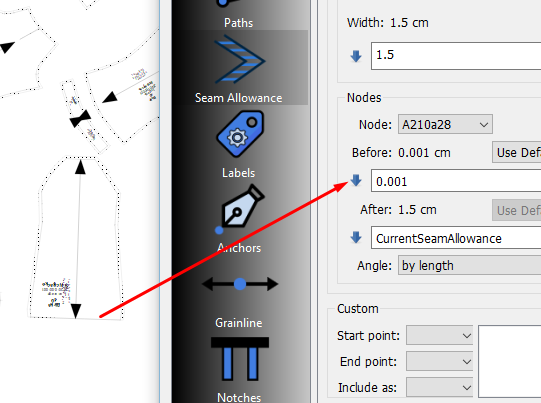
Ich habe die Nahtzugabe für den Saum im Schnitt angelegt und die Nahtzugabe auf 0 gesetzt. Ergebnis nach dem Update ist, dass linke Bild. Nur wenn ich die Saumlinie auf 1 setze stimmt alles. Natürlich könnte ich im Schnitt den Saum auf 3 runterrechnen und dann wieder 1 cm zugeben um auf einen Saum von 4 cm zu kommen. Das ist wohl aber nicht im Sinne des Erfinders.
Komischerweise hat es bei folgenden Schnitteilen mit der Nahtzugabe 0 geklappt. Das kann ich mir dann gar nicht erklären ![]()
Birka-002-A-Linie_v063.val (329,4 KB)
Hi @Scholli
I changed the seam allowance from 0 to 0.001 and the pattern corrected itself. I think this is something that @Douglas was trying to find out why it does this:
Perhaps this will help you to use your pattern until @Douglas sorts this issue out. ![]()
Well, it’s kinda hard to explain, but in a nutshell in order to be able to have the piece transparent within the seamline I was subtracting the seam path from the cut path - basically creating a doughnut if you will. Problem doing it that way, if there’s a zero SA the cut path was broken because the seam path was subtracted at that part… and it breaks. So I had to figure out a different way to paint the 2 paths while not breaking the cut path. And like I previously stated, in figuring that out it now makes sense to me how to add other details to a piece. Just have to figure out the code to be able to add more than 1 of a given detail- such as symbols. Once I figure that out, I can go back and make it so we can add more than 1 grainline or the 2 existing labels.
I’ve already got the fix. I just need to triple check everything, and I’ll push the changes later tonight or tomorrow afternoon.
Fix for this issue was pushed and PR’d.
In the Pattern Piece Tool dialog for consistency I made the change in the checkbox label “Show Seam Allowance” to “Show Cut Line”.
and I made I made a few slight changes in the Pattern Piece list in the docker.
The color column now contains a true icon so it doesn’t disappear when that row is selected.
The double clicking of a locked piece will disable the Color Picker & Pattern Piece Tool dialog.
Each item now displays a column specific tooltip… such as “Toggles lock of a Piece” or “Double click opens Color Picker”.
Download the fixed code here:
Under Help → About there’s a button that checks for new releases, and it works! Thanks @Douglas!