Bonjour,
Je suis en train de créer une pièce de patron en forme de cercle. J’ai crée un point central puis un arc de 0 à 360°. J’ai bien mon cercle.
Je n’arrive pas à isoler cette pièce de patron.
Merci d’avance pour votre aide!
Sophie
Hello, I am making a circle shaped pattern piece. I created a center point and then an arc from 0 to 360 °. I have my circle. I can’t seem to isolate this boss piece. Thank you in advance for your help! Sophie
j’y suis arrivée. il fallait que je mette un point de départ, un angle d’arrivée et sélectionner l’arc en appuyant sur shift pour qu’il soit dans le bon sens. tout va bien
I got there. I had to put a start point, an end angle and select the arc by pressing shift so that it was in the right direction. everything is fine
Oi Sophie. Isso aconteceu comigo também. Quando o Seamly2D cria um círculo o ângulo cresce no sentido anti-horário e para selecionar para o Detalhe tem que estar no sentido horário. Então pressionando a tecla SHIFT e clicando no círculo você vai conseguir.
Espero ter ajudado. Seja bem-vinda! Essa comunidade é maravilhosa! Estou amando.
Abraços
Google translation:
Salut Sophie. Ça m’est aussi arrivé. Lorsque Seamly2D crée un cercle, l’angle augmente dans le sens antihoraire et pour sélectionner le détail, il doit être dans le sens horaire. Puis en appuyant sur la touche SHIFT et en cliquant sur le cercle que vous obtiendrez.
J’espère que cela t’aides. Bienvenue! Cette communauté est magnifique! J’aime.
Câlins
Salut Sophie!
Heureux d’avoir trouvé une solution.
Si vous êtes intéressé, voici un modèle simple pour une jupe circulaire.
Ce n’est pas un bon modèle - les jupes circulaires qui s’ajustent correctement ne sont pas réellement circulaires, elles sont elliptiques.
Il est également incomplet en tant que motif fini - il n’a pas de ceinture et la marge de couture latérale n’a pas d’extension de fermeture à glissière.
Cependant, j’aime ce modèle comme outil pédagogique car il montre comment gérer les mathématiques. circleskirt.val (10.9 KB)
Hi Sophie!Glad you found a solution. If anyone is interested, here is a simple pattern for a circle skirt. It’s not a great pattern – circle skirts that fit properly aren’t actually circular, they’re elliptical. It isn’t using body measurements from a .vit file, it uses hard numbers in the formulas, but this can be fixed by anyone who wants to use it It’s also incomplete as a finished pattern – it doesn’t have a waistband and the side seam allowance doesn’t have a zipper extension. However I like this pattern as a teaching tool because it shows how to handle the math.
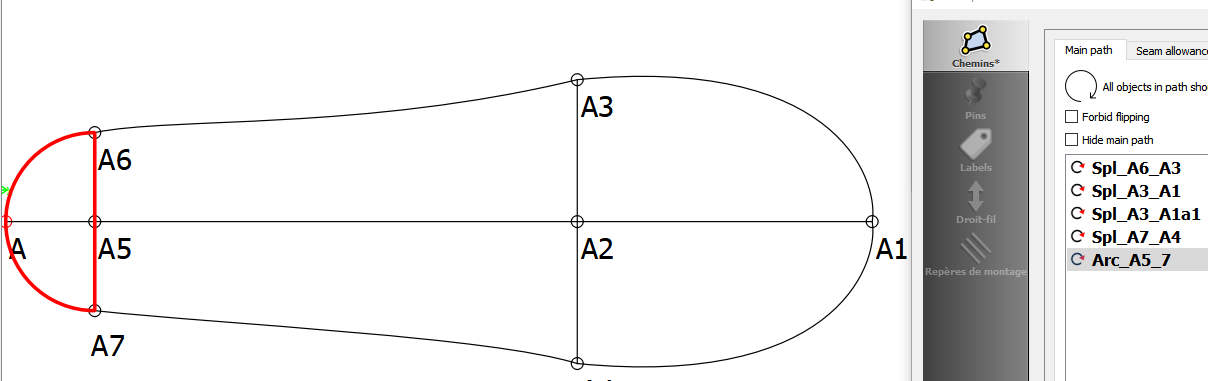
Je rencontre le même problème que Sophie. Et même en appliquant shift ça ne fonctionne pas. Quelque chose a du m’échapper. Pourtant j’ai déjà effectuer une tâche similaire sans problème.
Voici ma capture
Quand j’ai créé ma pièce j’ai commencé par la courbe A6/A3 dans le bon sens, puis A3/A1 toujours dans le bon sens, ensuite A1/A4 en appuyant sur shift, puis A4/A7 encore avec shift, puis enfin l’arc A7/A6 également avec shift. Et voilà ce que ça donne. In compréhensible pour ma petite tête. J’ai essayé en partant d’autre point mais rien à faire je n’y arrive pas et pourtant ça semble simple. Voici mon fichier Bottines Morgane.val (8,1 Ko) sans fichier mesure
Merci pour votre aide
Que coincidência! Esse final de semana estava brincando de fazer uma sapatilha no Seamly. Fiz a sola com dois círculos. Vou compartilhar aqui com vocês. Ele é para ser bem franzido e preso com elástico na parte de cima. Para diminuir o franzido basta aproximar o ponto A6 do A5 (calcanhar).
Sapatinho1.val (9,1,KB)
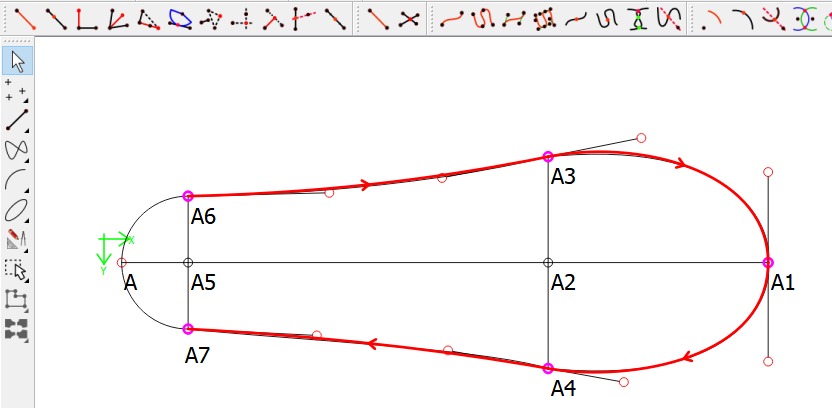
The best thing to remember is to create your curves in a clockwise direction… otherwise you will have to insert them (insert node) one at a time and move them into the proper order in the Workpiece Tool dialog and then reverse them.
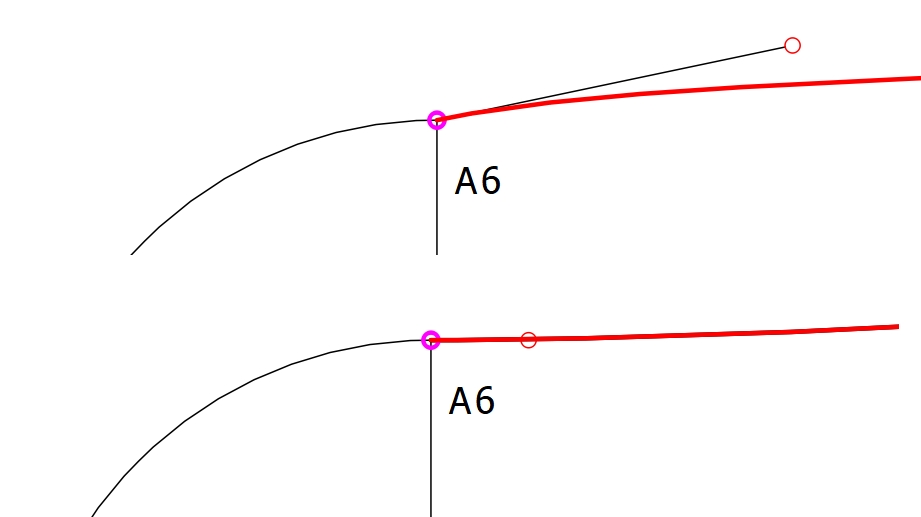
Also I noticed something else you want to avoid… when connecting curves you generally want to set the control handles so they are 180 deg apart to create a smooth transition. In your case you’re connecting an arc to curve so there is only one handle so you need to match the angle the the arc ends at… in this example the curve control point should be 0 degs.
Also a trick to keep in mind to keep 2 joined curves transitioning smoothly is the use the angle formula for the ending control point of one curve and add (or subtract) 180 to the angle formula of the second curve. This way the 2 curves will transition smoothly.
BTW… this pattern could have been done with one curved path from A → A6-> A3 → A1 → A4 → A7 and the arc from A7 - A6 Then it’s just a matter of placing the control points in the right place for the curve. You have to add the arc because a curve can’t start and end on the same point, otherwise it could be done in 1 curve.