Sure, I just sent you the video!
I stumbled upon your wonderful program earlier this week and upon this thread this morning. Thank you very much for both. I’ve downloaded the version 5 and studied the tutorial video. I’ve applied it to the pattern that I have made and all works beautifully.
@Elena - I see, in the video, you have added a fold line to the middle of the article. Is there any way that a fold line can be added to the edge and marked accordingly?
2 Likes
No. I did not predict such a case.
No! Actually you can. Use a label. It can contains string “on Fold”.
@Grace - Oh, yes, sorry, I forgot to put it in the video as well… But you can assign no seam allowance to one edge and then just chose in “Pattern Piece Data” in the “Placement” dropdown menu whether you want this pattern piece to be “Cut on fold”.
In the video, I just wanted to illustrate how to do some internal path, it doesn´t have to be fold, can be pocket placement of whatever else… Although, I still didn´t figure out if and how its possible to mark notches …

The notches feature has not been developed yet. It is next, although we need to do a lot of discussion prior to implementation.
2 Likes
Thank you! I´ll be looking forward to this feature
Sorry, I found the error.
1 Like
New improvement regardless to redesign Seam allowance tool. Just several minutes ago i pushed changes for issue #551.
These changes present new tool Pin point. This tool allow you to control position of label and grainline. Similarly to internal path you add one point per time to not united detail. Then it became available for you in Detail options. Each object (label and grainline) require two pin point to be controlled. One or none points will be ignored. Each point should be unique. Each can be used several times for both labels and grainline at the same time if you wish.
For label you select top left and bottom right points. If they are not right position will be automatically corrected to such (width and height always positive). Pin points control only size. You still be able to rotate your label if you wish, but not move.
For grainline you select top and bottom pin points. These points control both size and angle. You cannot move a grainline in this case.
Don’t forget that detail forbid positioning object outside of bounding rect. It will be corrected if such happened.
I know that @slpencer and @Stinde desperately wanted this feature.![]() I am waiting your feedback.
I am waiting your feedback.
This changes will be available in the next test build.
4 Likes
Dear friends, I had just tested this new feature and it is very good. I was looking a way to make a sewing mark on sleeve and this is perfect.
Thank you. regards,
1 Like
Finally I had time to test this feature
The basic idea is good to tight the labels in to certain points of the pattern piece.
I tried to use use it and the current version needs improvements from point of view
-
Normally the points in the pattern are either in the center or in the edge. When using these points the label is partly outside of the pattern piece, because the edge is very seldom straight line.
-
Using existing points makes the label huge in some pattern pieces
-
I need to select 4 points have both labels. The only way to have labels neatly, is to create label points in to the pattern. I feel this is a bit complicated.
Personally I need following for the labels
- Fit inside the pattern piece
- Regular size for large pattern pieces and shriked version in small pieces
Maybe the center or one corner could be tight to a pin point and size and rotation are determined by formula
1 Like
Pin points supposed to be separate points.
Again the same. Only new points.
Strange because this is great approach from my point of view. Probably you can’t just image this.
To successfully use this feature you need create special pin points. This approach is very similar to what you do for pattern.
For example
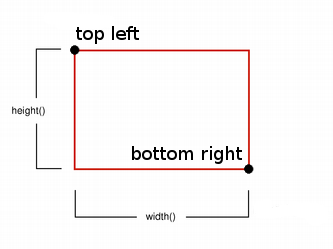
The idea is based on the fact that you can describe your label as rectangle. Minimally you need only two points: top left and bottom right. These points describe the size of a label. Because pin points are just a regular points in Draw mode you can use formulas to find correct positions each time you rebuild your pattern. But because you can describe by two point only classic rectangle you cannot control the size only by two points. This should not be a problem.
You control this by right positioning pin points.
Pin points control the size so this is also work now.
Yes but you need 2 points for Detail Label and 2 for Pattern Label totally 4.
I understand what you are saying. However for me creating the points in to the pattern just for labels is not useful. I prefer the the old method.
As i remember the old way doesn’t allow control size and angle.
Yes, you are right, but the new method is too complicated for me. For example the jacket has 43 pieces in the Details. Just creating to all pieces extra 4 point for the labels and selecting the pins and adjusting the label sizes, it is simply too complicated.
I’d rather accept the current situation and adjusting the labels graphically after the size change.
This is simple, but not scalable approach vs complicated, but scalable.
I think i can do it. Center point and two formulas. In this case you will need only one point for each label. Is it what you want?
The center point is the easiest. The center on symmetry and point along the line is very easy for most of the patterns. I would be very nice to test this feature.
Not sure i understood you correct. Are we talking about center of label?