Again, unless I’m missing something (wouldn’t be the first time - lol) … not rewriting the whole size (and height) routine(s), just making it so we could change the names. And of course converting the size tags in the XML… don’t have to, but it just makes it clearer that GSizes::S1 and s1 rather than GSizes::S22 and s22 would refer to the 1st size of 26.
If it were me it would have been GSizes::S1=“22” instead of GSizes::S22=“22” and s1=“false” instead of s22=“false”, but that’s just part of the quirky way RT the original dev thinks. Actually if it were me the pattern files would be a more efficent binary format rather than XML, and we would have already moved on to using Qt6, but that’s another whole can of worms.
Let’s start with this one. The sizes element should always be with the measurement chart around which the pattern is created. So if I’m making a pattern for a child, then I’ll load the child measurement chart into Seamly2D before I start drafting the pattern. So all the presets for a measurement chart should be in SeamlyME and Seamly2D will limit the sizes according to the presets stated in SeamlyME. So if a size chart will only cover 3 sizes and the presets are set to those 3, then there will only be those 3 sizes available in Seamly2D in the dropdown menu.
Hee-hee… I ain’t a programmer so I really don’t understand the reason why there have to be placeholders at all. All that I do know is that if my measurement file covers 6 sizes and the 1st size = size 8, and I tell the program that I want 6 sizes in total and each size must be incremented by 2, then it will give me 8, 10, 12, 14, 16, 18 in the dropdown menu. If I tell it that the 1st size is 32, then I’ll get 32, 34, 36, 38, 40, 42 in the dropdown menu.
If I tell it that the 1st size is 1 and the increments are 1, and it covers 4 sizes, then I’ll get 1, 2, 3, 4 in the dropdown. So if the sizes have an S in front of the number, then what the program should read is S1, S2, S3, S4 while only showing 1, 2, 3, 4.
Can’t those placeholders be programmed to get the number from the data entered when the measurement file is created? Because, as far as I can see (being totally dumb), these are just numbers that are used to draw out and calculate other numbers that are entered later.
LOL, yes, I was also totally confused by it in the beginning & totally harrassed everyone until someone told me just to ignore it. Now with time, I do understand that magic that can happen if you are lucky enough to be able to read Russian, because it’s tiny increments that are used to create military uniforms - or that is my understanding, since I’ve never gotten my hands on those measurements & nor do I read Russian.
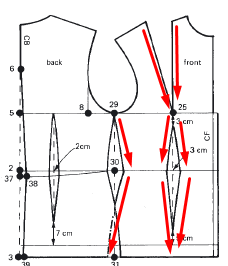
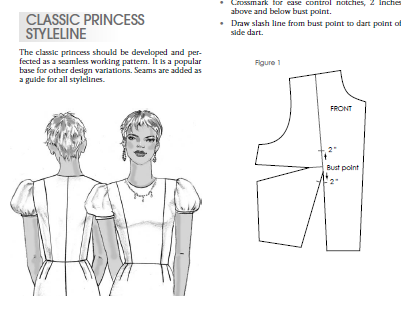
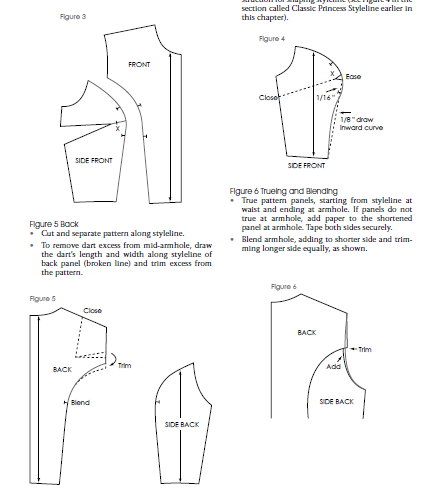
Princess seam is easy, it’s just cutting through the pattern from the shoulder dart point to the waist dart point with a curved line.
Most patternmaking systems teach this as a basic bodice. What you do with this basic bodice is according to the design that you are creating. So if you want a princess seam, it’s there. If you want to just use the darts, then just use the darts. This is what makes having basic patterns and keeping them as the base of all designs, makes total sense
The place holders are related to the label templates… like pSize is a place holder for the actual size. It’s the same idea of making a mailing label in Office, where the document has placeholder for Name, Address, City, State, Country… and it’s filled in when you run a mail merge from a list of names. No different with Seamly2D. The question Sandra raised is can we have user defined placeholders… yes, but we still need to reserve a block of user defined placeholders - which we can change the displayed name by defining it as something other than say pCustom1. The way a lot of the UI works - for example the drop downs - is there is a map which has a key and a value. For example there’s the color item key “deeppink” which has the text value of “Deep Pink”. The text is what you see, the key is what the app uses to search or what Qt uses to set the pen color. We could just as easily rename “deeppink”
Just as we could rename pCustom1’s text value to what ever we want to define it as. Question is… what data source would it be tied to?
As far as the “sizes”… sometimes it just easy to program when you have a defined number of objects in a set / list / vector / whatever, rather than it being dynamic. In your example you’re just saying use the 6th size in the list, followed by 7, 8, 9, 10 and 11… so yeah… in the dropdown it’s items #1, 2, 3, 4, 5, and 6.
I actually thought of another option… maybe easier to do - for now. Just extend the enum. May have to re think the dialog to select which sizes to use, but much easier to do.
Just add S2=2, S4=4… S20=20, and all the rest of the code ot handle the additional 10 sizes… same with the heights as well - although I don’t know if that’s as important.
BTW… in case you’re wondering, since it’s not given, it’s implied that GSizes::ALL = 0… which would present a problem if you wanted S0=0. Could possibly change ALL to -1, and then all the code that may be relying it being 0… theoretically though that shouldn’t be an issue, as that’s why you use an enum instead of a hardcoded number as you only need change the enum and not all the code.
Or as the case probably was… I don’t think it’s needed so I’m not going to do it.
Well… if you look closely at the enum code I posted it implicitly defines the enum as unsigned… meaning it can be + or -. So there;s no reason why ALL can’t be -1. The -1 can more or less be hidden. For ex you could have size = GSizes::ALL… and then test if (size == GSizes::ALL) {do this}… where the -1 is never used other than in the enum. You could use if (size == -1) {do this} and it would be exactly the same, but GSizes::ALL gives it more meaning than -1. There’s probably not a single code file that doesn’t use an enum - whether it’s a Qt defined one, or Seamly a defined one.
Love you to bits, @Douglas. I think you have a better idea of what I envisage and what I’d like to work with I’ll leave it in your very capable hands to do what’s best. I’ll just be around if you need me
Hi Grace, I’ve read about the princess seam approach you talk about, but my starting point is a bodysuit with negative ease and no darts. I created my Sloper using a commercial pattern for a bodysuit.
Maybe I’m calling the seam the wrong thing, but I want to create a seam along the same line as a princess seam. At this point I’m thinking I need to use my dress form / mannequin and drape it with tape to create one and then create a paper version that I can translate into seamly.
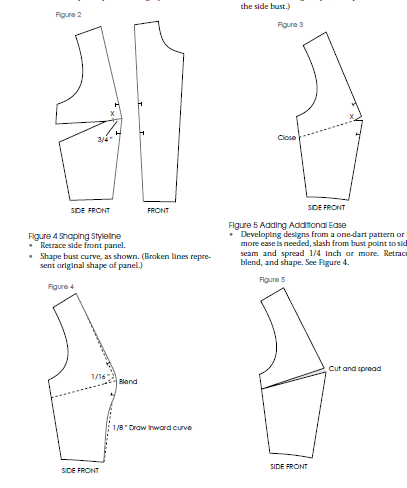
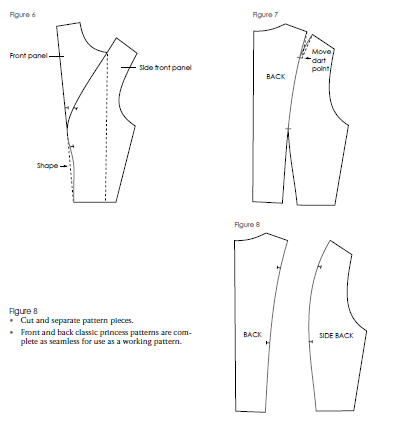
Yes, the method that I showed you above is the same method. Instead of possitive ease, you enter the negative ease (this is why I like having the ease in the Variables) and instead of darts, you shape the seamline between the darts and cut the panels (pattern pieces). The darts become the seam lines, just joined together with a bit of a curve. This will make the seams instead of the darts. And you shape the top as you wish.