Once again, I’ve fallen down the rabbit hole… But I’ll show you anyway…
Bug: Seam Allowance sometimes doesn't create "corners":
Once again, I’ve fallen down the rabbit hole… But I’ll show you anyway…
Bug: Seam Allowance sometimes doesn't create "corners":
figured I pointed out more than enough corner errors / design flaws, but you bring up an important one… that is creating a corner without as you put it no stitch allowance. I do this quite often on patterns as it obviously eliminates bulk in the corners. I’ll also ok metimes depending on the fabric add a little bit just so the corner doesnt come sticking out… and if not necessary can clip it down after stitching. So maybe we could add an option of an additional stitch allowance? Which could also be handy when doing a zipper opening such as in Susan’s example… does the right angle appear AT the point, above it, or below it. I can make a pic latter to show what I mean.
I think what I’m going to do is first fix the bug (this week end) that Susan pointed out, then look at what we can do to update the corners, be it any other bug fixes or new features and improve the dialog.
Oooo… I just noticed a few other things you put in your diagram, but I’m falling asleep and did quite catch them at first… will comment later today. 
besides that your right-hand corner labels are switched ![]() , WOW, I feel like a dodo might perch on my monitor any moment & demand that I start reciting poetry!
, WOW, I feel like a dodo might perch on my monitor any moment & demand that I start reciting poetry!
As long as it doesn’t accidentally add on to the seam allowance, that sounds good.
Ok, perhaps I should first explain…
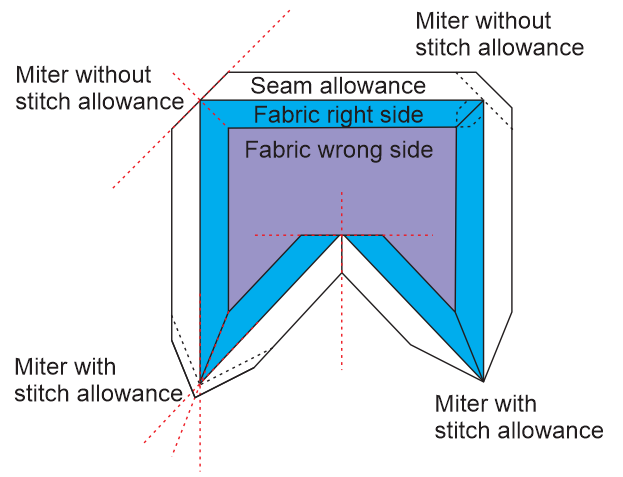
I’ve tried to replicate the fabric (blue) with the seam allowance folded back after sewing it. In other words, what the article will look like after it’s folded back on itself. The red dotted lines are only my working tools, so please ignore them.
The stitching lines are black dotted (top right I used it here to show where the extra seam allowance would lie). These are just to show where one would normally stitch in the given scenario.
So what I’m trying to demonstrate is the outer seam allowance line. And here there are 2 main scenarios. 1 without an allowance for stitching and 2 with an allowance for stitching.
They are both the same, except the one meets with the corner of the 2 sides while the other extends a bit past the corner. Any other trimming would have to be done manually by the sewer.
So here’s what I’m thinking in terms of programming…
Would it be possible to take the angle of the 2 sides of the corner, put in an invisible line between them to establish the centre of the miter once it’s sewn up and replicate that centre line to meet with the seam allowance line at a complimenting angle as in the picture?
If we can do that, then we’ll need to figure out how to set this corner backwards a certain distance that is chosen.
Oh, wow! Another rabbit hole… I think the quilting world will go gagga about Seamly if we could do this…
Yes, please. It’s a baddy. And thank you ![]()
![]()
![]()
![]() That’s me most of the time. However, you’re right. the right side with & without are switched, so you’re saved from reciting poetry
That’s me most of the time. However, you’re right. the right side with & without are switched, so you’re saved from reciting poetry ![]() Thanks for noticing.
Thanks for noticing.
I’m thinking… Always dangerous… Is it possible that you move the posts about mitering to a different topic, please? I don’t know how to ![]()
![]()
![]() but I do think that they’re in the wrong place.
but I do think that they’re in the wrong place.
I got where you were going with the mitre type corners. I’ve done a lot of stuff where this would be applicable… ties, Marine military belts, epaulettes, cargo pockets, other things I can’t think of at the moment.
Anything is possible. It’s really all about geometry… and figuring how to use the Qt functions to create points, lines, arcs and how you have to manipulate through rotation and moving them… and finding intersection points on a path… and and…
Fortunately I’ve already done the bulk of figuring how to create graphic items in doing the notches. I just have to break down each “corner” function to understand what’s there now, to be able to improve or add to the seam corner types.
So… theres an idea for a future SeamlyQd - quilting design module. ![]()
Actually now that I’ve had some sleep before looking at Grace’s example again… it makes perfect sense. There could be a secondary seam allowance that would allow one to stitch a mitered corner, and turn it. We did some costumes fawhike back for an off Broadway production that required these tapered cargo pockets, and it would be a prefect example where this would be handy. Right now you would not be abke to create the upper right corner in Grace’s example short of drafting it with a built in seam allowance or creating a “by length” corner and manually drawing or cutting down the corner.
Actually you can’t do the other corners as well as none of the current SA corner options cut through the corner point.
Yes on the angle to type. Again I understand why angle was used, but it’s the wrong semantics.
As far as the 1st and 2nd edge… yes, that’s kinda what I was thinking. Need to think on it… while I feast on the existing bit of spaghetti. ![]()
Ok, so further to this conversation…
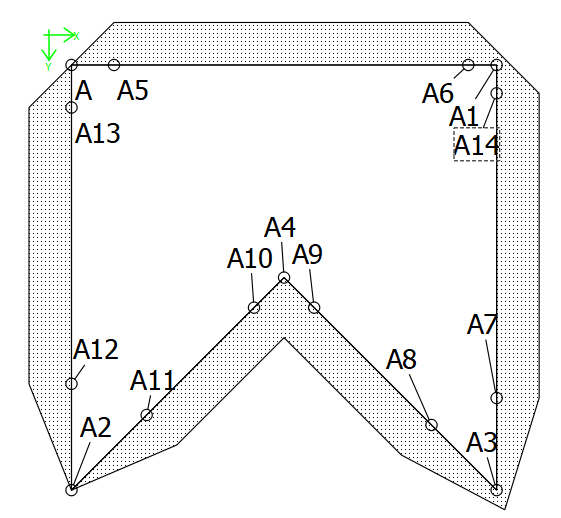
Currently, it is possible to create mitered corners by adding notches and setting seam allowances.
Here is a replica of the previous image created with Seamly2D:
So once again, with a little forethought  all things are possible
Wait… you mean there’s a good unintended consequence? ![]()
LOL, yes. I woke up with the idea and, as you can see, I think my pattern pretty much resembles the diagram I drew before. Sometimes (often), it takes a while for the brain cells to catch up
Agreed… it just dawned on me what you did. Can I assume the 2 corners on the right side would be if you wanted a seam allowance to sew the mitre? Where on the left A - A5 would be equal to the seam allowance, and A1-A6 would be equal to the seam allowance minus say a 1/4"?
Yes, here’s the pattern file, sorry I didn’t add it before:
Seam Allowances.val (6.1 KB)
I just eyeballed the miters on the bottom points. I guess there are better ways of getting these right
Grace, you are fantastic. This is excellent use of seam allowance features.
