Hello, I’m a collector of hobbies and my new collection item is garment making. I owned a few custom t-shirt shops in the past and have been sewing occasionally since high school on and off. I thought it would be fun to try making my own clothes for a change. I just set up a cheap projector hanging from my ceiling so I can do “digital” patterns and this software looks perfect for that. I’m excited to get started! I’m starting to follow the guides and tutorials. Any other things I should look out for with a projector? Thanks!
3 Likes
Hello and welcome, @MikeBigFrog
I haven’t tried to project directly from Seamly2d, yet - I normally do a bunch of size nesting in Inkscape first - but I can give you a small heads up…
Always leave large margins around your pattern pieces - top, bottom & sides - so that you can move the PDF page around to place the pattern on the fabric.
And then you should use very thick lines so that they’re visible on the fabric - dark lines for light coloured fabrics & light coloured for dark.
And you should always include a test square that you can measure to ensure that your projector is projecting in the correct size.
Further than that, I guess it’s all done to try & test what your preferences will be ![]()
3 Likes
Of course, you don’t need a PDF at all, I have been quite happy cutting from the Piece mode. However, I do strongly prefer when each piece fits in my projector area. I gave up & shelled out a dozen bucks to get the cloak pattern I’m working on printed professionally because my projector area is so much smaller than my cutting table.
& I’d recommend at least one calibration square per pattern piece, though I only use it to confirm that nothing’s gone sideways, the initial calibration being consistent. (For me it’s 35% zoom is close enough, though 34.95% is closer.)
![]()
2 Likes
Which you can set in the prefereces. You can set the cut, seam, or internal line type, color, and weight that is used in Piece and Layout mode.
3 Likes
Use SVG formats for exporting your patterns from Layout in Semly to Inkscape. You can then group the patterns and rearrange them in Inkscape. Adding thicker lines. Be careful not to resize them.
I would like to know a little bit more (get control of if possible) about the Layout print settings. Especially the Rotate workpiece, Rule for choosing next workpiece. Pattern piece tool also offers properties: Placement on fold, fold position (Up/Down, Left/Right), Orientation (Left or Right), Rotation (1-way, 2-way, 4-way, Any), Tilt (CW X, CCW X), Forbid Flipping. Can I decide the orientation of a printed pattern piece - or all of them? So far I have rotated the patterns in Inkscape.
3 Likes
I haven’t really explored these very much because they didn’t seem to work very well a few years ago and since then, I’ve opted to do my layouts in Inkscape. Perhaps @Pneumarian can help you with these.
3 Likes
I don’t know any more about the Layout mode than @Grace. I don’t recall any major changes in the Layout mode being announced in the past few years. The mentioned settings have no predictable effect as far as my limited experimenting could uncover. I use the Piece mode unless I need to print to a specific sized paper. I often haven’t been able to tell a difference I think that if one is going to be Inkscaping it would be easier to export from the Piece mode than Layout in most circumstances.
![]()
2 Likes
I did not try exporting from Piece mode before your reply ![]() . Thank you for pointing that out! Saves me rotating one piece at a time in Inkscape. Now I can start from the same orientation for all and do a 90-degree angle once. Even then I’d prefer to edit the pattern in portrait mode mode in Seamly, and project it in 90 degree mode on the cutting board.
. Thank you for pointing that out! Saves me rotating one piece at a time in Inkscape. Now I can start from the same orientation for all and do a 90-degree angle once. Even then I’d prefer to edit the pattern in portrait mode mode in Seamly, and project it in 90 degree mode on the cutting board.
3 Likes
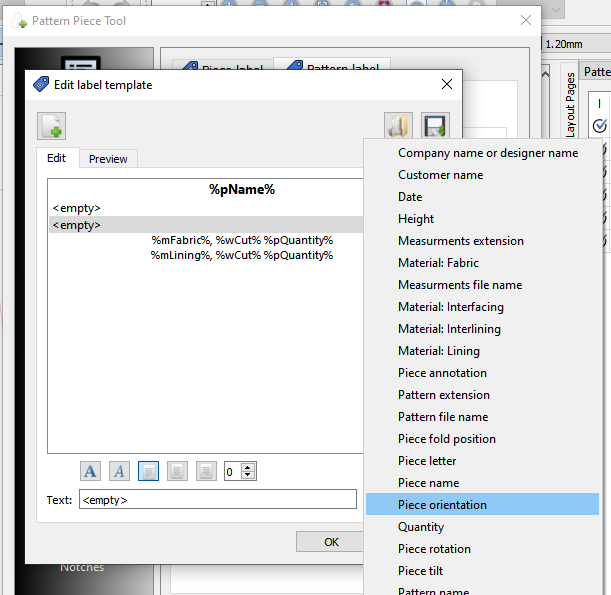
These are only used as variable place holders in the Label templates. For example:
Enabling prevents a piece from being flipped when creating a layout. If not enabled the Layout generator will try and flip pieces to best fit them in the smallest amount of space. If a Piece is specifically a left ot right you would not want the piece to flip.
A layout is only for printing purposes, and not meant as a cutting marker. Again the generator will try and rotate or flip pieces to get the best fit. At this time you can not prevent pieces from rotating.
If you export from Piece mode the Pieces will be oriented exactly as they are on screen,
4 Likes
Is printing without observing grainline-orientation used? Another way of optimizing in print would be to cram all the pattern pieces, perhaps overlapping? Automated cutting need preprocessing where pieces are oriented by design. The preprocessing can be seen as out of scope… of course. Layout Print Settings does not have an option to set the Grainline orientation. That would be required if pattern pieces are to be matched up with Grainline in Pieces. ![]()
1 Like
A layout is strictly for printing patterns… mainly with tiled PDF’s, so the orientation is irrelevant. In order to maximize paper usage, the layout engine will rotate and / or flip (unless you Forbid Flipping) pieces.
Until such time as we add a real cut marker feature, the best option is to export as SVG or DXF in Piece Mode and use a 3rd party application to import the pieces to create a marker manually.
3 Likes