To become proficient with Seamly2d/Valentina I have been following Gillian Holman’s book Pattern Making Made Easy, and have tried to re-create each of her blocks as closely as I can.
It has been an interesting exercise, and I thought that I was doing rather well until I attempted the final block - trousers (pants).
The final instruction in the book reads: Check the inside leg front and back are of equal length.
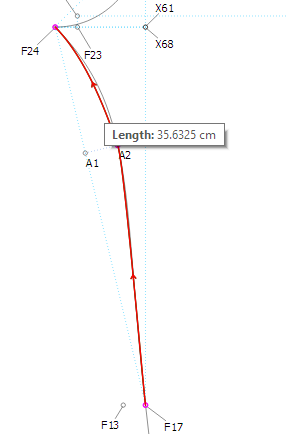
In my drawing this means curves F8_F18 and F17_F24, the former being slightly longer. Although the difference in length is only marginal (just under 5 mm), it would be rather satisfying if the program could be made to carry out a correction automatically.
I have considered the work-around suggested by slspencer in Walking Patterns - #8 by slspencer but still feel I would like to take it one stage further. To avoid upsetting the geometry of the whole back leg piece by inserting a short additional curve with a length calculated to represent the difference in length of the two inside leg curves, I wondered if it might be possible to instruct the program to set the ‘angle of curve’ at F24 so that the ‘length of curve’ would be equal to F8_F18. Currently, I have arbitrarily set the angle at 315 degrees, simply because it looks about right.
I’m not clever enough to write a formula to achieve this, even supposing that it is possible, but if anyone has already managed to do it I would be so, so grateful to learn the secret. Such a technique might well have other uses in the program.
LOL, yes, I would be very grateful as well. what I do, if the difference is too much, is I add 1cm at a time to the length of the handle until I get really close to the length I’d like.
I play with all sorts of settings in all sorts of situations to get the right look & feel to the pattern. In this instance, you could shorten the length of the handle at F17 and make the angle of F24 a little less if you wish to accommodate the extra length of the handle at F24.
All the same, that 0.5cm wouldn’t make much difference over that distance when you make up the garment, but it is about the largest I’d allow as a difference. Fabric has a certain amount of stretch and movement in it for you to be able to ease it into the stitching of the seam or to trim it off when you get to put in the hem.
All that being said, and looking at your pattern, I’d like to add (because this was totally above my fireplace when I started out learning):
I see that Gillian Holman has you creating a line from F24 to F17. Normally, she’d also mention to arch the curve inwards by a certain distance from this line. This is normally 1/3 of the distance from F24 and I think she may have mentioned 3cm since this is close to the existing distance.
Here is what you do:
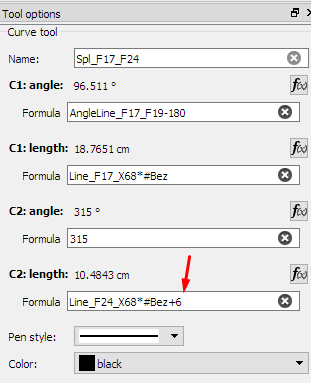
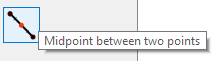
Using the Midpoint between 2 points tool, click on F24 and then on F17, change the formula to CurrentLength/3:
- A new point will be created (A1)
Using the Point Along Perpendicular tool, click on A1 and then F17 and enter 3 into the formula box: - this will create point A2
Now, using the Curved Path tool click on F17, A2 and F24. Enter the formulas and angles at the relevant points & click on Ok.
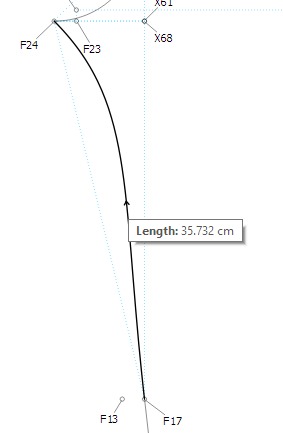
This has resulted in a 0.09cm difference:
Here is your pattern file back with the back curve done for reference. You may now practice on the front
I am thinking long and hard about your detailed and very helpful response to my problem. Thank you so much for the time and effort you have devoted.
Several things are becoming clear as my brain-fog starts to clear. The Holman approach to pattern making is rather too vague when it comes to the creation of a computer generated outline that maintains its proportional integrity over a range of different body shapes and sizes.
Nowhere is this more apparent than in the smoothness (or rather, lack of smoothness) of curves as the outline varies from size-to-size. The Bezier function which seems to be rather successful in the case of armhole and sleeve cap curves, seems to become a bit of an enemy when applied to the curves of trouser/pants legs. Also, the angles of the curve control handles really need to be controlled by a specific formula, and it is here that I am having real difficulty in figuring out a coherent approach to calculating that angle.
As you suggest, I shall go on experimenting with these various factors, and maybe have a sudden breakthrough.
My decision to follow the Holman system was made solely on the fact that her book was one of two available in my local library, the other being Dennic Chunman Lo’s rather daunting college textbook style volume, which I find rather too formal for my taste. If you have any other suggestions for bedtime pattern-design reading I’d love to hear. I’ve recently bought Teresa Gilewska’s Basic book, but sadly she doesn’t cover trousers.
Please don’t give up on Holman, the instructions in the pattern have helped you to make a very nice trouser pattern.
Personally, I don’t have any of the books you have mentioned. I’ve been learning from the Winifred Aldrich series, although mine are quite old now and she has new ones out. That said, I find that a lot of the finer details are skipped over in these ‘monkey see, monkey do’ types of books where specific instructions are given and must be followed step-by-step. They don’t go into the actual science of why and how. In the Aldrich book, she just says: Draw inside leg seam 24, 29, 28; curve 24–29 inwards 1.25 cm (24-29 being the line that we discussed on yours from the crotch to the knee).
As with the armhole and sleeve cap, You can create blocks to control the length of the handles using the Bezier function that @KeithFromCanada kindly researched out for us in this chat: Creating Smooth Curves: The Kolson Method.
I just didn’t do it because of the time it took. I just wanted you to know how to use the line that you created to get the correct curve inwards in the upper leg.
(LOL, yes, I can’t thank you enough, @KeithFromCanada, for that tutorial. After learning that method, I use it all the time. It makes my curves much nicer. Thank you )
Hi @KeithFromCanada , would you please be so kind to share that method with me as well? The link you’ve shared above does not work anymore. I’m drafting my first Bunka skirt in Seamly2D and I am stuck on the very end of it (with curved lines)
 - A new point will be created (A1)
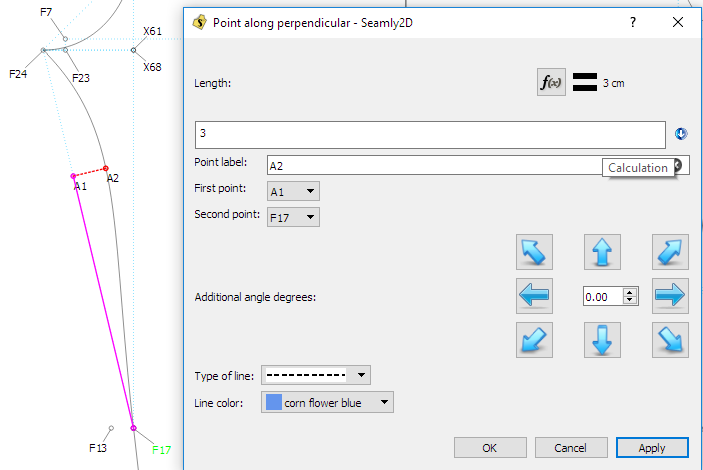 - this will create point A2
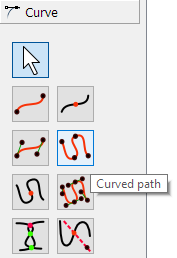 click on F17, A2 and F24. Enter the formulas and angles at the relevant points & click on Ok.