I´m hoping for some advice here:
Has anyone tried to use Valentina patterns to make a cutting marker for production with some other programs (since Valentina doesn´t have this option yet)? If yes, which program and formats could be used for marker and printing?
I find Valentina is wonderful for fashion design, finally the right approach to patternmaking and especially grading, and I´ve created several pieces with Valentina, which I´d like to use for a small production run. But of course, the production facilities are still “stuck in the last century” and cannot open or use any other pattern files than their preferred CAD system (usually either Gerber or Lectra)…
Anyone had similar issues?
I would appreciate very much any advice or tip!
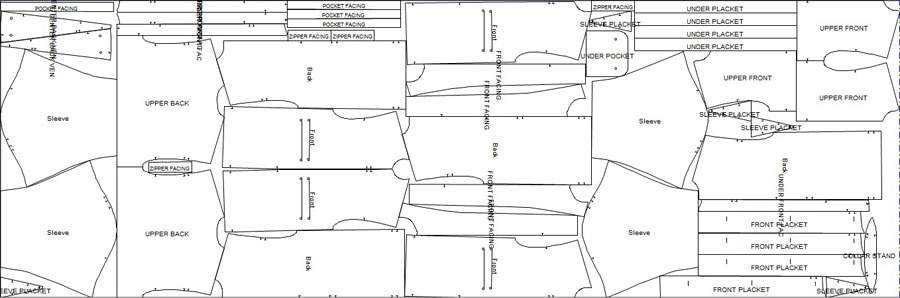
A Marker is an arrangement of the pattern pieces as they will be cut on fabric.
The Marker is as wide as the fabric, and the grainline of pattern pieces follow the grainline of the fabric.
It is several steps more complex than the current Layout function in Valentina.
We plan to implement this in the future.
Basically, its an “advanced” layout of pattern pieces in all sizes that are planned to be produced, arranged for the optimal cutting of a fabric (usually several layers at once). It has specific size (length x width) corresponding to the fabric width, print (if exists) and grainline, and also to the length of the cutting table of a production facility.
In case anyone would like more information on it, here is some good and detailed explanation about it, for example: What is a marker? – Fashion-Incubator
I suggest exporting your layout as an SVG, and opening in Inkscape or Adobe Illustrator and rearranging the patterns.
Create a group for each pattern piece, making sure the pattern pieces’s bits (seam allowance, grainline, labels, internal paths, etc) are included.
Rotate each pattern piece group to make the grainline either 100% vertical or 100% horizontal (zoom in to confirm.) to match whether your Marker is vertical or horizontal.
Create a rectangle the width of your fabric and the length you estimate that it should be. Fill the rectangle with white, select a narrow black stroke line so you can see the rectangle.
Create a narrower rectangle to exclude the selvedges, same as above with white fill and narrow black stroke.
Align both rectangles down rectangles’ center length with the Align tools.
Groups the rectangles together.
Then select all the pattern piece groups that should align along an edge, add the narrow fabric rectangle to the selected group, then select the Align tool to align the edges together (left, right, top, or bottom).
Then move the remaining pattern piece groups onto the narrower fabric rectangle. Make the rectangles longer if needed.
I was also already thinking that probably the only chance is to make it in something like Illustrator…
I am just concerned about how much inaccuracy that might create, if the scale would be altered through all such transferring, reformatting, arranging and then printing…
Have you ever done something like this for productions?
In any case, thank you so much again for a guideline, at least I know which direction I could go now
@Elena You are correct. Everytime a file is exported from one program and imported into another it introduces risk.
Right now Inkscape is moving to 96dpi, like GIMP.
So it is good to check if your program is 90dpi or 96dpi (program setting for monitor display, not printed DPI).
I believe Valentina’s exported SVG file is based on 90dpi (monitor, not printed).
@slpencer Thank you again!!
I will try it out with Illustrator and will make sure to control that the settings are correct… let´s see how it will come out
And I especially liked your idea: “The pattern pieces which are marked as Placed on Fold should be mirrored down the foldline - this could be automated for user convenience.”
I think if/when the “Marker and Yardage Calculator” tool will be implemented - that would take Valentina to a completely new level!