Hi,
I’m drafting a bra and get stuck on getting the lowest point of curve. On paper draft it would be easy to me, but how to do it in Seamly? Thanks for your ideas 
1 Like
Hello, @petulinkax, and welcome to the Seamly2D forum.
 My trig isn’t very good and I’m sure that there is some fancy formula that will help with this and make it very accurate. But here is what I’d do…
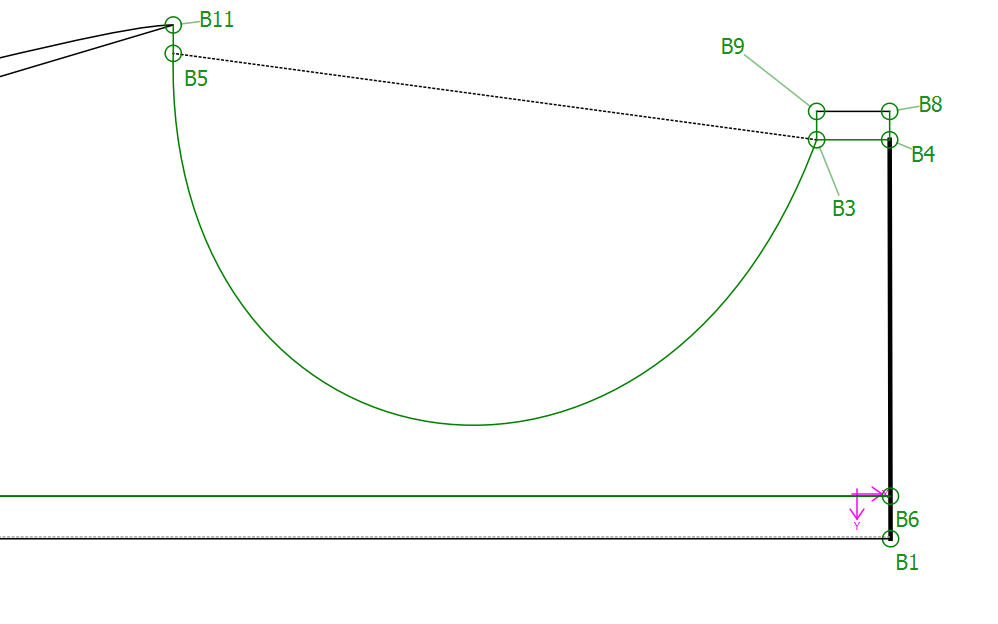
I’d make a node in the centre of the line B5 to B3 and then use the Interect Curve & Axis tool. First select the curve and then the new node and ‘eyeball’ it to the place that looks like the lowest point  and press enter:
Hi, Grace,
thanks for your answer, but I’ve already did this. But I really need the point to be accurate 
1 Like
Could you explain why you need the lowest point on the curve? From a pattern perspective I don’t understand what that accomplishes… the lowest point is dependent on the rotation of the draft block. For example… If I rotate my laptop screen the lowest point will change.
And how would drafting it on paper be any more accurate?
That being said, if you did as Grace suggested, and then by trial and error change the angle of the axis until you find the longest length of A5 to A6, you will have found the lowest point - given the curve being relatively circular in shape.
1 Like
Based on the presumption that Seamly patterns are meant to be “hands-free” once drafted, would this translate to other measurements?
@petulinkax I’d probably try bustpoint_to_bustpoint/2 starting from the centerline & going along the line below the curve, & hope a straight vertical was close enough.
1 Like
I would think it would scale with the measurements. But again, I fail to see the purpose of the “lowest” point. If it where an an axis intersection point perpendicular to the midpoint of B5_B3, then it would make sense.
That being said, given the use of a curve VS an ellipse (circle), I don’t see a way to exactly find that tangent point of the curve and a horizontal axis with the tools available. I’m sure one could solve an equation of the curve based on the start / end points / control points to find the lowest point, but that’s really beyond the scope of the app.
2 Likes
If I may ask, how would you find that lowest point if you were doing it by hand? Perhaps we can translate the manual way to Seamly way.
T-square (or ruler) and triangle… line the triangle up on the vertical, and draw a horizontal tangent to the curve… and pretty much guess where the tangent point is. About as accurate as you get with what you suggested. Besides… how accurate does it have to be? It’s a bra. It’s not like machining engine parts to 1000’ths of an inch.
Problem is, without using an ellipse (circle) there is no way to determine the center so you could create a point using the intersect axis - curve with a vertical axis angle of 270 degs.
I’m more interested in why the lowest point?
2 Likes
I think it’s the design. From that lowest point, one needs to make 2 sections (at least) with curved edges to shape the cup to the breast. and the lowest point is probably where the 2 sections will meet, so it will need a notch on the pattern at that point.
I’m not quite that clued up on bra-making but if you have a good ebook on the subject, I’d really like to have a look at it ![]()
I would have to see the big picture to understand the need for the lowest point. If it’s just a case of locating notches, accuracy on the curve shouldn’t be an issue… just use the length of a curve section to locate the matching notch.
Me neither. My experience with bras and sewing has been limited to sewing padded bras into costumes, and usually drag queens at that. Lol
I have nothing in the way of bra pattern books.
1 Like

Perhaps this will explain it better:

Once you have your basic bodice pattern (moulage), you can use it to design the bra. For the band, you will close the darts, which will curve the band a bit to fit around the torso comfortably. While for the cups, you will rotate the darts to where you want them while still keeping the edges curved to create the cup shape and the outer curve will fit into the curve in the band.
Yes this make sense… vertical measurements are marked off to provide horizontal lines, the bust point is located, etc… here the lowest point of the curve is located BEFORE the curve is drawn. Unlike the original post just wanting the lowest point of a curve.
1 Like
Yes, it’s a matter of pattern making methods. I think that in most methods for bra making, they’ve eliminated the need to draft the moulage and headed straight out into drafting the band first, angling it as if the darts have already been closed and with the under-curve already in place, which necessitates the finding of the lowest point on the curve.
Yes, that’s the way I would do it. It’s not absolutely accurate, but I’ll be OK with it (since it’s “just by hand”)
Lowest point (as @Grace wrote) is about design and notch, but it has to be there ![]() This curve is a wireline, wire has been cut but I don’t know the original length/width, just the position in bra… It’s disappointing
This curve is a wireline, wire has been cut but I don’t know the original length/width, just the position in bra… It’s disappointing ![]() If I knew the measurements, it would be easy (with a circle)
If I knew the measurements, it would be easy (with a circle) ![]() If I locate the point 2mm and more out of the lowest point, the bra will look odd. That’s a thing you find out only when bra is on the body…
The notch marks a seam on cup going to bust point and without it I can’t even make the cup pattern
If I locate the point 2mm and more out of the lowest point, the bra will look odd. That’s a thing you find out only when bra is on the body…
The notch marks a seam on cup going to bust point and without it I can’t even make the cup pattern ![]()
If it’s not possible right now, I’d have to guess where the point is.
Thanks
2 Likes
Another way would be as @Pneumarian suggests… Establish where the bustpoint would normally be & use the same tool that I suggested at a 270° angle (downwards) and this should normally be the lowest point on the curve, since it’s normally the measured distance from bustpoint to low bust line.
Well… if you’re only concerned with one size, you could print out the pattern as it is now. You can now export a draft block in the latest ver… print & draft the point on paper… measure the distance along the curve from one end or the other, then go back in Seamly2D and add a point along the curve at that length. If you need to adjust to more than one size… I’d add a midpoint between B5_B3. Find the angle between the midpoint and the point on the curve you located, and create a new point from the midpoint and an axis at the angle intersecting the curve. That way the point will scale reasonably well.
1 Like
Hi! Thank you so much for the post. I think now only me really needed the point to be correct. It is really valuable.
2 Likes
Hello, @JuliaWo , and welcome to the Seamly2D forum.
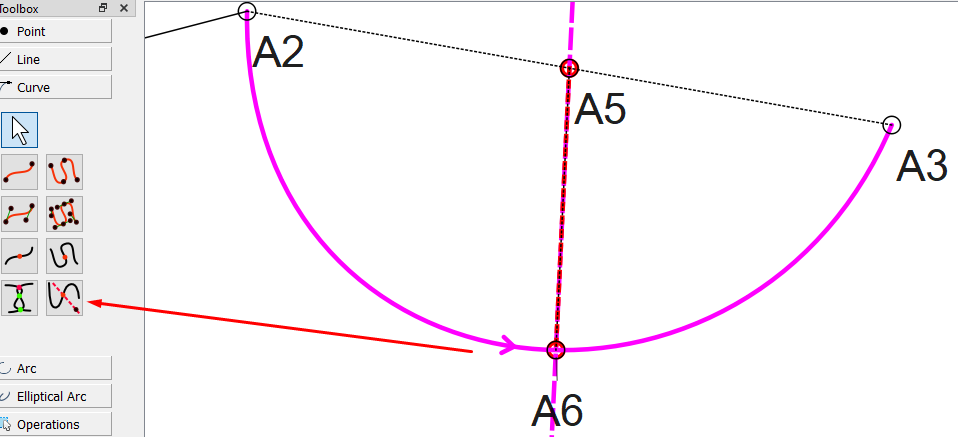
The other option is to first determine where the lowest point is to go and to create the curve to pass through it, like here:
If you were creating the curve using the Arc tool, then you could use the Tangency Point of Arc and Tangent tool, but that would also need to have a line at the height of where the lowest point should be.
1 Like
Hi, Julia! Thanks so much, now we’re two! 
2 Likes
Hello folks,
I was looking for an advice about finding the lowest/the most protruding point on a curve and I found this topic. If I understand it properly, it actually can’t be done unless the curve is an arc, is that so? ![]()
I am looking to solve this:
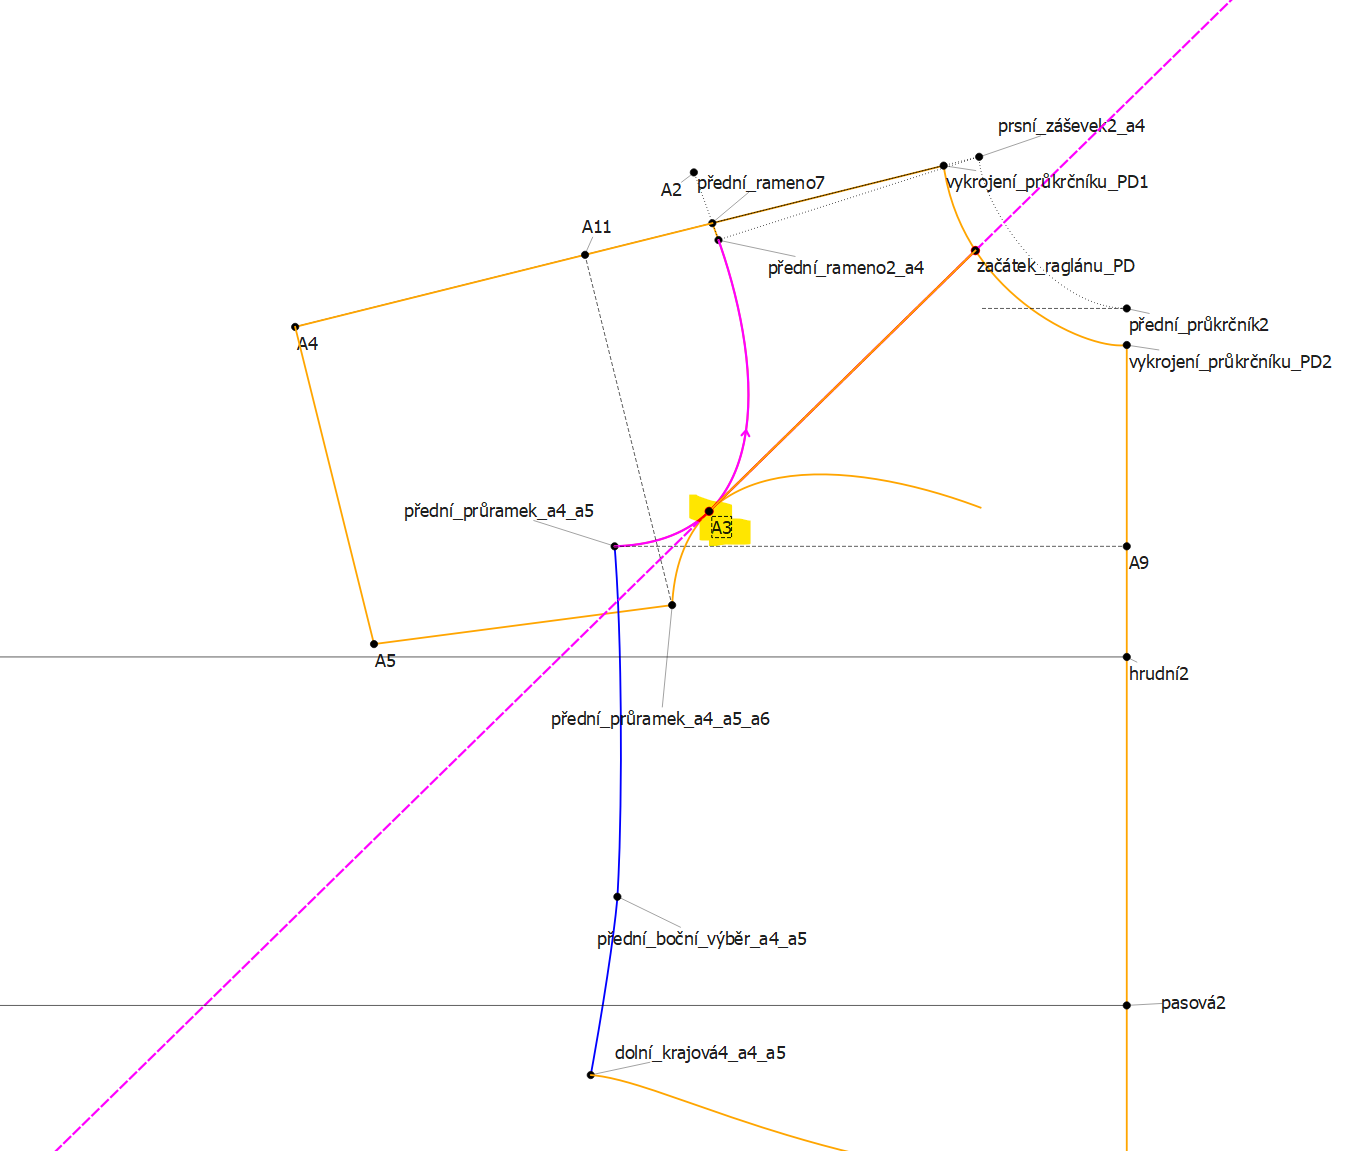
I need to find A3 on my pink curve (front armhole); A3 resides on a tangent of the armhole + the tangent goes through the point začátek_raglánu_PD. Sure, I can guess A3 without much harm but resizing the pattern than doesn’t scale nicely and I have to edit the A3 location after each resizing. I would be grateful if there would be a way to express A3 with formulas.
I am using the “Point - Intersect Curve and Axis” tool for finding A3 now.
Thanks!
2 Likes