Hallo Schneider was genau wolltest du konstruieren? Schulterpunkt? Ich habe festgestellt, dass man, wenn man zuvor immer nur auf Papier konstruiert hat, in der Herangehensweise sehr umdenken muss. Beim Konstruieren auf Seamly muss man vielmehr vorausdenken, weil spontane Änderungen nicht möglich sind und meistens müssen Zwischenpunkte gesetzt werden, dass es zu einer passenden Lösung kommt. Ich arbeite gerade einen einem für mich perfektem Gerüst, damit ich später leichter und schneller zu Ergebnissen und Veränderungen komme.
2 Likes
I am still learning the software. I was trying to reproduce a vintage early 1900’s draft as an exercise in learning more about seamly2D. i am realizing exactly what you say- on paper it is more spontaneous, with Seamly, I need to rethink and the old ways require a different approach
2 Likes
Fragen Sie, wenn sie etwas nicht erarbeiten können. Bin jetzt schon etwas länger dabei und habe so manches Problem in den Griff bekommen:)

1 Like
This is my humble attempt at period pattern making from the book “Parisian Ladies Tailoring”. As you can see, everything is very mathematically created using curves and tangents. And yes, it does teach you all there is to know about the tools in Seamly and how to get from one point to another. It also teaches about which measurements to use where to achieve what.
However, since I have no need for period clothing, I switched to learning from the Aldrich books that are much easier to convert into digital flat-pattern making. Since then, I have worked my way through a number to books & internet tutorials, in my quest to really understand pattern making in general, since I only started learning it after I found Seamly. 
@Scholli, @Douglas, @slspencer, @Pneumarian and a whole bunch of others are light years ahead in pattern making than I am. However, I have made a number of patterns for clothing for family & friends that do fit very well and make up very nicely, as well as some bag patterns and even some cardboard cupcake box designs for the local baker.
If I have to give you some advice, it would be to read the step-by-step instructions a few lines in advance so that you can plan in your head which line of instruction to create next. Sometimes, it’s better to skip a line and do it afterwards, since Seamly needs to have one node to flow off a previously made node or arc, unlike when drafting by hand, where you can go off & tack in a bit anywhere on the paper.
3 Likes
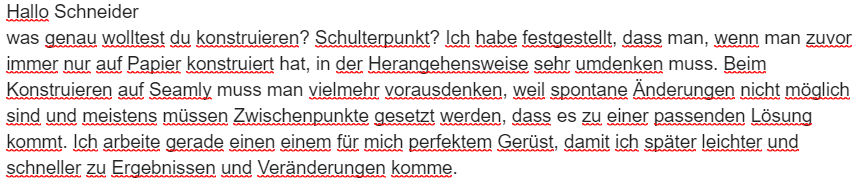
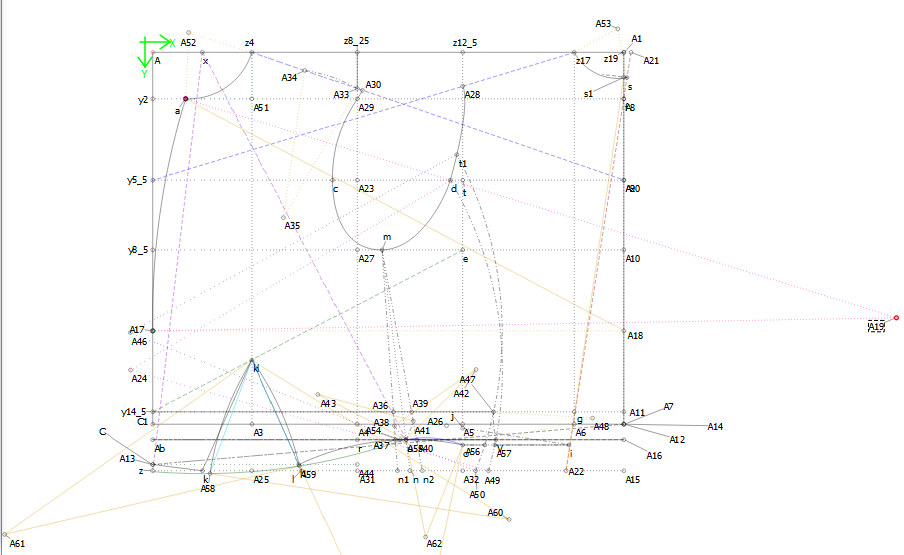
This was what I was working on. A waistcoat from TheClimax System c.1920 I am merely using these as a means to learning the software. I can usually figure out a way through trial and error, but I am also like to know if I am missing the obvious or the easier way to accomplish a task! I have way more pattern making experience than software experience! I do want to thank everyone who responds- it makes for a great sharing experience!
3 Likes
![]() Wow! they do look very similar.
Wow! they do look very similar. ![]()
![]()
![]()
It seems to me that you’re actually doing very well. There are a few topics on here that may be of interest to you, like the ones on creating curves that will stay smooth when the sizes change, since we can’t use curve rulers. Like these:
With all the tools, there is a small help feature in the bottom right corner of the drawing board, which pops up as soon as you pick up a tool:
![]()
And when a formula returns an error, a small description of the error will appear if you hover your cursor over the word ‘error’:

These are 2 things that I didn’t realize when I started out, but once I found them, they have proved to be of immense help.
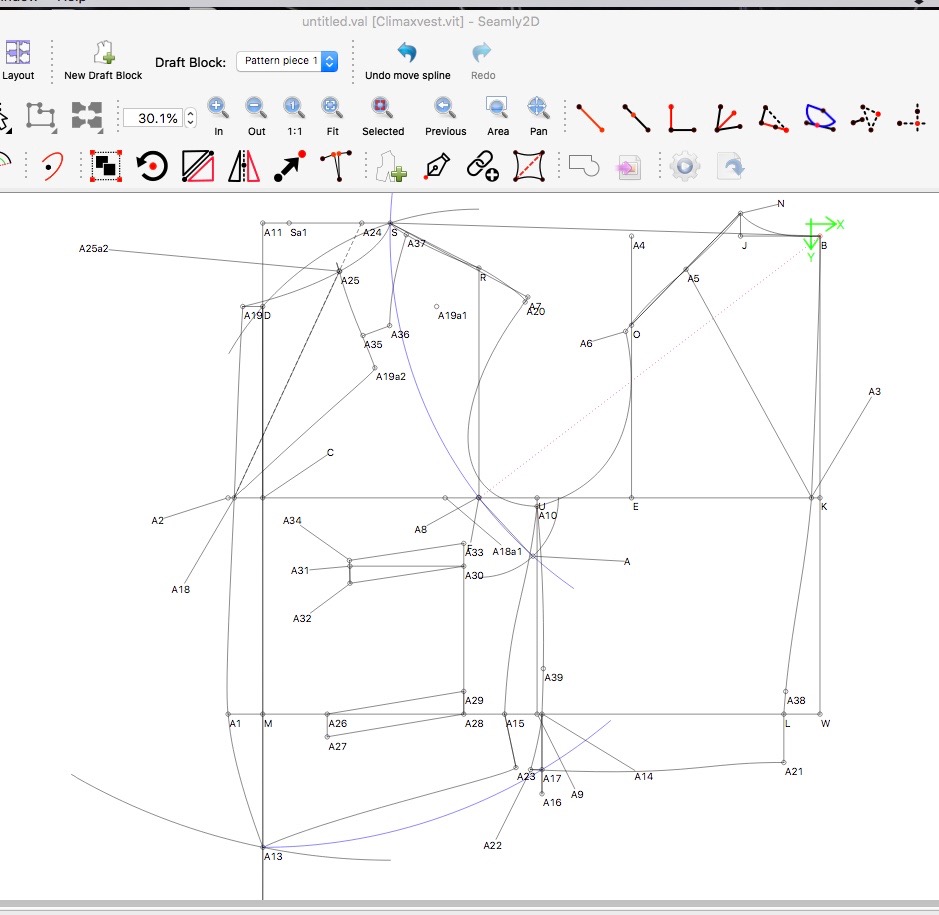
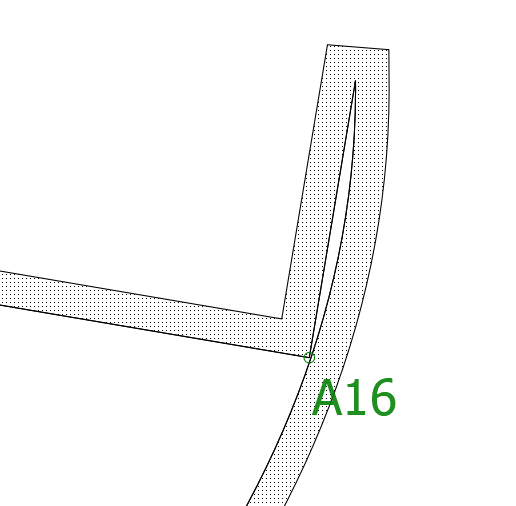
As far as an easier why to add points on either side of your arc is concerned, if it were a curve, then yes, I could suggest one, but with the arc, it’s a bit more complicated. You could choose intersect line & arc or intersect 2 arcs, as an arc is, pretty much, a free-standing object only connected to anything by the node from which the radius is measured. So until you do place a node on the arc, there is nothing to measure from along its circumference.
In your image, if node A13 is a certain distance from M, the you could use the tool Point at Distance Along Line, instead of creating the arc first and then intersecting it.
So, yes, there may be other tools that could make the workflow neater & easier, but only by using the tools and knowing what they do, will you be able to grab the correct tool for the neatest & easiest desired result.
Other than that, please don’t hesitate to ask. We’re all happy to help.
2 Likes
Hi there! This has been really helpful for me, but I’m still struggling with how to make a point on the end of the section of arc that I’ve drawn and mirrored, so I can then connect these points to other parts of the block. Can you think of a way to do this please?! Thanks in advance!
1 Like
For the drawn section of arc you use the Point along Arc (AA) tool, & set the point to be the name of the arc distance along the arc. This will be showing in the dialog with a format of Arc_[centerPoint]_[number], eg: Arc_A_14 So if I put a point at distance Arc_A_14 along Arc_A_14 the point will be on the tippy end of the arc.
The mirrored arc segment may be dealt with in the same manner, (but it might be pertinent to note that if your master segment was 2 units long, the mirrored segment may be -2 units long.)
I hope that clarifies how to deal with this. If not, pictures might help, either of your particular situation, or of my checking on the process.
Best wishes!

1 Like
Thanks so much for getting back to me so quickly! I really appreciate the help. For some reason it’s not putting the point on the end of the arc though, and I can’t for the life of me understand why! I’ve screenshotted the steps I did: So, it’s this arc I want, which I select with the Point Along Arc:
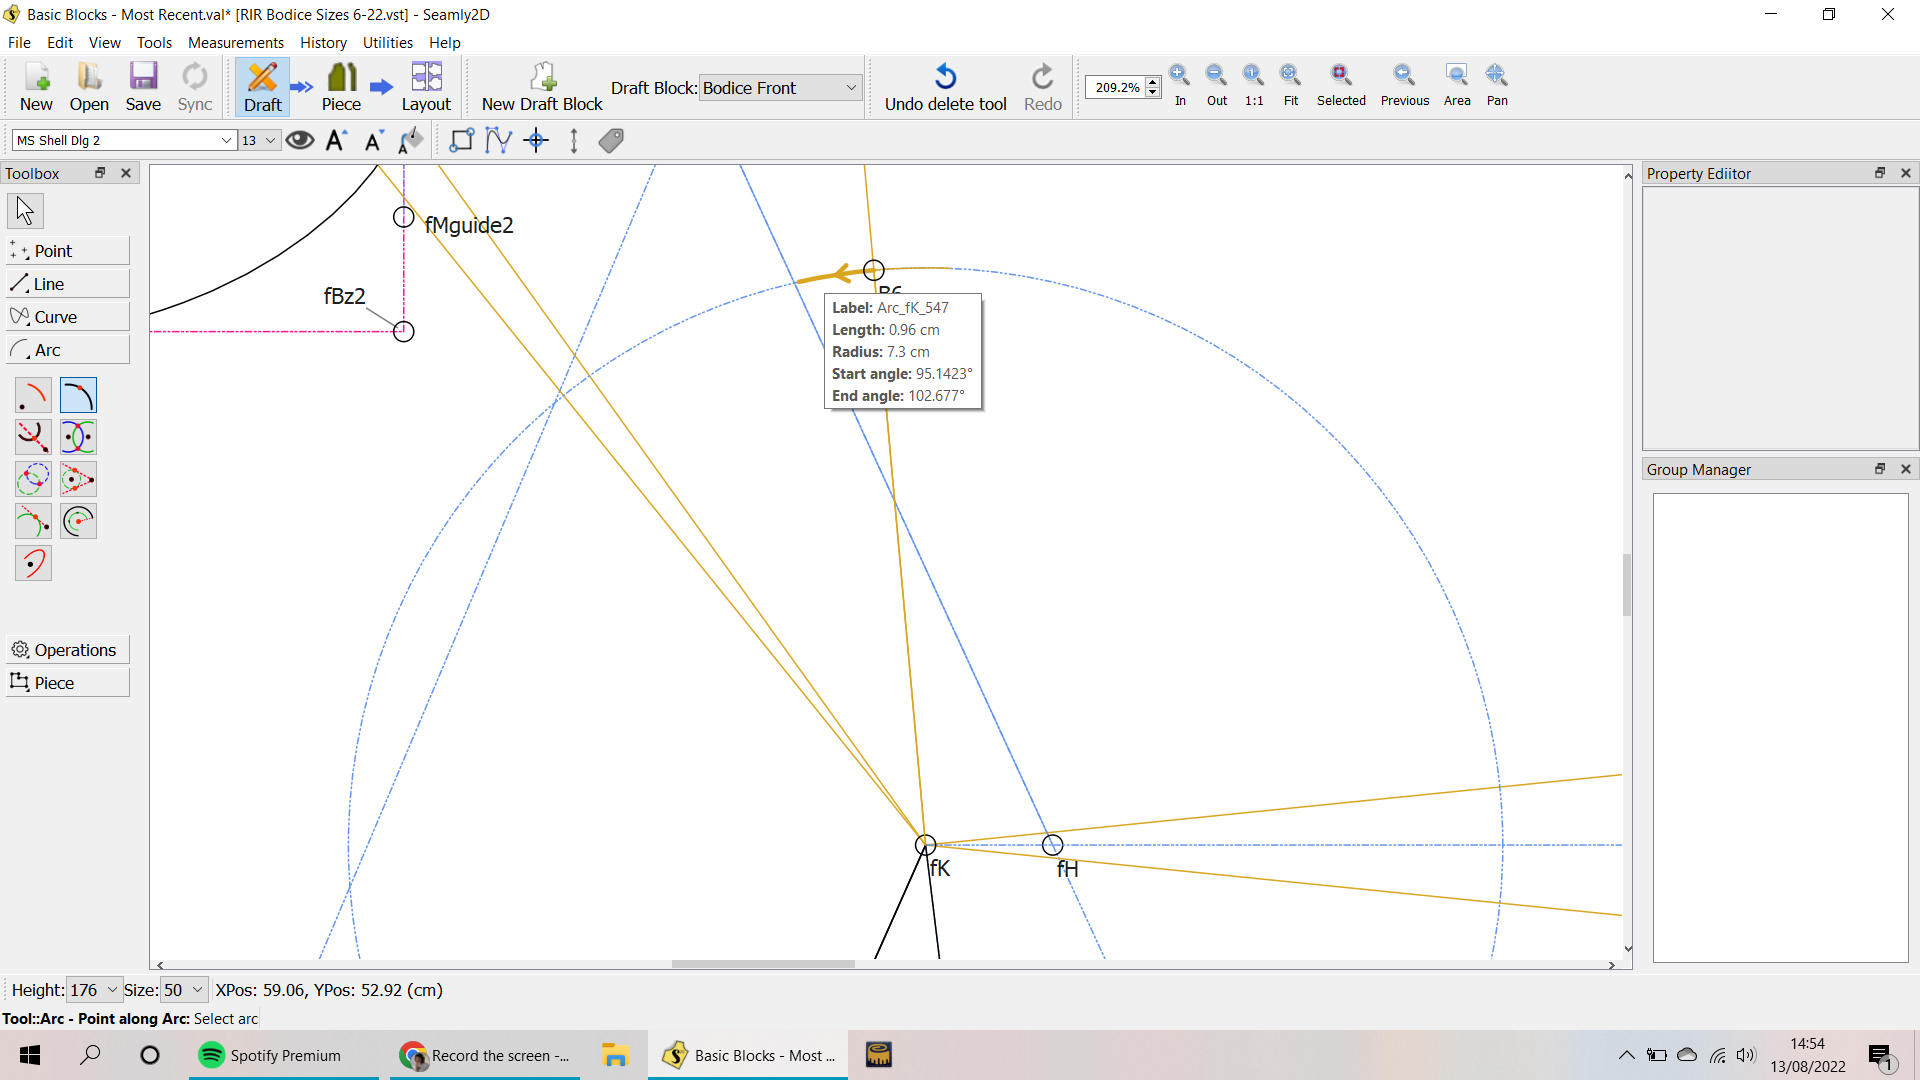
And for the length I select the length of the arc…
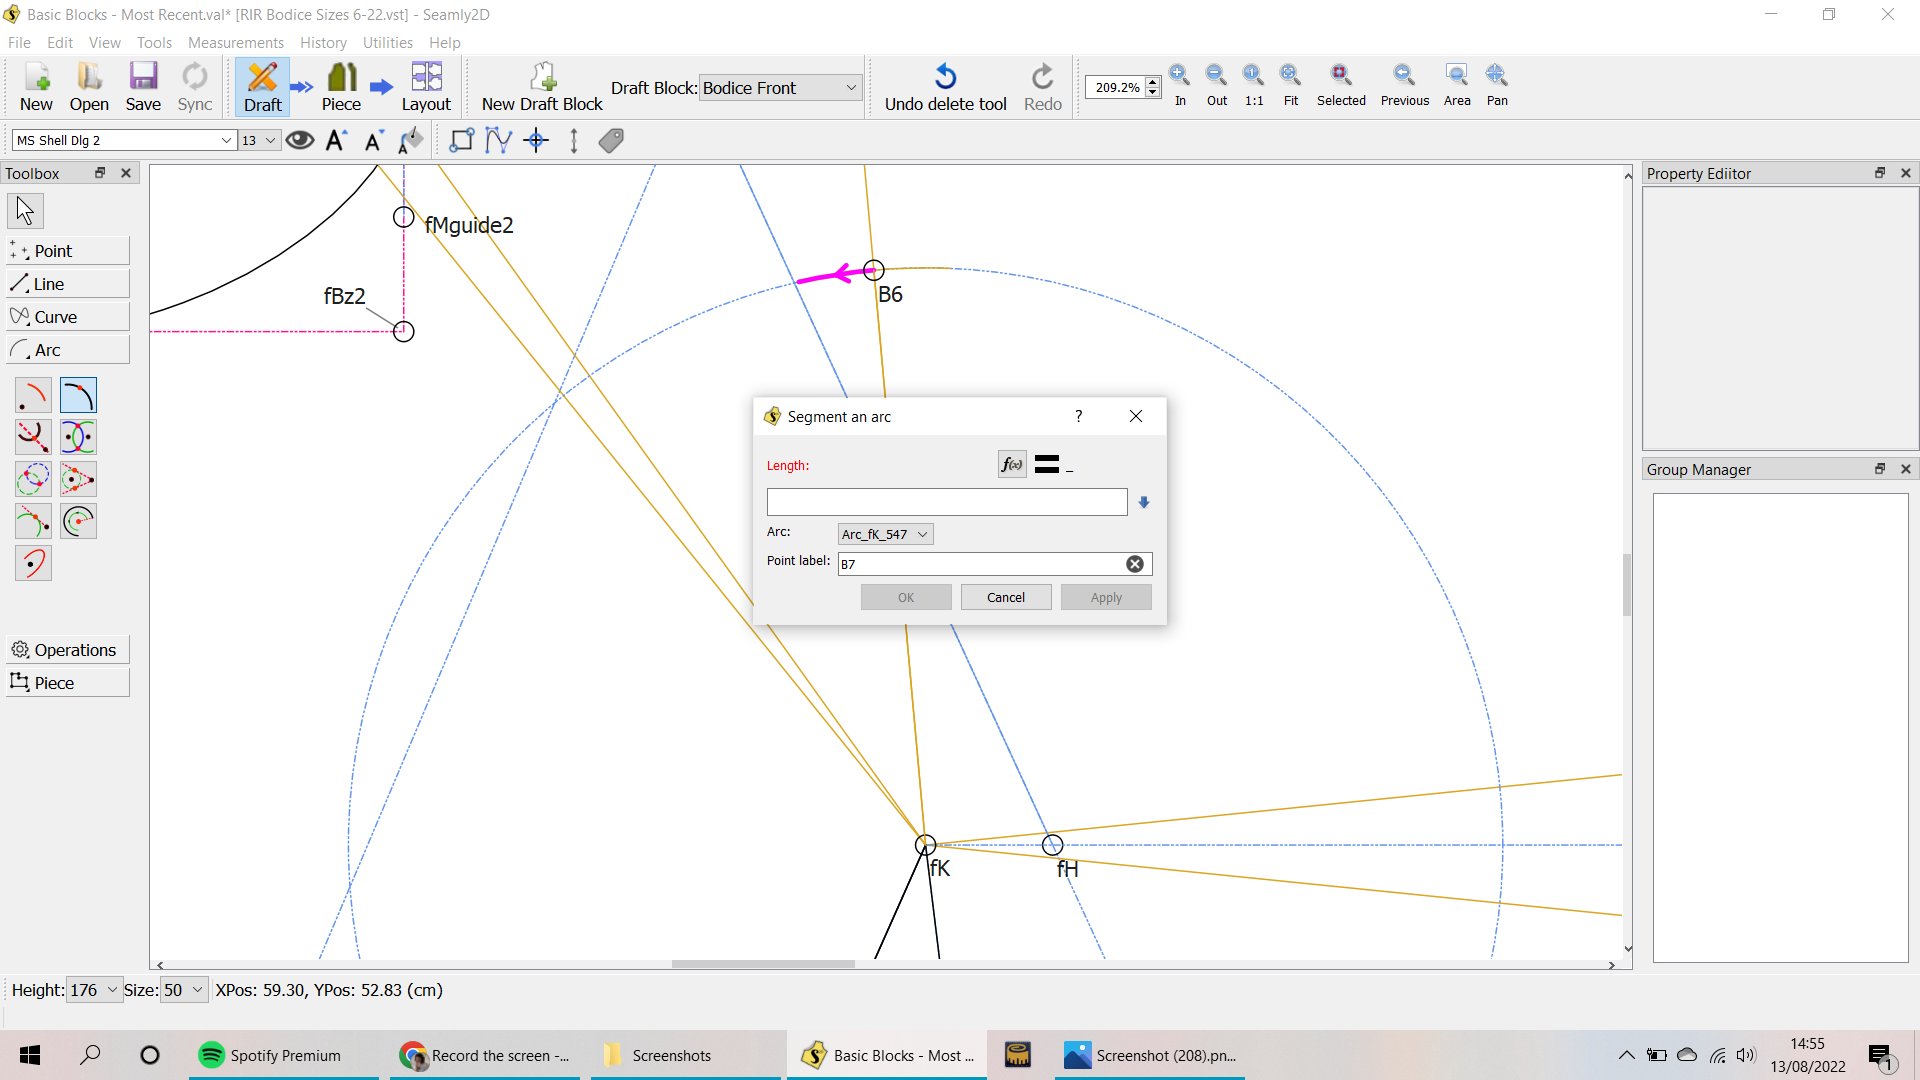
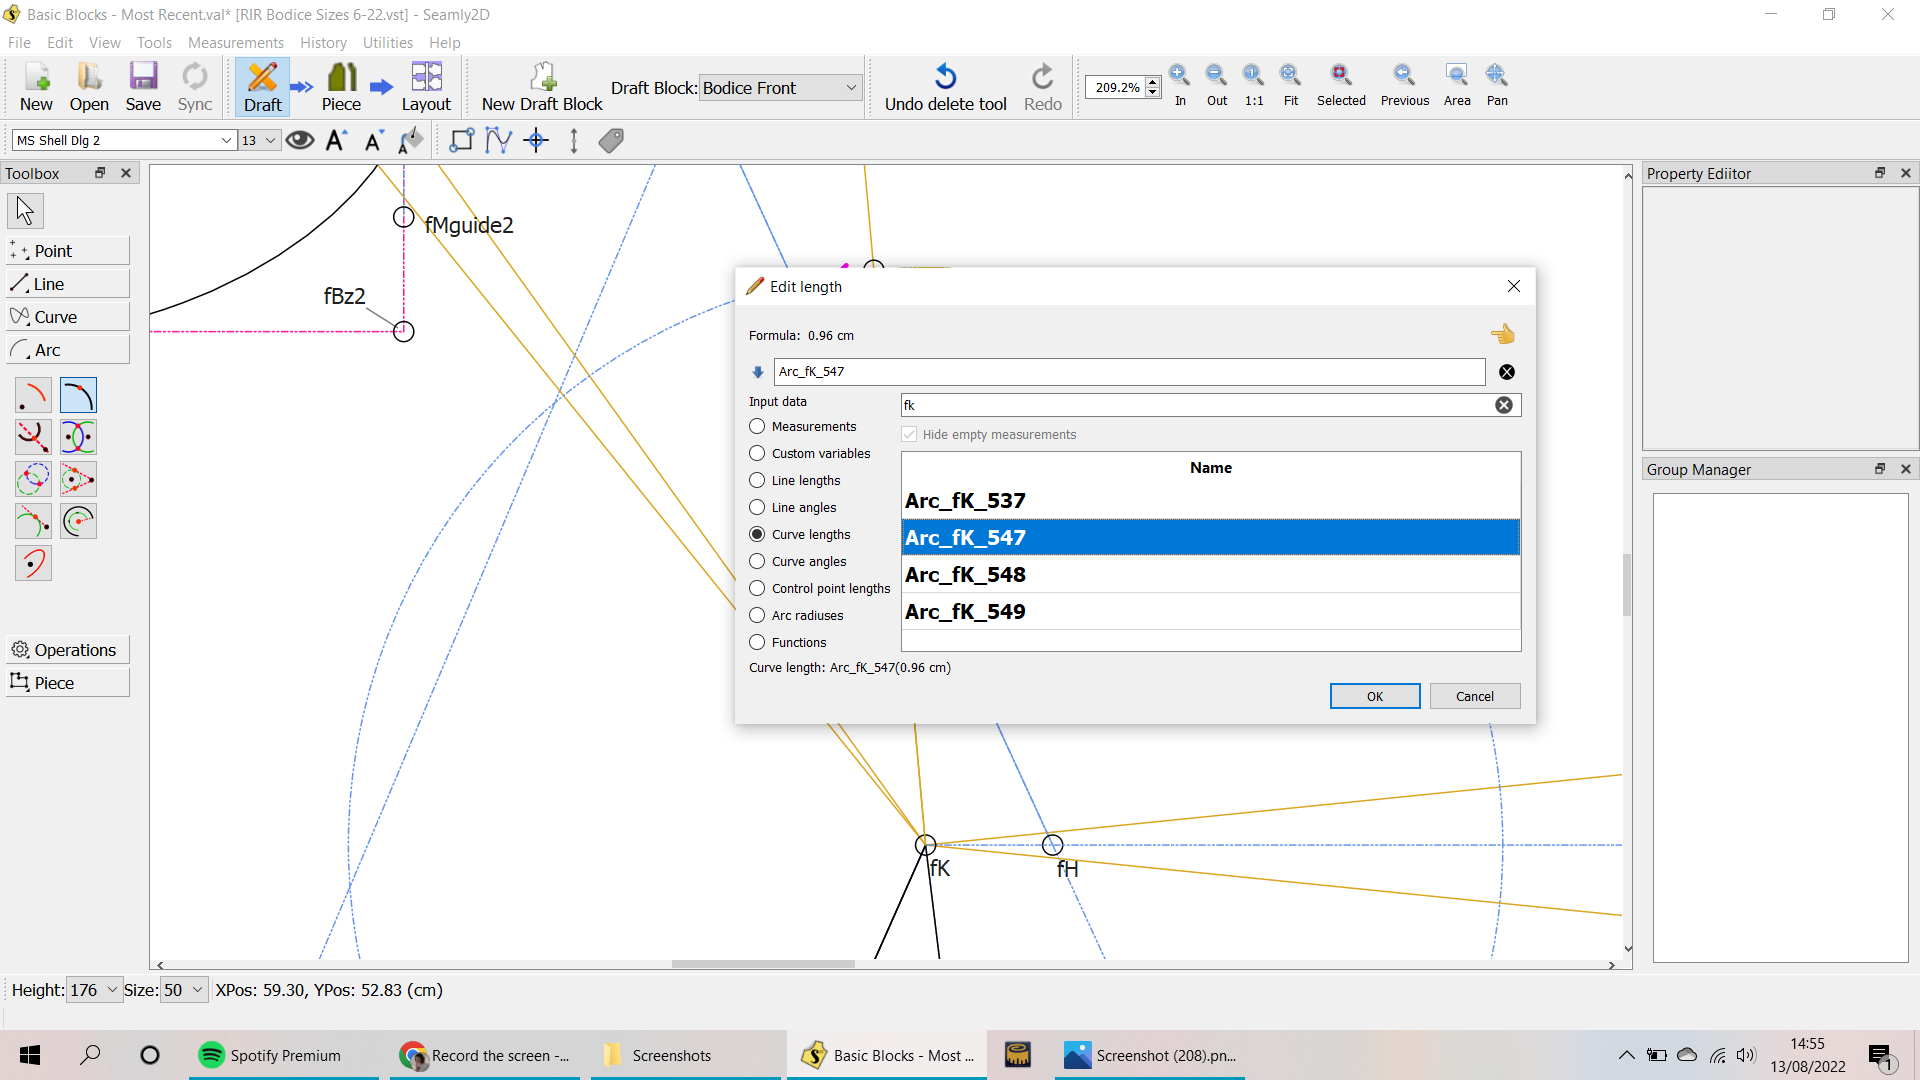
But the point isn’t placed at the end of it when it appears…
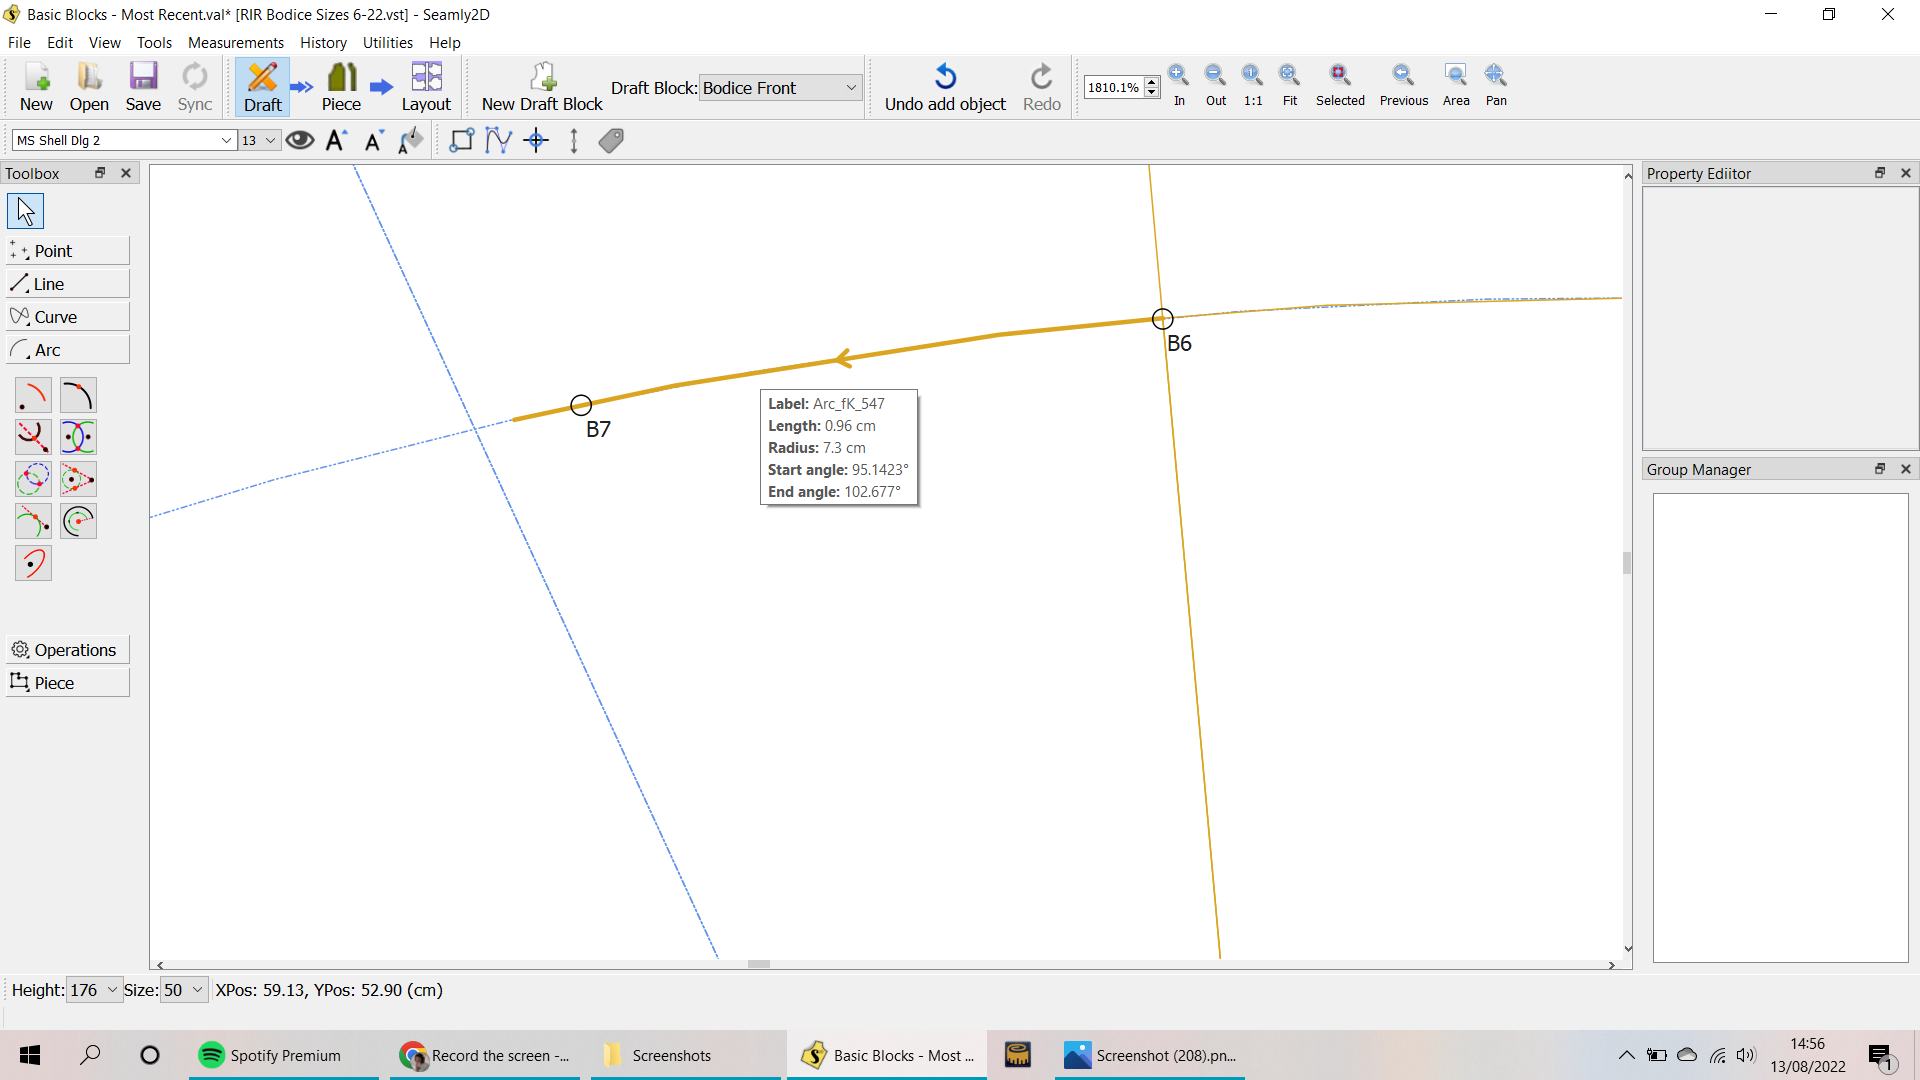
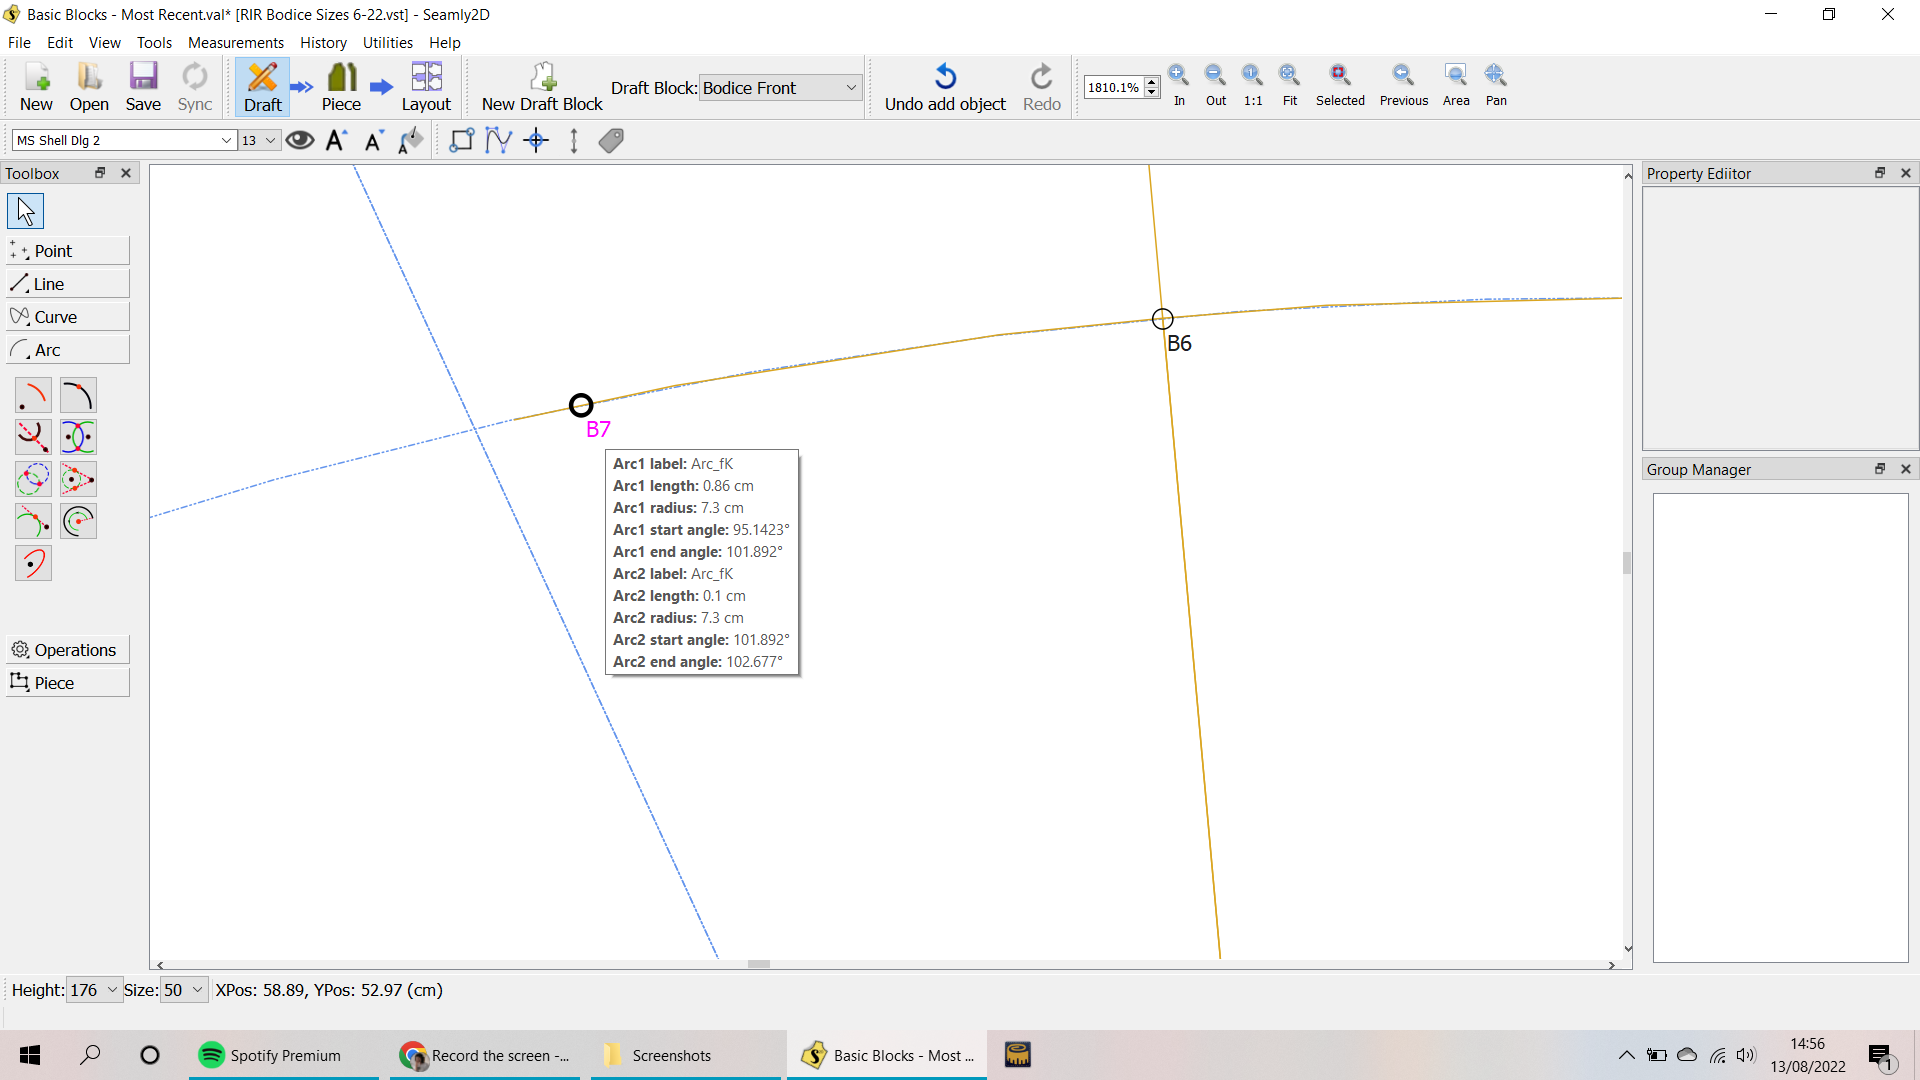
I don’t know if I’m being stupid but I just don’t understand it! Any thoughts?
2 Likes
Ahh. I see now. The bad new is you aren’t doing anything wrong. I think @Douglas made a comment about why that is some time ago, but I can’t find that post right now. My only solution is, if millimeter tolerances matter in your pattern, I see that the point gets placed exactly a mm in, so if you added a mm to the formula for making Arc_fK_547 it would come out how you wanted. If mm tolerances are tolerable in this portion of the draft, it’s probably best to just be disgruntled at it & hope it will be eventually fixed, (& try not to look at it closely.)
2 Likes
Could you post your pattern and any vit and I can take a look at it?
Yeah… I know I addressed this before, can’t recall if it was something I fixed and was justing waiting to push the changes? Off the top of my head I do seem to recall this might be one of those fuzzy math things, where with the floating point math you can’t rely on 2 values exactly being equal, so the 1mm might be the tolerance when comparing 2 points.
3 Likes
That does seem likely. I have one pattern which had an intersection axis & arc neatly formulated to appear right at the end of the arc, only it would fail by a hairsbreadth with certain measurement files. I extended the arc by either a tenth of an inch or a couple hundredths, or maybe it was a similar portion of a degree, —it was a bit more than the apparent minimum— & haven’t had a problem since. But it was either a cape or a skirt, & so very tolerant.
1 Like
In reality… the width of marker chalk or pencil is wider than the fuzzy tolerance. Heck… if you tape tiled pdf’s together your likely to be off more than that. ![]()
1 Like
Thanks so much for taking the time to help me with this! It’s nice to know I’m not just being stupid and not being able to make it work, hah. Here is my pattern, it’s the Bodice Front that I was working on:
Basic Blocks - Most Recent.val (53.7 KB)
And here is the measurements file:
RIR Bodice Sizes 6-22.vst (5.3 KB)
1 Like
(I totally agree about the tolerance being something that can be worked with, it absolutely doesn’t matter in reality if something is only a mm out! But it just makes me worry when something doesn’t work exactly that I’ve done something terribly wrong!)
1 Like
Also, I just tried adding a mm to the formula (as recommended by @Pneumarian above) and the point stayed in the same place! So weird.
1 Like
hmm, it worked for me just now with your file, I think I failed to properly clarify what I was saying. Here’s your file, with my edits: Basic Blocks - Most Recent.val (53.7 KB)
Note that I changed the point placement formula to what the arc length formula had been, so that when floating points become more grounded, (pretty sure Seamly will need to be re-coded for trinary computers before then,) your point won’t get back out of line.
2 Likes
Ahhh okay, I had added the 1mm onto the point placement formula rather than the arc length, but it makes much more sense to do it the other way around; obviously your brain is much more used to thinking along Seamly logical lines than mine, I need more practice! That’s great, thank you so much I really do appreciate it!
2 Likes
That’s what I stick around for! Glad to be of service!
2 Likes
When I get a chance I’ll try and look back through the topics for the one @Pneumarian was referring to… it was a cape pattern that the seam allowance was doing strange things because an intersect point was not on the arc / curve. I just came across my screencaps on my phone I posted while looking for something else. I need to refresh my memory what I came up with, and if I found a programming solution - or not. It was doing this:
2 Likes