Can you input your own patterns into seamly ? By digitising or scanning?
2 Likes
Hi! Thanks for showing an interest in Seamly!
The short answer is that, yes, it is absolutely possible to hand-digitize your patterns! The pattern files Seamly uses are scripted in XML.
So, perhaps the answer is that no, you have to input your pattern mathematically by hand. but once you have done that correctly, the sky is your oyster, you can print it off for anyone’s personal measurements, (or use a multi-size measurements file,) & know that it shan’t require significant alteration.
& we would love for you to help us explore the very best ways to input patterns correctly! 
A more experienced user will have to give you the long answer.
1 Like
@Pneumarian I really liked your answer. You made the most important point that needs to be understood. The pattern needs to be based on FORMULAS, CALCULATIONS and MEASUREMENTS. There are many books on different patternmaking systems. This is not an exhaustive list: UserManual:Patternmaking References - Seamly2D
I confess that many times I have simply looked at a commercial pattern or even an existing garment and made a guess, sewed up the resulting pattern out of scraps or old sheets, then repeated until I got a paper pattern that works. That process cannot be taught, is time consuming, and requires access to a dress dummy or the person during the fitting, so is possibly not what most people want.
Here (Sleeve Block, McCunn System - Seamly2D) is an old tutorial that I wrote that shows some of the basic principles on the example of creating a sleeve pattern using the method documented in books (and on line classes and ebooks and video) from the author of the first method I studied when I started trying to understand patternmaking. That tutorial is no longer available from the “User Manual” wiki above and the tutorial needs updating in a few minor things. References to a program called “Tape” should be replaced by the program called “SeamlyME”. The method I used for shaping the curve in the sleeve cap is an imperfect way to implement McCunn’s method using the Seamly Tool. Once you are comfortable with the basics, try looking elsewhere on this forum for references to curve shaping. There are ways to do that which provide much improvement over my initial attempt.
There is such a huge amount that I do not know, but I have learned enough to decide that the approach used in the Seamly2d software is well worth the effort to use.
Many others on the forum use other systems, documented in other books. @Grace has a significant amount of tutorial information using several different systems.
Please feel free to keep asking questions. There is usually somebody who can help.
3 Likes
One more thought.
You’ve probably gathered this from our previous replies, but if you were asking if you can input your own patterns as opposed to the programs, (like Dress Shop,) which prevent you from even playing with their presented patterns, then YES!! Absolutely!!!
Though some patterns are available, (there is a website, my-pattern.cloud, for storing & sharing your patterns online,) none come with the program at this time, because Seamly is intended for you to be able to draft whatever pattern you, (or your clients,) want to make.
2 Likes
digitising - No and scanning - No.
Seamly does not work like standard garment CAD programs. It is parametric and you have to define points using the various tools with associated formulas, and if you want the pattern to adapt to different sizes you need to incorporate measurements / increments from the SeamlyMe into to the formulas.
That said… I figured out a way to take an existing pattern, and using the various tools to place the grade points in the proper X-Y pos, and then using standard Wolf dress form sizes I can do a standard 2" grade up or down. I presented several patterns done this way in another thread you may find useful.
3 Likes
Hi! this link says: Wiki not Found ![]()
2 Likes
Thanks! The wiki got updated to seamly.net recently, so some links are broken. Here’s the new link: Sleeve Block, McCunn System - Seamly2D
1 Like
The problem with the formulas are, that even in this wiki link there are to often fixed values: 3/4" or 1"
If I use this pattern for a baby or for an plus size person (200 kg), this can not work!
We need formulas without fixed values! – So, the real question here is, which measurement does correlate with these fixed sleeve cap values?
2 Likes
Yes, sleeve caps are really contentious. Not only is it the size of the person and the measurements, but it is also the amount of arm movement that you would like to do in the sleeve. So… if the garment is going to be used at a fancy dinner party, one wouldn’t need to raise the arms much, so a higher and narrower sleeve cap will be perfect and display beautifully. But if the garment was going to be worn grocery shopping, you wouldn’t be able to reach for things on the top shelf, so a lower and wider sleeve cap would be needed. And it’s here where formulas get really handy.
And yes, inches are really difficult to keep typing in or converting
And the McCunn System in the wiki is for women’s sizes.
Wow, I have time to share armscye and sleevecap info today. Since the subject came up I’ll post it here. It’s a bit lengthy, but here it is  :
:
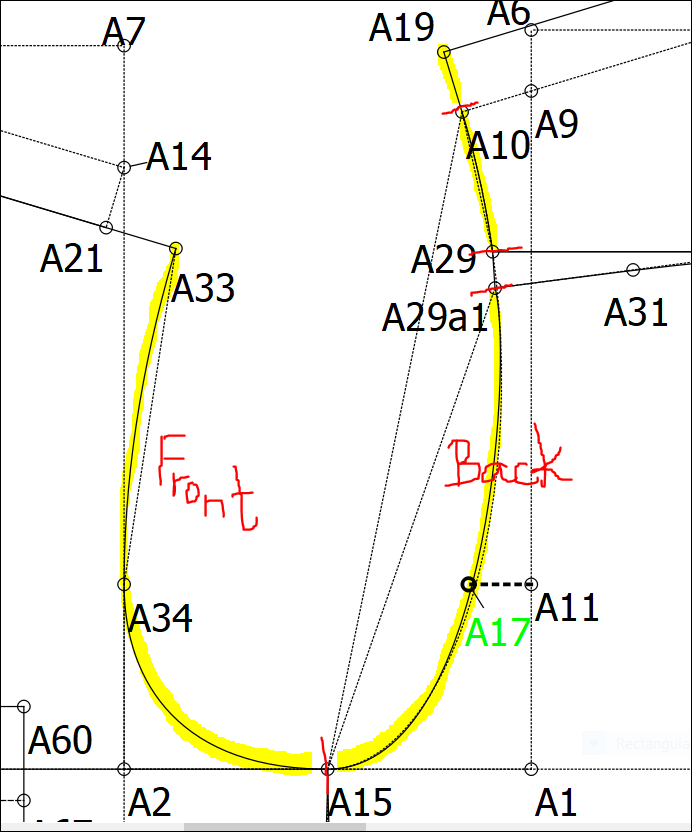
Sleevecap values are related to the front and back armscye lengths.
Custom-fit patterns don’t look exactly like they do in patternmaking textbooks, as we all know by now. The front armscye length is often much shorter than the back armscye length.
The Sleevecap depth is typically the overarm length minus underarm length (arm_shoulder_tip_to_wrist - arm_armpit_to_wrist). A small additional length is added for slim-fit shirts or subtracted for loose-fit. An additional small amount is subtracted if the shoulder has been extended outward. Even more is subtracted for t-shirts, bowling shirts, or hawaiian shirts. When the sleevecap is short the bicep line is wide. Most of us don’t have access to the underarm length measurement of clients, so using a percentage of the overarm length can create a reasonable estimate of the underarm length.
Here’s how I do it:
- Create the first pattern piece that contains both Front and Back shirt blocks.
- Create the second pattern piece as a line equal to (front armscye length + back armscye length). It’s easier for me to type ‘Line_B_FrontArmhole’ and ‘Line_B_BackArmhole’ into formulas instead of the spline names. Sometimes there are multiple splines and line segments, so making this pattern piece to calculate the front & back Armscye lengths keeps things simple.
- Create the third pattern piece for the Sleeve. The Sleeve will need two calculations: Sleevecap depth and Bicep width.

-
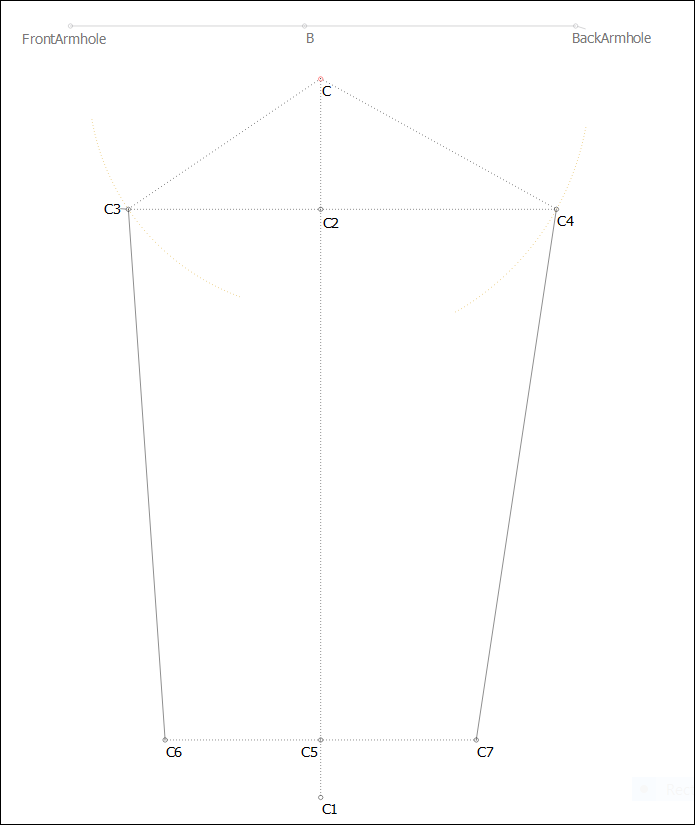
Create C & C1 - Sleeve length for long sleeve shirt:
- C - Sleevecap top
- C1 - Sleeve length. Use Point at distance and angle tool, point=C, angle=270, length=arm_shoulder_tip_to_wrist
-
Create C2 - Sleevecap depth for a regular-fit shirt (not slim or loose)
- Use the Point along line tool, 1st point=C, 2nd point=C1, length=(arm_shoulder_tip_to_wrist * 0.17). For loose-fit multiply by 0.16, for slim-fit multiply by 0.18. These percentages were determined by looking at the sleevecap length found on a commercially available garment for a particular size and fit, for example 11.5cm sleevecap height for slim-fit, 11cm for regular-fit, 10.5cm for loose-fit, and 10cm for t-shirts for men with height=177cm, chest=100cm, and sleeve length=64cm. Find the percentage by dividing sleevecap height by arm length --> 11.5cm/64cm=18, rounded up to 2 digits. Women’s blouses start with this basic sleeve block then the sleevecap is extended upwards above C and slash-and-spread rotation with C3 and C4 from the center of the elbow line adds in ease for gathers or pleats. And if any of you have percentages for baby & toddler clothes sleevecap height please post, we’d love to know more!
-
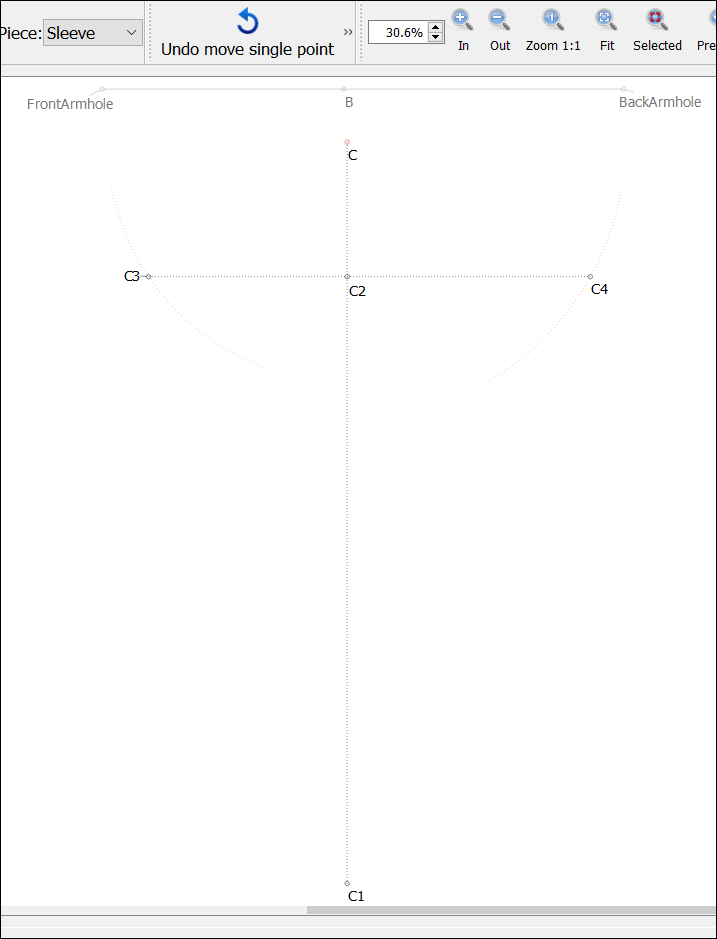
Create points C3 and C4 - Bicep width
- Create 1st arc with Arc Tool
 , centerpoint=C, radius=Line_B_FrontArmhole, 1st angle=100, 2nd angle=250.
 - Create point C3 with Intersect Arc and Axis tool
 , Axis point=C2, the 1st arc, and Angle=180. Draw dashed lines from C2 to C3 and from C to C3.
 - Create 2nd arc with Arc Tool, centerpoint=C, radius=Line_B_BackArmhole, 1st angle=300, 2nd angle=350.
- Create point C4 with Intersect Arc and Axis tool, Axis point=C2, the 2nd arc, and Angle=0. Draw dashed lines from C2 to C4 and from C to C4.
- Create 1st arc with Arc Tool
-
Create Wrist line and Side seams
- Use whatever formulas you wish to calculate the wristline length and the cuff height - there are many variations.
- Create point C5 with Point along Line tool, 1st point=C1, 2nd point=C, length=((2/3)*cuff_height)
- Create point C6 with Point from distance and angle, point=C5, length=(wristline_length/2), angle= 180.
- Create point C6 with Point from distance and angle, point=C5, length=(wristline_length/2), angle=0.
- Draw lines from C3 to C6 & from C4 to C7 as Sleeve side seams
-
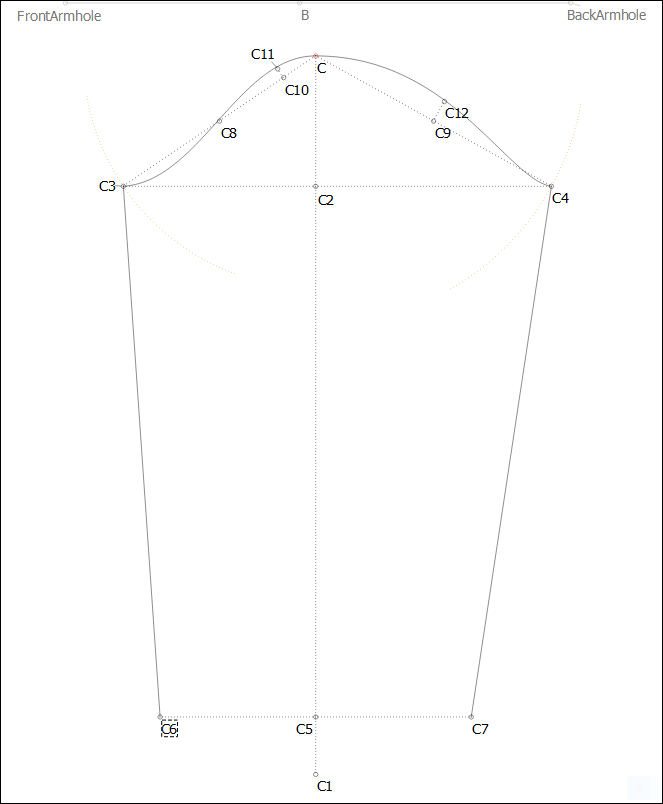
Create the Sleevecap curve using your preferred method - there are many variations.
4 Likes
Oh, wow! @slspencer. Thank you very much for this 


It’s something that we all need. You’re an angel! 
1 Like
I usually have just the opposite when making patterns for period men’s jackets / waistcoats where they will have a drop shoulder. Also makes for interesting 2 piece sleeves. For what ever reason the last few years has been a lot of 18th century men’s outfits. ![]()
3 Likes
Merci infiniment ! Je n’arrivais pas à trouver les explications pour construire une manche.
Thank you so much ! I couldn’t find the explanations to build a sleeve.
2 Likes