What I’ve got so far fit’s the title, but not necessarily the discussion of the issue. Added is the ability to rotate a group of selected objects after moving them. Also you can select an origin point for rotation - which defaults to the center (point) of the group of objects.
Either I can keep the Move tool like this, add a union option to it, or (more likely) create a separate new tool as Grace describes in the issue discussion - using this as a starting point. As it is now this would at least eliminate some of the intermediary clutter if one needs to move & rotate a group of objects. I’ve also put in place some of the structure to set the pen style (color, linetype, linewidth) of the Moved objects… which will also apply to the other operation tools, as they all share the same base abstract class.
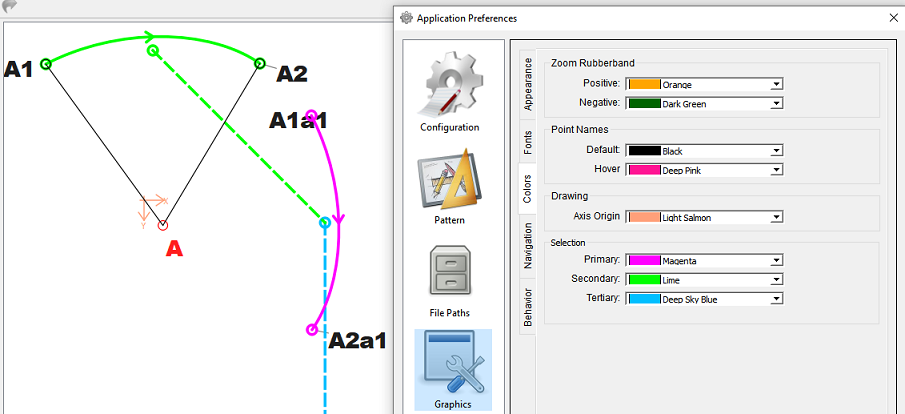
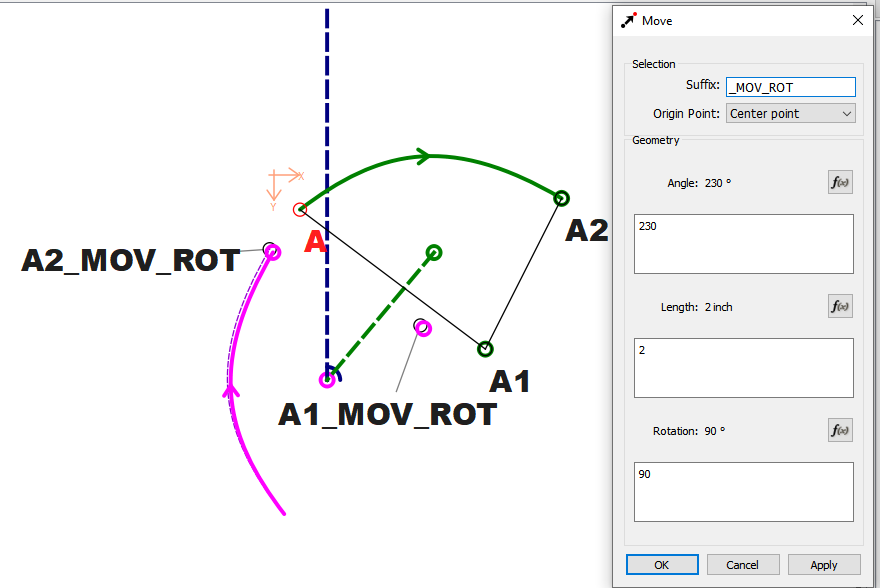
I figured you would like this. I just need to track down a slight glitch - there’s a discrepancy between the location of the visual (magenta) and the actual destination objects (purple dash). Probably something stupid like some clipping or rounding of some decimal points.
Hey Grace… I was giving this some thought… would it make sense to be able to select an orgin point of a group of objects (vs the group center), then select another destination point - presumably if one were drafting multiple pieces within the same draft block - which would determine the move length, and then one could use a line angle of the destination point to some other point in the moves rotation formula?
I know it’s not quite the same as selecting 2 source and 2 destination points to make a union, but I think it might work, without having to figure out how to deal with matching up 2 segments (or curves?) of unequal length.
Also I know it’s a bit off topic… maybe not, but would it be handy to be able Move and Flip a group of objects in one tool… or even Move - Flip & Rotate? Seems like I could simply add a checkbox in the Move tool to apply a flip the objects as well. Like fir example: adding a self facing to the front of a shirt.
The problem with having a Translate tool, is that we’re used to translation of languages, not geometries. But it sounds really cool. I can’t remember if I ever wished I had a single tool to do all three, but it does sound vaguely familiar.
. I’m just thinking that we could eliminate the messy duplicates of the in between steps - while making the workflow quicker… unless you need them, in which case you could just use the rotate & mirror tools on their own. Like I mentioned I can easily see creating a self facing for a shirt all in draft mode without the added hassle of using the union tool in Piece mode… since you have to create a mirrored draft first before you add a (flipped) facing piece, which can then be joined to a front piece. It would be kinda of like having a MACRO within the tool.
I think this could be another paradigm shift in the workflow to make the app more useful to someone like my self that would actually use the app more if it didn’t take so darn long to create a pattern.
I think I have a pretty good idea how the move/rotate dialog would present, (much like your picture in the OP,) but am having a hard time envisioning the flip, unless it was limited to by cardinal axis… or by degree, which would be easy enough to simulate using the rotation part of the tool. Since the current Mirror Objects by Line requires two control points.
I assume that the files will be upgraded to several one-process uses of the single tool, rather than uses of the four existing tools. (New files, of course, just needing the one use doing the 1-4 things wanted.)
If you look at this post on a Raglan blouse, you’ll get an idea. @slspencer uses a few line-guides for formulas in moving and rotating various sections to create the sleeve cap: Raglan Sleeves with Rotate and Union tools
Perhaps it will show you what I’m trying to explain.
And yes, I can think of a few uses for a mirror function to be included, if that’s at all possible And I make it a practice to avoid the Union tool like the plague
We would just flip the group of objects - about the origin point. Which by default is the bounding rect center of the group. Then you can move it and / or rotate it. Or you can move it (which moves the origin point), rotate it about the new origin point, then flip it. It’s all the same.
Granted you could either flip by X axis or Y axis… where flip by XAxis = flip by YAxis + rotate 180 degs… and vice versa.
Hopefully dealing with the Move tool I’ve gained a bit more insight into the point geometry and adding references to used objects I can find out why the Union tool crashes. Something in the Union tool is probably getting lost to cause unexpected crashes… which could be a null pointer or a maybe an object not incrementing / decrementing a reference.
While trying to figure out the discrepancy between the ToolMove objects and the visuals, I figured I’d add some prefs for the “support” colors in the operations tools visualizations… which over time I will add to the rest of the tools. This will allow a user to change the colors if they don’t like the defaults… which are Magenta, Dark Green, and Dark Blue. BTW… the Move & Rotate needed a 3rd support color. Won’t bother you’all with the details, but in adding the comboboxes for the support colors I had to work around a slight issue with my custom “line color” combobox widget used. You might notice that a tool line can not be magenta as that’s been reserved for the primary support color. Without having to add magenta to the schema I realized I didn’t have to as we’re only storing it in the settings. Light bulb moment… I have some other ideas. OR maybe I could add a separate support color combobox widget that is populated with non line colors so as to avoid any clashes? Given how many Qt & SVG colors there are there’s a lot to choose from.
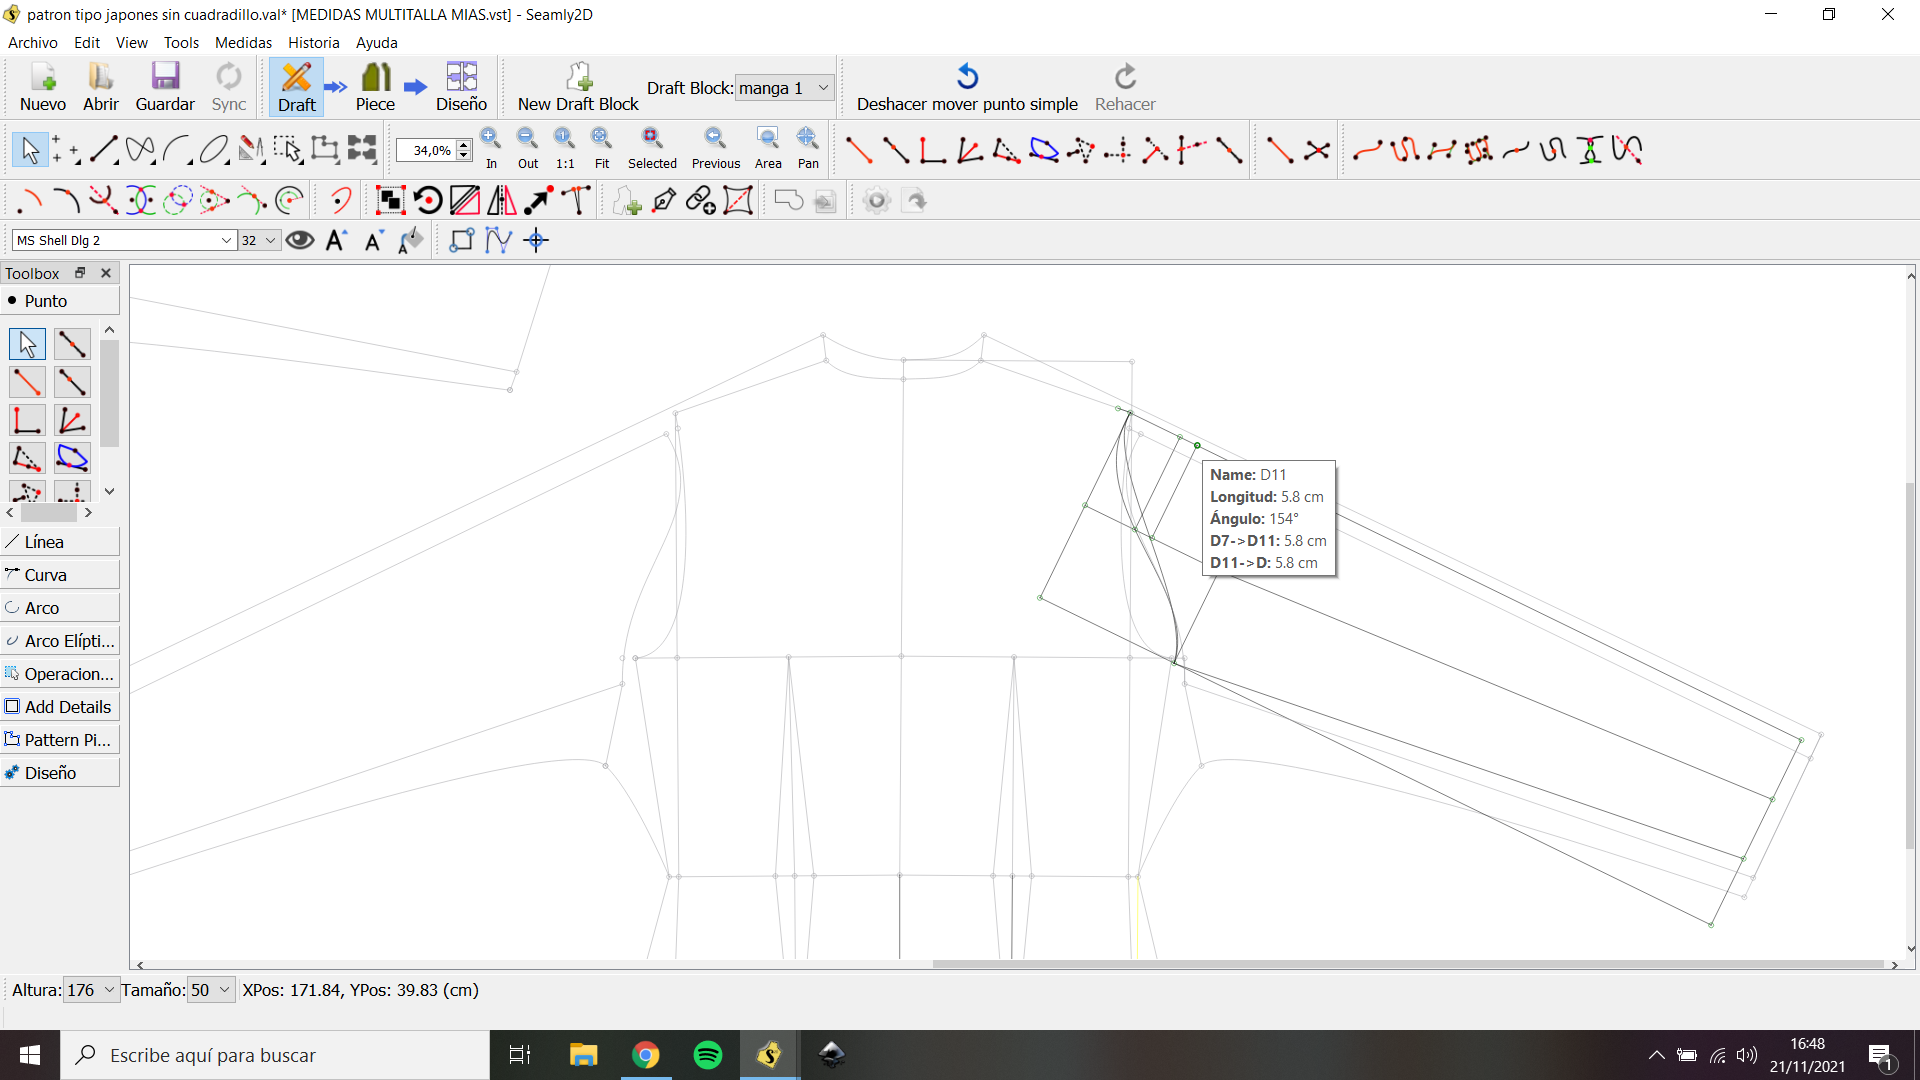
That being said… after pouring over ToolMove and VisToolMove and a couple abstracts for hours, then putting it aside to add the Prefs - it worked! Sort of… while zooming in and out I noticed sometimes the tool and visual lined up (like in the attached pic) , other times not. Turns out it looks to be related to the zoom when zoomed more than 100%, where the visuals of the selected objects seem to be scaling a bit larger than the original tool objects - thus they don’t line up. This only happens when using the default “center” origin, as it’s calculated in a function by the bounding box of the objects, and since the visual is scaling different than the tool, the 2 rotational origins are calculated differently. Now I know what to look for.
Hola Douglas lo que comentas de rotación se podrá utilizar con un bloque de patrón. De manera que se pueda rotar toda una manga y asi sobreponerla sobre un punto de un delantero?? como mi patrón. Esta manga que os enseño la dibuje inclinada, para poder cuadrarla con el delantero y así poder copiarla en el delantero.
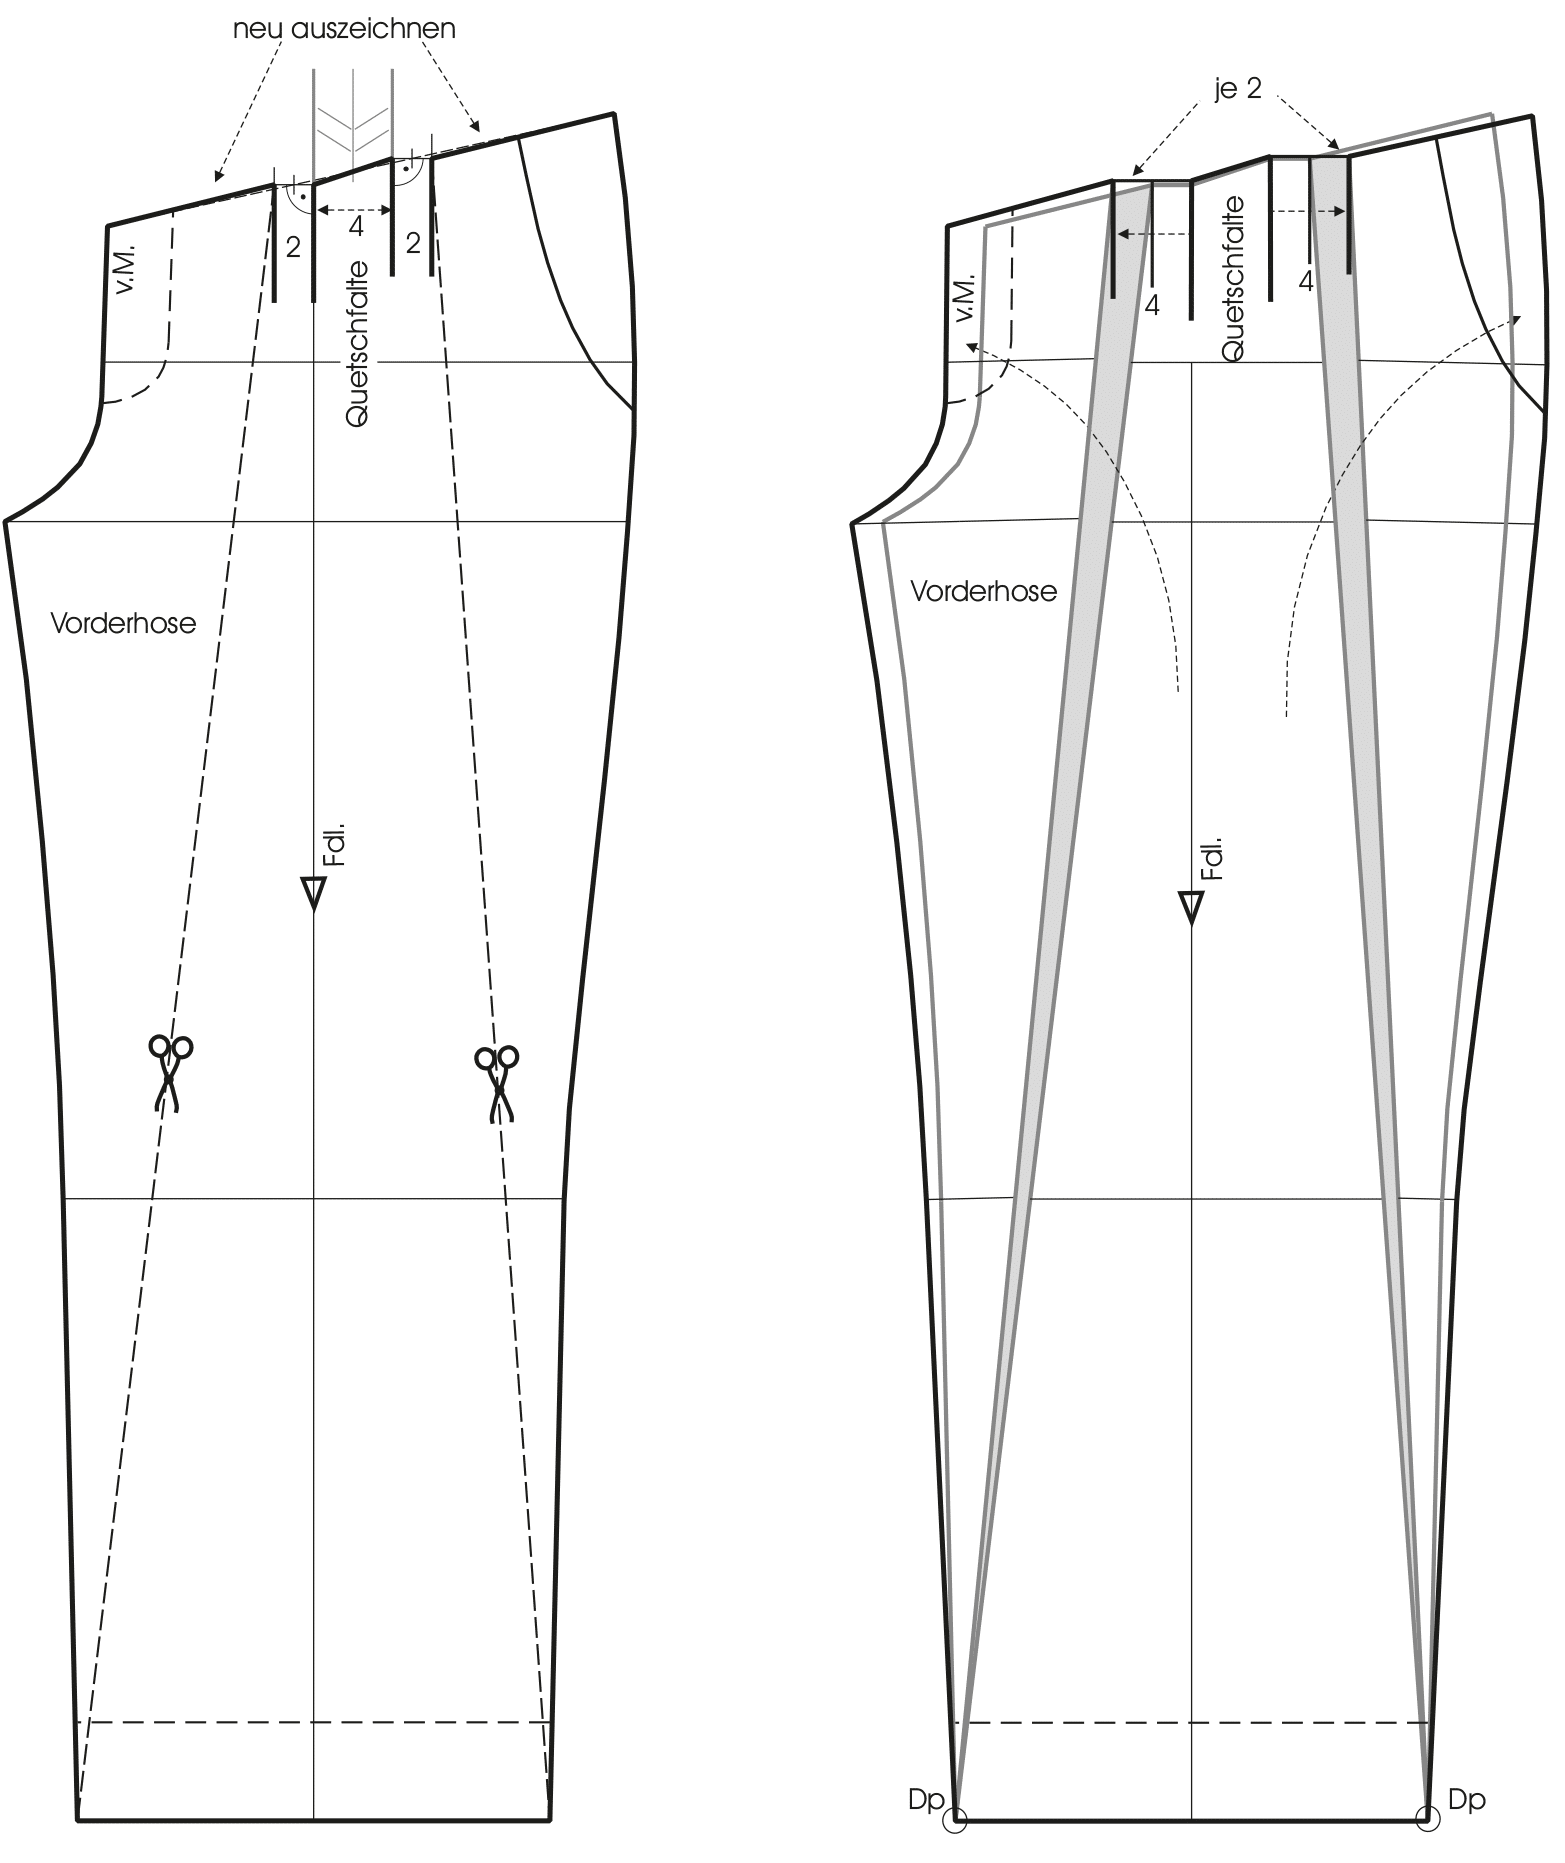
Like Grace said you can achieve this with just the Rotate tool… although in the example you’ve shown it’s already got 2 pleats… and it’s doubling each of those. In other words you could take a regular pants pattern… rotate once to get the 1st 2 pleats, then repeat. Note that to create an actual pattern piece you don’t need the lines connecting the pleats at the waist line, you can use the line tool to visually connect the gaps.
BTW… once you get far enough into it, where you find things looking cluttered - which the operation tools tend to do - lets us know if you need help figuring out how to group objects so you can hide them when you don’t want to see them.
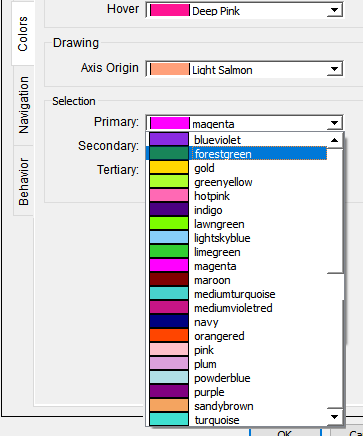
I tweaked my custom color combobox widget to add a method to set the list items… in a nutshell it means I can drag & drop and promote a combobox in a dialog form and then (re)set the list of color items in the drop down list. The default is the list of line colors… but now I’ve added a separate list of “support colors” to use in the prefs., where the list of SVG colors do not conflict with any of the line colors. Again we can do this because it’s a user preference and is not stored in the pattern and doesn’t affect the pattern XML schema. Here’s the colors I’ve selected… if anyone wants a color not on the support list and is not a line color I can easily add it. BTW… Forest Green and Navy are the closest to the Dark Green and Dark Blue currently used for the secondary and tertiary support colors. I’ll set these as the default.The primary will remain magenta.
I’m debating whether to make the 3 pref color selections exclusive as for ex: it wouldn’t make as much sense to set all 3 to magenta.
The way Qt works is you either have to programmatically code the widgets for each dialog, or you can create forms in Creator, or a combination of both. Currently all the tool dialogs use the later… where empty combobox are added in a form, but filled in each dialog.cpp. Qt also has a mechanism where you can promote widgets in the form editor using a custom subclass version of a widget… which is easier to maintain as you only edit the form or promoted class, and not every file that uses that widget. So… in the case of the color combobox I fill the line colors items, and create the color icon in the color_combobox class, promote the color widgets in the forms, and delete all the “fill” code in all the dialogs that use it.
In this case I wanted a separate list of colors from the line colors… so I simply added a method to the color_combobox that takes a qmap< QString > < QString > of the color items… there’s the text name - like Green Yellow" ’ and the value “greenyellow” - it clears and sets the items. In the class constructor it calls the setItems() with the line color qmap. So now I can pass any qmap of colors to the class and voila… different than the default
line color combobox.
Hmmm… I think you lost me in the 1st sentence. Too much info at the end of a busy Monday…
I think that if one had a choice of about 10 or 15 colours, that would be plenty, as long as there are dark and light colours to choose from. Too many choices can be very confusing when someone is starting out using a program and learning pattern making at the same time and also bloat the colour list, so one is scrolling up & down all the time.
Personally, I very seldom check out the colours using the scroll bar, I just choose something on the 1st portion of the list.
And it will, perhaps be a teeny bit less for you to keep track of in your programming.

 No probs. I’m really looking forward to this one
 OR maybe I could add a separate support color combobox widget that is populated with non line colors so as to avoid any clashes? Given how many Qt & SVG colors there are there’s a lot to choose from.