Just create a 4"×4" (10cm x 10cm) square pattern piece. Save it as a pattern to load as a template for later use where your 1st piece is always the test square.
4 Likes
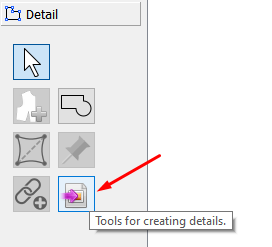
Have you tried exporting from the “Details” screen, instead of the “Layout” screen? It’s the button labeled “Tools for creating details.” on the bottom right of the Detail toolbox. At least until @Douglas or somebody gets it a name that actually makes sense. LOL.
It won’t export to a specific paper size though. It exports to whatever size it takes to show all the activated pieces as you have them laid out. But you could make a paper-size pattern piece to lay the other pieces out on in order to force a desired size.
1 Like
Xodo is recommended for mobile devices because it keeps layers. However, there is no way of entering zoom percentage. It has to be approximated by “pinching”.
Creating the four pattern file types in Inkscape is quite similar process to yours, I think. And equally time consuming.
2 Likes
I’ve been using the export option in Details, and it works well. Would work even better if I had drafted the pattern so that the grain lines would be horizontal. Is it possible to rotate pieces in Details; I don’t think so? It would be a nice feature. 90° at time, maybe.
2 Likes
Yeah. Of course you could rotate & re-trace in the drafting screen, but it would be handy to have that feature in the detailing screen! As well as flipping.
![]()
2 Likes
No. Not at this time.
1 Like
With that we’re crossing over into the idea of producing a marker… either manually or automatically.
And that’s one of the problems that exists right now… we only have the option of producing a (print) layout, that is automatically and randomly placed pattern pieces on a selected size of paper. There’s no way to produce “in program” a “cut” layout AKA marker as to the #of each size, #of each piece, their orientation (rotation, flip x/y, right/wrong side), the width of paper/fabric, plaid matching, etc. That’s one of my longer range goals… Ver 7.0.0 ?? LOL
To either reorganize the layout mode or add a marker module to handle layouts that can be made manually or automatically and then printed or plotted or used as a cut file. And somewhere in that workflow a way to produce a scaled down layout to use in spec sheets as instructions for fabric layout.
3 Likes
Well, I can’t find the export option in the Details screen. But from the details screen, I was able to save as which gave me an svg file exactly like I have in the detail mode. I moved my pattern pieces to my coordinates of XY to match and it seems to work. I still need to play around a bit.
3 Likes
Interesting. Here in the 20201005 weekly release of the Linux AppImage “Save as” only lets me save to a different VAL. But the “Tools for creating details.” button, which Grace pictured, opens a dialog labeled “Save Layout” which lets me export to a number of non-VAL filetypes.
![]()
1 Like
There’s no way to produce “in program” a “cut” layout AKA marker as to the #of each size, #of each piece, their orientation (rotation, flip x/y, right/wrong side), the width of paper/fabric, plaid matching, etc.
When I started looking for pattern making programs I naively thought I could make a pattern and then see how it drapes across a mannequin. Turns out that’s way beyond where we are, but it surprised me that you cannot even enter that information anywhere. I expected you would be able to specify where the fold is (it’s just a text field now), and that it would show the unfolded parts and you’d be able to indicate the seams (what is connected to where), types of fabric, etc. This kind of information is different from what is needed for printing a pattern, but from what you say that is kinda the direction you’re thinking of? A stage after “Layout”?
1 Like
![]()
![]() When I need to create a layout across a range of sizes, I place all the parts with spaces in between and use this option to export to .svg. (I turn off the labels and grainlines after the 1st one.) Then I import them all into the same Inkscape file. They all layer on top of each other perfectly and I can ungroup them and tweak their placements further.
When I need to create a layout across a range of sizes, I place all the parts with spaces in between and use this option to export to .svg. (I turn off the labels and grainlines after the 1st one.) Then I import them all into the same Inkscape file. They all layer on top of each other perfectly and I can ungroup them and tweak their placements further.
Hmmm… Yes, when I found Seamly2D, I thought that all I needed to do was to put in my measurements and then choose the style I wanted. It was a huge surprise that I had to learn how to actually create a pattern ![]()
![]()
![]()
However, there has been some talk, over the years, about the 3D mannikins and some people have imported their patterns into programs like MakeHuman or Marvelous Designer. There’s even a tutorial on Instructables on how to do this. But, for now, yes, our developers are very busy improving the program and I am so grateful to them, that I’m not even thinking of teasing them about this dream of mine ![]()
Yes, this should be coming out soon. It has been discussed in one of the developers threads.
If I understood @Douglas correctly, he is busy with the idea of 3rd module included in Seamly2D that would be for grading and layouts to be sent directly for cutting in an industrial environment. Up until now, the software has been designed for very small/home industry and the bespoke fashion environment.
The idea has always been to help people to build up their fashion design businesses without having to spend hours and hours bent over a table drafting pattern after pattern by hand because patternmaking software is so very expensive.
As the program is now, I can attest to it that the software has definitely achieved this and more. ![]()
1 Like
Marker for cutting yes… grading no. Grading would be another whole area. Which could include the idea of “nesting” different sizes in a single print… like commercially available patterns are done. That’s generally what other garment CAD programs will do. You draft a pattern in a middle size. Then using the grading section you define the grade rules (like misses, women’s, petite, etc) and apply those to the pattern… and they generally have an option to automatically nest the pieces without having to export to a 3rd party program like Inkscape and mess around there.
Yes… this will be one in the symbols tool I have plans for.
2 Likes
No. In lieu of the layout stage. A marker is a layout of how the material is to be cut. Currently only thing the layout stage does it “automatically”… with a lot of trial and error - layout the selected pattern pieces to print. In commercial use a marker is used… whether it’s a physical plotted paper layout to place on top of a fabric spread, or done as a layout file to send to a cutter. Also generally a marker is made up of different sizes of a garment. Marker software modules also take into account whether pieces are to flipped, rotated, or maybe stripe or plaid matched. BTW… it’s called a marker because it takes the place of tracing or marking the pattern pieces on a fabric spread. Nowadays it’s more common to send the marker right to a knife or lazer cutter. It’s also why there is a need to “colorize” the different detail on pattern pieces as you only want to cut the cutting path, notches and drill points if used. But that for another day.
2 Likes
TMTP had a test square on each pattern in the upper lefthand corner. This was essential while testing the conversion from inch or centimeter into ppi. But test squares don’t identify problems in the print instructions sent to the printer. The Layout module has so many weird issues that it would be great to have test squares to identify when a print scaling problem has occurred.
- One test square each of 3cmx3cm and 2inx2in is sufficient to test the entire printout.
- This doesn’t have to be on every page, just every layout.
- A checkbox on the layout dialog would allow users to decide if they want them printed.
- The test squares would be in the upper left corner of the layout. They would appear on the first page of a tiled PDF to let the User pause the print job, check the size of the squares, then resume the print job if it’s correct.
To reduce the empty space requires a better layout algorithm.
2 Likes
Or a way to do it manually. A better layout algorithm usually comes with a time cost. I’ve cut out so many jackets and pants over 40 years I can layout a suit in less than a minute… I just know where the pieces will fit. ![]()
2 Likes
SVG Nest is an improved layout algorithm for backpack problem in SVG. One of the contributors, Jon Nordby, is a friend that we can contact when we’re ready to implement this.
@Grace or @Pneumarian would you create:
- a bug issue to improve our current layout algorithm (if one doesn’t exist yet)
- a feature issue to add a manual layout tool?
2 Likes
There’s an old issue about this in Layout mode. It might be useful to generate a layout using Grainline angles, then allowing further manual adjustments:
1 Like
Grainlines a given. Need to be able to force pieces on grain, allow for 45 or 90 rotation and allow // disallow to rotate 180 for one way fabrics.
3 Likes
Okay! I have posted these issues!
![]()
2 Likes