Ik werk nu geruime tijd met Seamly2D maar het volgende is mij nog niet gelukt. De afbeeldingen zijn van alleen voorcup van een BH.
Welke formule moet ik gebruiken om deze krommingen te krijgen zodat deze mee veranderen als ik een andere BH maat gebruik? En dat de krommingen van de kleinste maat in verhouding gelijkwaardig zijn aan de grootste maat. Het is belangrijk voor het patroon dat kromming AVC12 naar AVC6 een bepaalde lengte heeft als onderdeel van de gehele beugellijn lengte.
Wie kan mij helpen. Ik ben helaas niet echt wiskundig aangelegd.
Alvast heel erg bedankt
I have been working with Seamly2D for quite some time now, but I have not succeeded in the following. The images are from front cup only of a bra.
Which formula should I use to get these curves so that they change when I use a different bra size? And that the curvatures of the smallest size are proportionally equivalent to the largest size. It is important to the pattern that curvature AVC12 to AVC6 has a certain length as part of the entire stirrup line length.
Who can help me. Unfortunately, I am not really mathematic.
Dank u voor uw snelle reactie. Ik heb dit nooit eerder gedaan dus ik hoop dat ik goed doe.
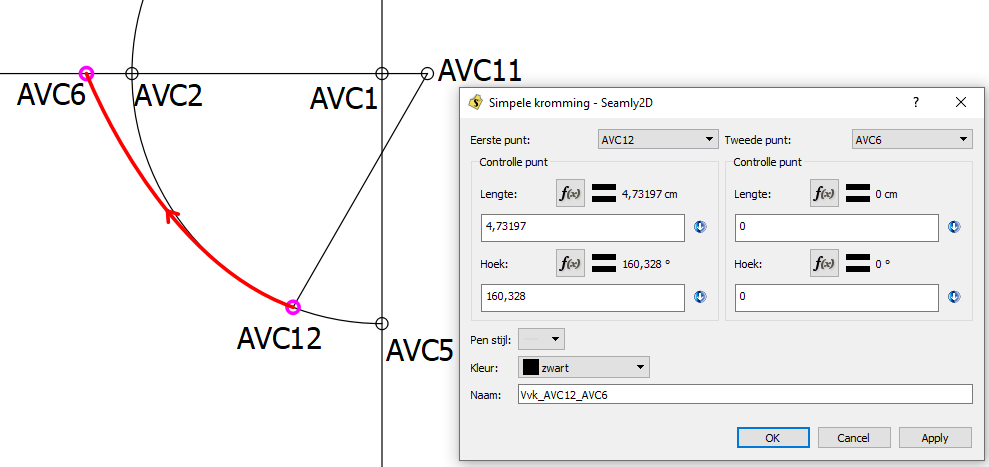
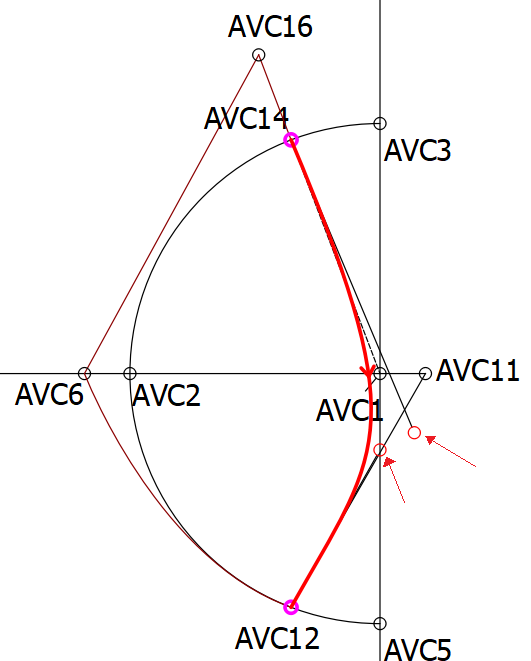
Ik heb in deze patroontekening 2 krommingen getekend:
AVC1a-AVC12: deze lijn moet lijn AVC3-AVC5 raken maar dan onder het punt AVC1. Hier is de lengte niet erg van belang. Het begin en het eind van deze kromming moet als het ware een verlenging zijn van hulplijnen
AVC12-AVC6: deze lijn is onderdeel van de beugellijn lengte. Die staat voor elke BH maat vast. De gehele beugellijn bestaat uit de volgende lijnen (AVC12-AVC6) + (AVC13-AVC7-AVC8).
Er staan nu geen formules bij de hendels van deze krommingen omdat ik niet weet hoe ik dat het beste kan aanpakken. De vertaling komt van google translate.
Thank you very much for your quick response. I have never done this before so I hope I have done it right.
I have drawn 2 curves in this pattern drawing:
AVC1a-AVC12: this line must touch line AVC3-AVC5 but under point AVC1. The length is not very important here. The beginning and the end of this curve must, if possible, be an extension of auxiliary lines
AVC12-AVC6: This line is part of the underwire line length. This is a fixed length for every bra size. The entire length of the underwire line consists of the following lines (AVC12-AVC6) + (AVC13-AVC7-AVC8).
There are no formulas on the handles of these curves now because I don’t know how to do that.
The translation is duthch-english is done through google translate.
I hope you can help me.
@slspencer is the best person to help you with this that I know of. Unfortunately, she’s really busy at this time with the program, so I’m going to try and head you in the right direction with the way that I would do it.
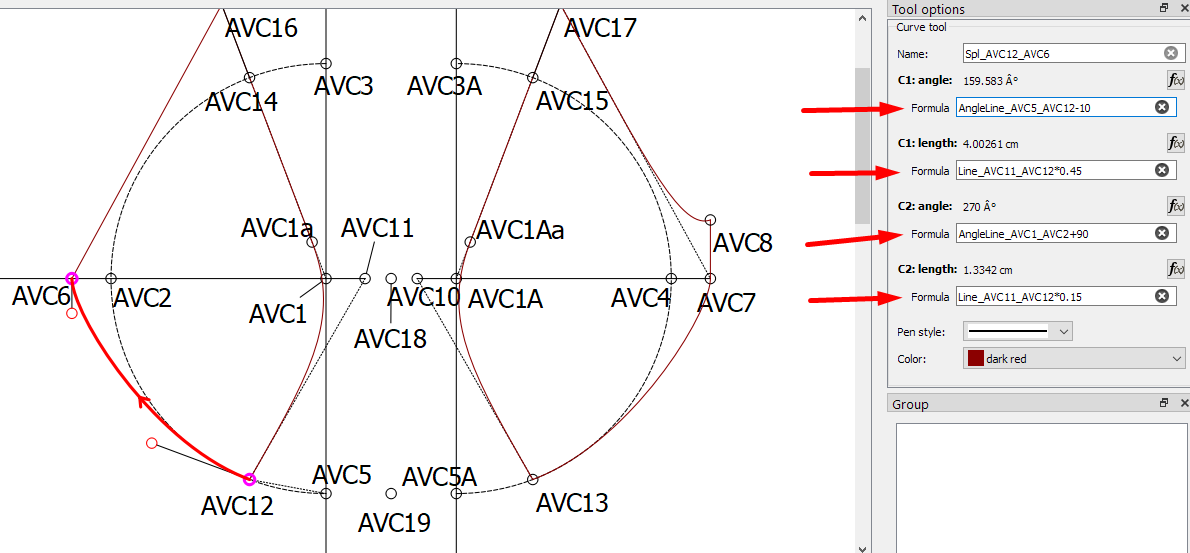
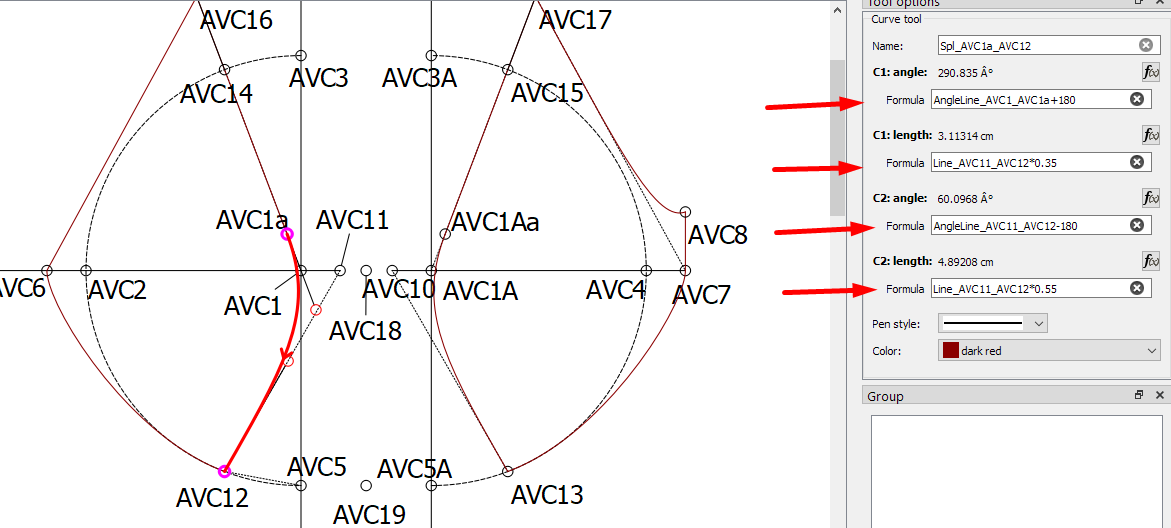
The secret of getting the curves to resize is with using formulas that reference the angle and length of lines in the pattern. These lines should preferably reference a measurement in the .vit file.
Once you have the reference line or angle in then you can start playing with percentages as I have done here:
To create a perfect curve would be to make the handle 55% long, so I start with adding * 0.55 to the end of my formula and then increase this or decrease it until it looks right.
As for the angle, you will see that I added a line from AVC5 to AVC12 (I had to do this back in the History since you’d already duplicated the left side on the right side, but this is a whole new topic that you can read up on). I used this as the angle of the handle in the curve at node AVC12 and then subtracted 10 degrees off it to get the curve to follow the curve of the arc.
The handle at AVC6, I referenced a line that goes at 270 degrees to have the curve going smoothly into the line AVC7 to AVC8 on the right side, and then I made the handle quite short so that it starts curving quite soon to keep a nice shape.
I can’t test the resizing but this should resize very nicely when you change the measurements file. Please let me know how it resizes
Here is your pattern file back, that I have made the changes on, so that you can see what I’ve done: Basic pattern bra size 80B (dutch)_a.val (10.5 KB) - You may have to point the pattern back to your measurements file when you open it the 1st time.
Thank you very much for answering my question. I’m going to delve into this and see how this works for me. Thank you very much. You’ll hear from me as soon I tried this on the other measurments.
Hi Grace, I used the formulas you gave me. I have left out the formulas that have been used for the cups (bust), as there are no fixed lengths. However, the AVC6-AVC12 and AVC7-AVC13 do. And I tested it with all cup sizes. Fine tuning becomes monk’s work I already know. As the cup sizes increase, the curvature lengths also deviate. Although mm, but that is very important for a bra. I think I should start making smaller nests. But for the time being, the formulas are working pretty well. Thank you for that. Greetings Esther
This text is translate with google translate, so probably not the best english.
Thank you very much I also use google translate a lot. However, the internet is a wonderful place. If you right-click on the page, there is a menu that pops up that gives you the option to translate the page, which makes me really lazy.
Thank you so much for your help. I tried to read your first suggestion earlier on, before I put my question here, but I didn’t understand it then and still have trouble to convert this methode to my pattern.
Your second suggestion is a total different appraoch of drawing a bra than I teach. Still, thank you for thinking and finding a solution for my problem. Esther
'k kheb haar ebook gekocht toen het net uitkwam (nadat ik al tien jaar haar vorig boek probeerde te bemachtigen :p) Maar ik heb helaas nog geen tijd gehad om het echt te bestuderen en testen. Maar ik vind het leuk om te weten wie met wat werkt, dan kunnen we elkaar helpen naar de toekomst toe
Mooi om te horen. Ik heb van Margreet toestemming ( als enige) om haar lessen te gebruiken en daar les in te geven. Het e-book is echt goed uitgebreid en omvat de omschrijving voor het tekenen van een BH.
Het vorige boek ( Een tweede huid) is een verzameling van alle basispatronen waar zij les in gaf.
Grappig om te zien dat er meerdere mensen gebruik maken van Seamly2D. Sinds dat ik het een paar jaar geleden naar het Nederlands heb vertaald zie ik steeds meer mensen het programma gebruiken.


 Esther