Hmmm… I still don’t know what this will look like with a really busy pattern and a small laptop screen but I can see the sense in it when it comes to deleted objects. And other than deleting objects, I really don’t know what the use will be or whether anyone will really use it ?!?
As it is now, if you are looking for objects attached to a line of node that you wish to delete, you can use the search in History - it will only be where you use the lengths in formulas that highlight in History.
I normally put them into groups to kinda ‘thin them out on the ground’ and then make a group for the final pattern piece before I create the Detail. I also make a temporary group for items that I want to include in a move and/or rotate or mirror so that I can get it right the 1st time, which I later delete. When all my groups are in place, I can close ‘eyes’ and zoom in when I want to edit the properties of something.
It would look like the File Explorer in Windows… using a tree widget, where for ex: a draft block is a folder, inside would be the objects, inside that could be the properties. Or think of inside a block folder there could be group folders, with objects inside those sub folders… where you can interact with the objects - like rename objects, change color or visibility, move objects in groups, etc. It’s all collapsible so it doesn’t take up space.
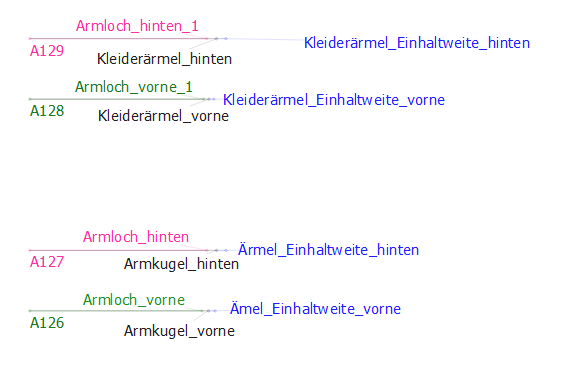
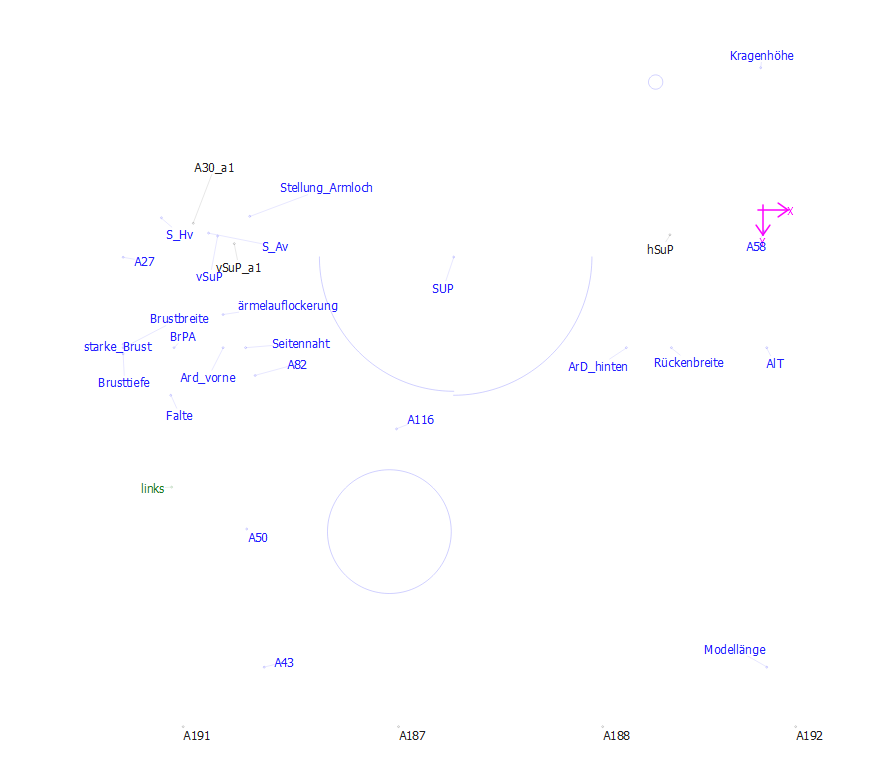
Ich habe für Maße eine eigene Gruppe angelegt. Beispielsweiße möchte ich immer die Länge von Armloch und Armkugel miteinander vergleichen, um die Einhaltweite im Blick zu haben. Diese Gruppe öffne ich nur bei Bedarf. Klicke ich auf die Punkte mit der Einhalweite der unterschiedlichen Armkugeln wird mir im Property Editor die Länge angezeigt.
Genauso verfahre ich auch mit den angelegten Gruppen für das Armloch, für die einzelnen Gerüste der unterschiedlichen Ärmel.
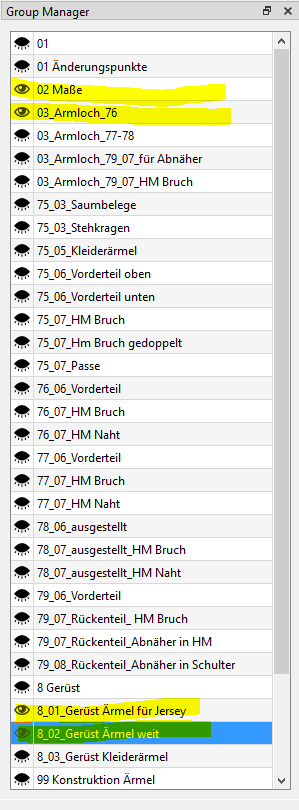
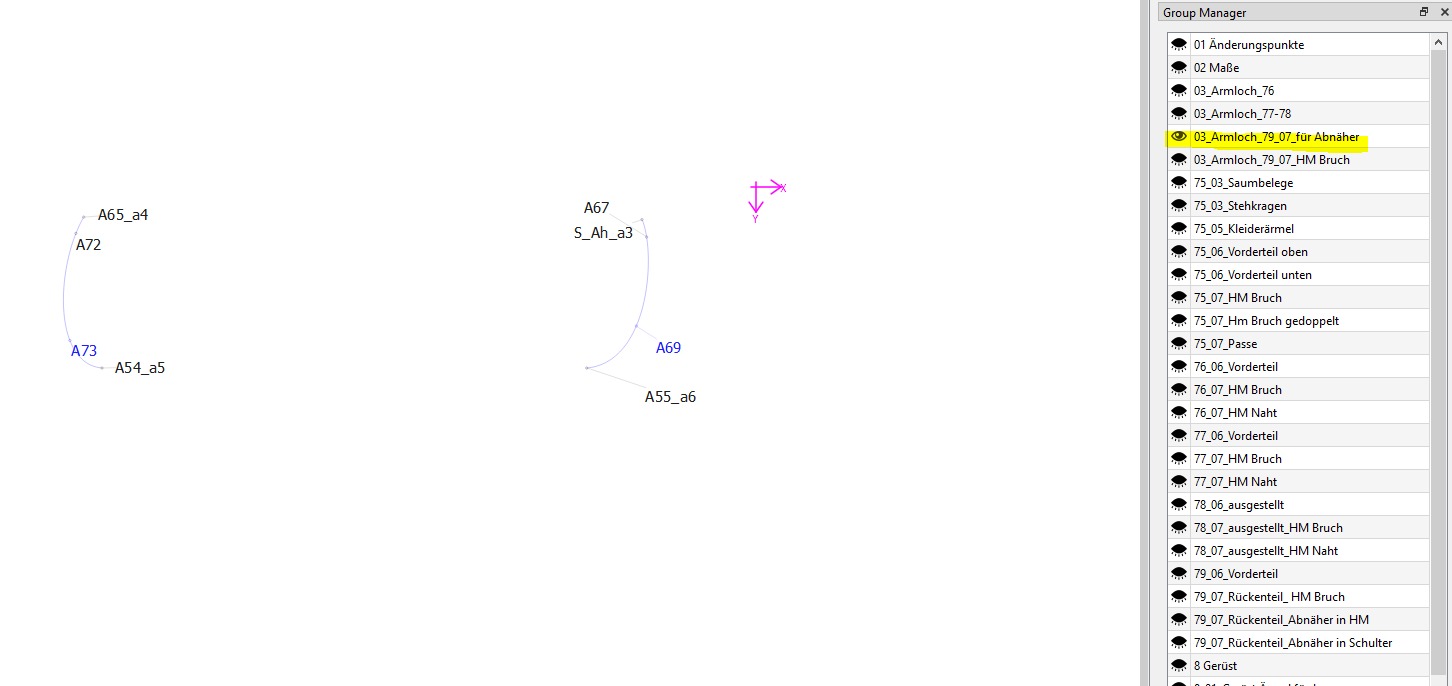
Bei der Ausarbeitung der Modelle setze ich Zahlen davor: hier 79 bis 75, wobei 75 das letzte Model ist und ganz oben steht. Sinnvoll wäre für mich folgendes:
Wichtig sind eigentlich die Änderungspunkte (01), die Maße (02). In diesen Gruppen ist halles hinterlegt, um sich Informationen zu holen ( Maße) oder den Schnitt an bestimmten Schnittstellen zu änder. Unter der Gruppe 03 befinden sich die Unterschiedlichen Armlöcher für die unterschiedlichen Modelle. Mit den vorangestellten Zahle habe ich dafür gesorgt, dass sie immer oben stehen:)
Leider wird dabei die Liste der Gruppen immer länger. Von Vorteil wäre es hier einzelne Gruppen gebündelt als Untergruppen zu führen. Diese tauchen dann in der vordertsen Liste nicht mehr auf.
Hier noch die Gruppe mit den Änderungspunkten (01 Änderungspunkte)
Auf einem Arbetsblatt habe ich vermerkt, für was diese Punkte gebraucht werden, wie sie entstanden sind und wie sie geändert werden müssen.
Bei Kunden oder den unterschiedlichen Modellen kann ich dann die entsprechenden Maße dazuschreiben. Hier wäre es gut, wenn man die Möglichkeit hätte wie bei Word in einem extra zu öffnenden Fenster solche Informationen zu hinterlegen.
Alles in Allem ist Seamly ein mega tolles Programm und spornt den Kopf dazu an kreativ zu bleiben und einen für sich gut funktionierenden Weg zu finden. Vielen Dank dafür
!
I think what I going to do (soon) is improve the Groups functionality using a tree widget rather than the current list widget. Once I get familiar with working with the tree widget, I’ll morph it into a more comprehensive Object Manager. I also want to try and include Drag & Drop to the tree so all you have to do is select objects and drag them to a group to add them to a group. This could streamline workflow immensely.
I’ve thought of this previously. It may be possible to program the groups so that a group can be a sub group. What we can’t do though is have any objects be a member of more than 1 group… otherwise you get into all sorts of strange behavior as to which objects are visible.
Then there’s the issue of how do you handle the visibility of objects in sub groups? Do sub group objects take on the visibility of the parent group?
I think @Grace alluded to this, where we could more or less eliminate the need for multiple draft blocks if we can sub group objects. For ex: you could have the parent groups Front, Back, Sleeve, and Collar. Within each of those you could have whatever various groups. Just like we have currently you could switch to the Front by simply hiding everything but the Front objects. The beauty of this is tge elimination of non accessible objects in other blocks as it’s all one block, but still maintaining the ability to only show the part(s) one is working on. Also, by using a Tree widget to display the groups in the dock, it would be easy to collapse the items down to the parent groups… leaving only the working group expanded.
Hmmm. Lots more work, but I think this would be well worth the effort.
Oh, wow! @Scholli I think you’re a master at making Seamly and the groups work for you. I’m in awe.
Yes, the different draft blocks may work very well for some, but I have difficulty in joining the pieces together with the Union Tool in Piece Mode. So if one can have all of the pattern parts on one draft block, then one can use Move/Rotate to join parts on the Drawing board before creating the Piece Mode item.
I’m still a bit in doubt about the ‘Tree Widget’. Especially if objects can’t be placed in multiple branches. Because, for instance, if I’m changing my existing master bodice pattern and sleeve into a raglan, I’d rotate & move the sleeve to meet with the armhole and shoulder line of the bodice. I’d cut the bodice shoulder portion from the neck to the curve point of the armhole and join it to the sleeve, thereby creating a new pattern piece, which would normally go in it’s own group and be labeled accordingly, but it would still be a down-line of both the bodice and the sleeve.
Shew! My pea-brain just isn’t wraaping itself around this at the moment. I’ll think about it again.
The tree widget has nothing to do with it… it’s just a wayv o display the data. No matter what way you show it , we cant place objects in more than 1 group. For example… if you place an object in Group 1 and Group 2, to see it both groups have to be visible to see it. If you add it to a 3rd group all three have to visible. But what if Group 3 has objects that are in Group 5 and 6? It gets out of hand as to what needs to be turned to see anything.
Yes, that’s why I like the groups we have at the moment, where I can put everything into one group and then pick out certain things to put into another group. When I close the eye on the 1st group, I see only the items in the 2nd group. This comes in handy when doing rotations or moves or selecting objects in Detail to have the things that you don’t need hidden and out of the way, so you don’t have to do things more than once to get it right
Was wir jedoch nicht tun können, ist, dass Objekte Mitglied von mehr als einer Gruppe sind. Andernfalls geraten Sie in alle möglichen seltsamen Verhaltensweisen, wenn es darum geht, welche Objekte sichtbar sind - Zitat von Douglas
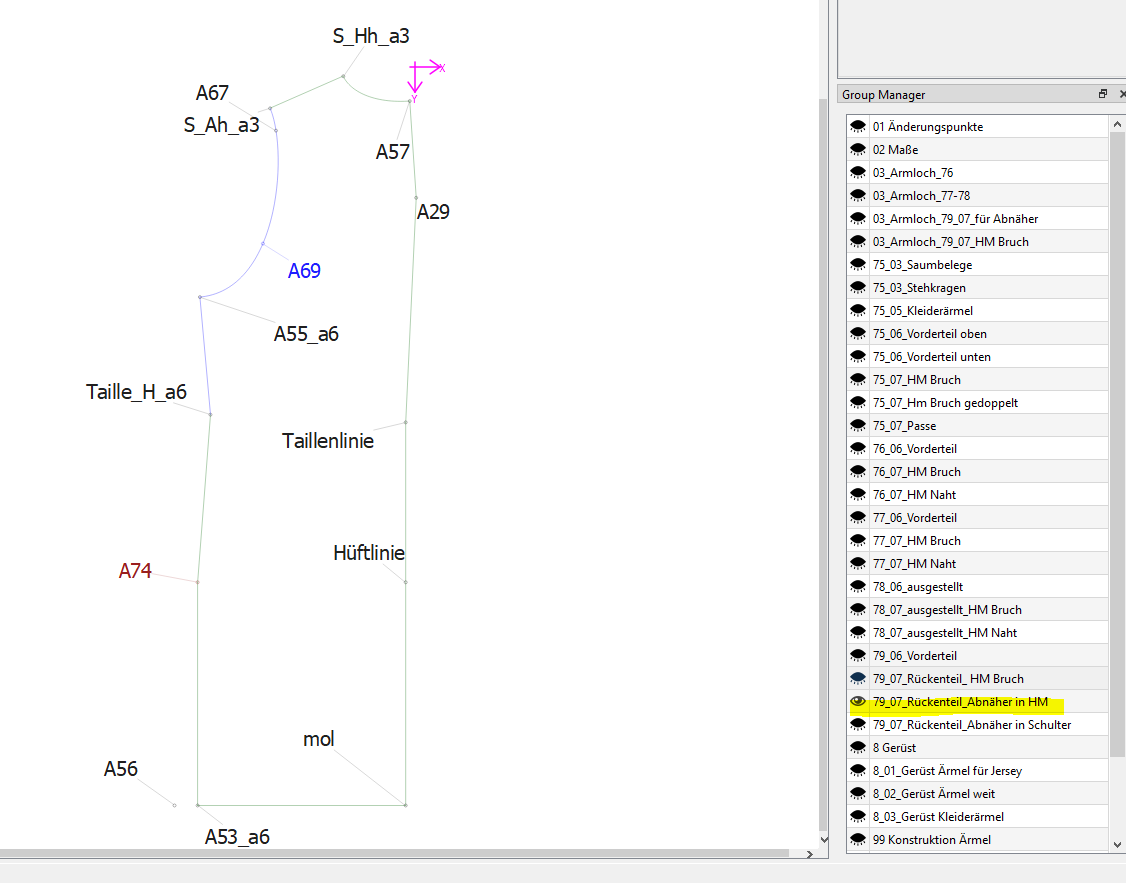
Das verstehe ich nicht - ich habe z.B. drei unterschiedliche Armlöcher in einer Gruppe (03) Dann kommen jeweils das passender Armloch wieder in der Modelgruppe vor: z. 03_Armloch_79_07_für Abnäher passt zu der Gruppe 79_07_Rückenteil_Abnäher in HM und zu der Gruppe 79_08_Rückenteil_Abnäher in Schulter
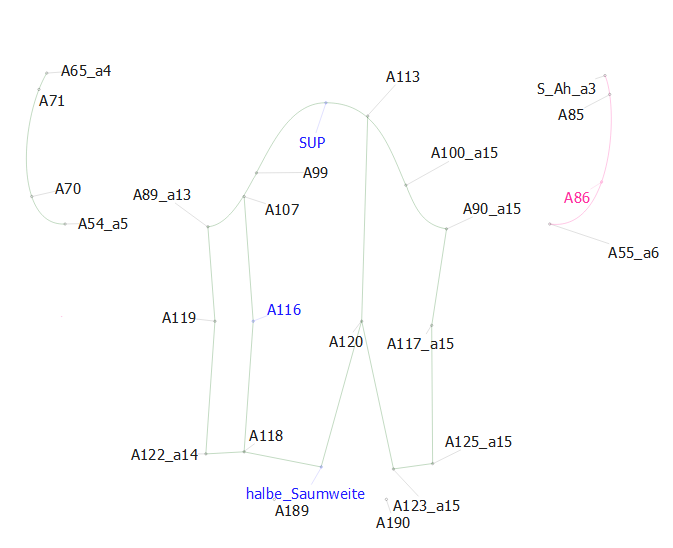
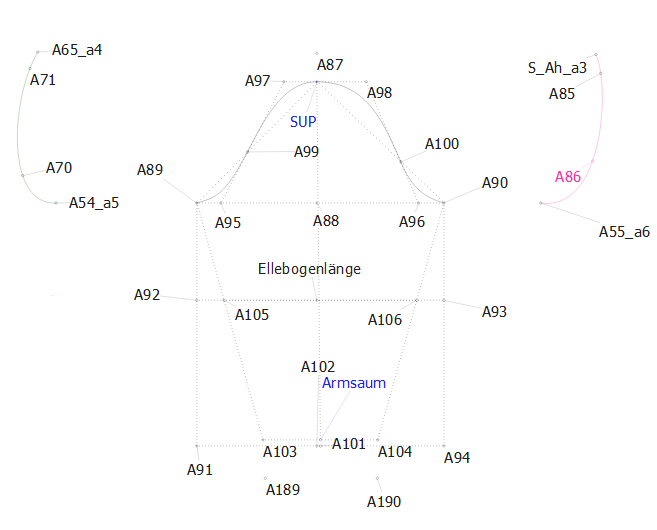
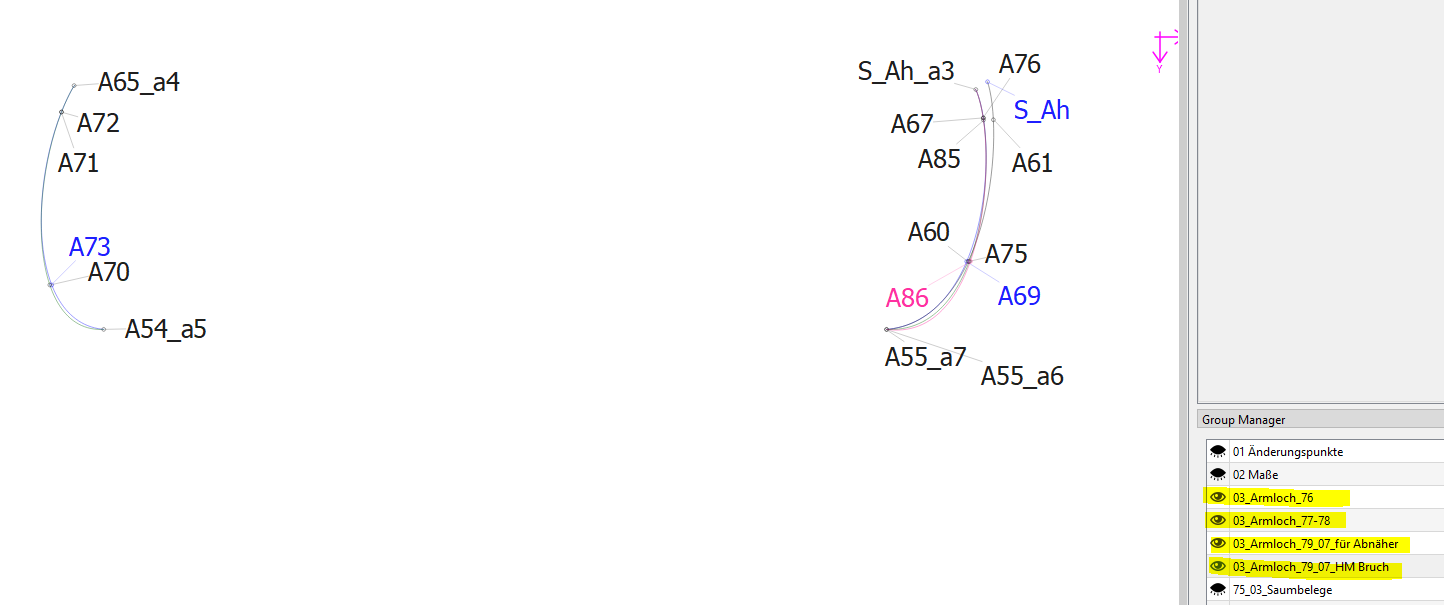
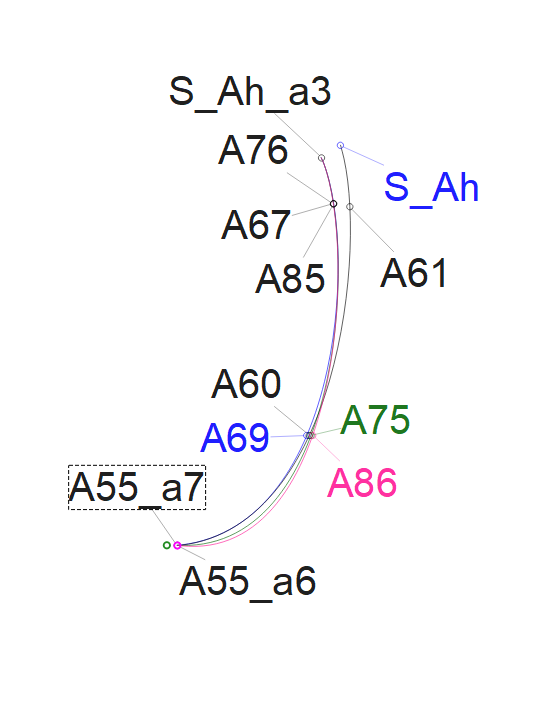
Im nächsten Bild habe ich alle Gruppen nur mit dem Armloch sichtbar gemacht und in unterschiedlichen Farben gezeichnet. Die Unterschiede sind nicht groß, dennoch beim Nähen wichtig, da sie auf die unterschiedlichen Winkel der Seitennaht und Schulter zurückgreifen.
Was mir dabei aufgefallen ist und vielleicht auch anders gemacht werden kann:
Die Einsatzzeichen der Ärmel habe ich auch in den Farben der Kurven angelegt. Dafür habe ich das Werkzeug Punkt schneidet Kurve und Achse genommen. Bei den Einsatzzeichen mit den Punkten 76, 67, 85 und 61 konnte ich keine Farbe hinterlegen. Das benutzte Werkzeug war Punkt auf ein Kurvensegment. Wäre es möglich diesen Punkten auch eine Farbe zuzuordnen?
You said it yourself This is exactly the behaviour that I do so like and practise.
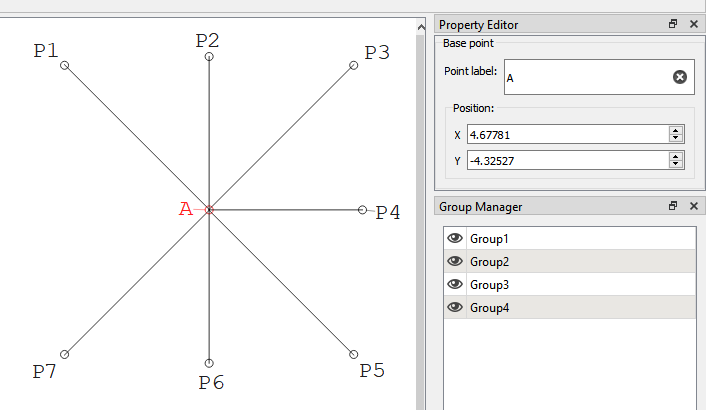
You need to choose only the items that you want visible in one group, while all of the objects are in a larger group. So, to hide P3, you will have to exclude from all of the groups and put it in a group of it’s own. At the moment, it is included in Groups 1,2&3, which also have other objecgts in them.
In this case, you can’t. It’s all in how you set up your groups.
If all of the eyes are closed, except Group 4, then you will only see P6.
Exactly… an object should only be in ONE group. To hide P3 you have to toggle off Group1, Group2, and Group3. Illogical.
Currently the groups are severely flawed. Again I will refer to how Inkscape would handle this… what should happen if you try to include P3 in a new group, P3 should be removed from it’s current group, and added to the new group, thus maintaining the 1 group limitation.
That’s unintuitive, and presumptuous that a new user would understand that - especially given no other graphical app works that way. You shouldn’t have a feature behave one way in one case, and another way depending on something in another case. The behavior (given the current setup) should be if a Group is toggled off, ALL it’s objects should be hidden, and vice versa. You shouldn’t have to know what convoluted combination of group toggling is going to show / hide any given object. Not to mention - and someone can correct me if I’m wrong - but part of the big picture of the project is to be able to share patterns, where a user should have a reasonable expectation of how the Groups behave, and not have to analyze how someone else setup their Groups. In other words - if you click something - something expectable should happen. In all the cases of how I setup the groups nothing is expectable, and in one case nothing happens.
So, all items in a visible group are visible. Hiding a group only hides items that are not part of another, visible, group. This sounds intuitive to me.
So if I wanted to make a vest, cravat, & trousers all on “A” drafting block I could include point A in the vest group, the cravat group, & the trouser group without having to worry about losing sight of it if I just want to see one of the drafts.
On the other hand with you working on making groups useful for more than just hiding superfluous objects, I can see that it wouldn’t be nearly so neat.
For instance, if I wanted aforementioned hypothetical to have a dash-ing dark red cravat, blue dotted vest, & solid dark green trousers; what color would point A be?
It almost seems more convenient to have two types of groups.
Huh? In what universe? The whole concept of grouping objects. - in any application - is to apply the group properties to EACH member… you can’t do that if you allow objects to belong in more than one group. Not to mention, we’ve only been talking the visibility property here… what happens to a group color, linetype, lineweight… or any yet to be determined group properties if you allowed an object to belong in more than one group? It would be a mess.
Simple. Don’t put point A in any group. Create a vest group, a cravat group, and a trouser group.
Exactly. Although I can definitely say it will be Red, as that’s what all basepoints are… on purpose.
I don’t see how. Each tool object has a boolean visibility member… when you toggle a group, it toggles the visibility member of each object. You could have 10 ways to do groups, but it still comes down to whether the object visibility is toggked on or off, and subsequently the associated qgraphicsitem that you see on screen. If one group way changes, it pulls the carpet out so to speak of any other way of grouping objects. That’s more or less what currently happens… as you have to toggle this, this, AND this, but NOT that, OR sometimes both, XOR sometimes neither.
On the other hand I could try and maintain the current behavior by including a preference to use “old style groups”, but I have no idea how that would work / look with all the other group properties I plan on adding? I suspect for example a tool would take on the props of the 1st group that is found that contains that tool object… or not. I seem to recall I previously added in my earlier fork a “groupId” element to each tool that was used when parsing a pattern file, that’s used to get a tool’s group properties.
These are helpful, but it would also be useful to be able to specify length lines/angles on the final design being printed similar to how you print the labels. Let’s say I wanted to print a soft copy but simply use the output as a reference as I draft the varying blocks on the actual cloth. After designing, drafting, I can have an output showing this line is 2", pants length is 4.25 inches etc.


 This is exactly the behaviour that I do so like and practise.
