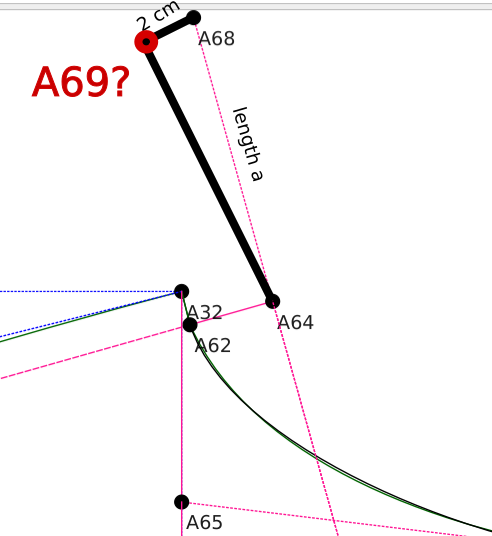
I have a problem that I cannot directly solve with the Seamly tools, probably because I do not know them well enough. For the construction of a collar, I must find a point A69, given the points A64 and A68, the length A68-A69 which is 2 cm, and the fact that the angle between A64-A69, and A69-A68 is 90 degrees. See my drawing for explanation.
I have been looking through all tools, but could not figure out how to solve it. Eventually I solved it by calculating the angle between A64-A68 and A64-A69 as atanD(2/lengthA64-A68), and setting the length as sqrt(LA64-A68*LA64-A68-4), and that did it. But I guess practicing one’s highschool maths is not the usual way to proceed?
Thanks for any suggestions!
2 Likes
I’ve had to resort to remembering my high school math too - so it’s not that unusual… but since I have to get back to my real job ![]() I’ll take a look later, and maybe offer a solution using the existing tools if no one else does in the mean time.
I’ll take a look later, and maybe offer a solution using the existing tools if no one else does in the mean time.
BTW… as being one of the devs - also feel free to offer suggestions for the application(s)… such as a tool that doesn’t exist that could be useful.
2 Likes
@peterh I did something like that once too! & like that time it turns out that using arcs is way easier. Here’s [the hard easy way]:
- On point A68 make an arc with a radius of 2cm. It only needs to be in the direction of the new point, but I like using full 0°-360° arcs.
- While you have the arc toolbox open anyway select the
Tangency Point of Arc and Tangenttool (key: AT) - Select A64
- Select the arc on A68
- That’s it! You can verify that A69 is properly placed using the
Point on Perpendiculartool (key: PP)
Best wishes
![]()
2 Likes
That will do it.
Just to add to what @Pneumarian said… since there may be 2 tangent points, there is an option to use the 1st or 2nd point. You will have to determine that when you see which side of the arc the tangent point is on. Also, in cases like this it best to just draw a full circle 0 and 360 degs. That way you will be guaranteed a tangent point. If the arc is not long enough to have a tangent point, the Origin point 0,0 will be used as a place holder, otherwise the pattern would crash. Think in terms of multiple measurement files. Changing to a different size can move points, or change an arc radius, resulting in no tangent (or as in other cases intersection points), and if you base subsequent points on the tangent point it HAS to exist or the pattern crashes… thus the origin point as a place holder. Some of the intersect tools I put in a message box stating an intersect not found, and the use of the origin. The tangent tool I have not, but I have made a note to self to do so.
2 Likes
Thanks for that note @Douglas! Yes, it will be necessary to use the second point in this situation. I forgot while posting. @peterh I’ve also realized a single-tool method:
-
Intersection Point of Circle and Tangent(CT) also in the Arc toolset.
- Select A64
- Select A68. Dialog box opens.
- Take second point; Radius
2, or whatever formula will make it be correct for all probable measurement sets for your use.
Same effect, less circles cluttering your work surface!

2 Likes
Thanks for the tips, @Pneumarian and @Douglas. I will try them and solve this problem the elegant way. @Douglas, I have experienced already that the origin is sometimes chosen as the default if an intersection or tangent cannot be found. It has a quite awkward effect on the user interface, especially if the origin is far away. At one point I even lost my drawing in an immense white space where I could not find it back. Would it be possible, in this case, to use a more nearby default point? You could think of the middle point between line and arc, measured along the perpendicular to the line that goes through the centre of the arc. It would be relatively easy to retrieve this point, and it would have the advantage of being nearby and not distorting the drawing space, while the user is warned and can search for more appropriate parameters. I cannot oversee the possible consequences of such a change, so maybe it is a futile suggestion… Anyway, thanks - I can go on discovering the programme! Peter
3 Likes
You can use one of the Zoom tools - Zoom 100%, Zoom to Selected , etc to find the draft blocks again.
That being said, maybe I could add a Zoom and center on the Origin point?
No. The ONLY point that never changes, and can be relied on is the Origin. Any other point in a draft block has the potential to move out of range.
2 Likes
Hey… I was just testing something else and tried the Intersection Point of Circle and Tangent, and thought of something I can add to the tool - create the 2 lines LINE_A69_A68, and LINE_A64_A69 - like I did with the IntersectXY tool. I already subclassed a 2 line class, so it would be simple to drop the code in. It would save having to add those lines seperatly if one needs one of those measures. There’s probably similar tools where it would also be nice to have the 2 lines.
4 Likes
Sounds wonderful ![]()
What do we think the zoom factor should be? 100%? Or whatever the factor is that includes all draft blocks? Or do I just make a Center to Origin tool, where you would select one of the Zoom tools, then move the view to center on the Origin?
2 Likes
I’d lean toward 100%. Just centered would be OK, but all blocks would be a nightmare in the case of any pattern big enough to lose the origin point in the first place.
1 Like
That’s my thought too. I just tried Fit All with a pattern I’m testing with, and it zooms to 9.2% with only 5 draft blocks. Point names don’t even appear until 24%. What would be real handy is to implement the Object Manager I’ve mentioned before, where you can just click on an object in the tree - including the origin point - and the view moves to that object.
5 Likes
I agree that 100% is a reasonable option. The point is to find lost content if you have managed to pan yourself into unknown territory. Actually, “Center to Origin” is a more accurate description of what I was asking for. The zoom factor is not particularly important to me, since it is easy to zoom in or out. I also really like the idea of the Object Manager.
2 Likes
Center to Origin works if you’re already zoomed at a reasonable scale, but if you’re zoomed way out, and center to origin you still won’t see anything, and then do to the nature of the zoom - the fact it centers on the mouse position - as soon as you zoom you just lost the origin as center. That’s why I think we’d have to zoom to some reasonable scale while centering on the origin.
4 Likes
agreed, and 100% zoom works for me
1 Like