Hello I just wanted to run something by the community before I get in over my head.
I created a pattern that I really liked, and hoped that if I made a couple of changes to some of the points, I could make it more extensible.
So in draw mode I added some points, but noticed that I cannot just simply connect certain lines or objects to these new points (as they will not be shown in the drop down). Possibly because older points cannot be connected to all newer points?
So I got to looking in the .val pattern file with a text editor, and I can see that within the tags, every point has an “id” and a corresponding name (example id=“5” name=“existing-point”) as well as any relevant “firstPoint”, “basePoint” etc.
And I noticed when I create a new point within Seamly2D, the new point that I create is added to the .val file, and has a much higher “id” (example id=“1549”) and will be placed at the very bottom of the “calculation” points within the tags.
So…
I just simply moved that new point up the list (above the object that I want to connect it to) and now it shows up in the dropdown when I am editing the point via the “options” menu.
I got a little carried away and was performing edits directly via the text editor, and at first I had some parsing errors as I didn’t realize the complexity of the hierarchy of points, and the way they were associated with other points (via basePoint, firstPoint etc.). But as I replaced the existing point dependencies the parsing error was resolved and now the pattern file opens right up. And I can make some fairly intricate changes now via the actual code in the file.
So now I am curious if it is okay to leave the new point higher in the list even though the id is also higher (example id=“1549”)? I would assume so, as the id is in fact unique. The program appears to be working just fine.
*Feel free to move if I put this post in the wrong area.
Sjoe! That’s a major task that you went through The ID’s are only a name for the different points and it won’t matter where they are in the file.
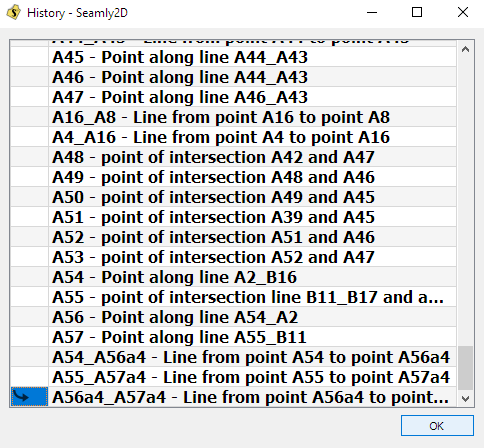
An easier way would be to use the history to add points to a specific point in time. You can find a short section on using the History on Pg 6 of the Seamly2D Quick Start Guide ebook that you can download from here:
Click on History in the top menu, and then on History again (or press Ctrl/H) to open the History box. Scroll down to where you’d like to add a new node and click in the margin, you can move the box out of the way while you add your nodes and when you’re done, click in the margin on the last line and click on OK.
Ahh! That’s a nifty trick for creating a node in a specific point in time. Thank you.
Outside of my much more involved method, do you know of any other way to change the specific point in time of an existing node?
Well, I hope you had a backup-copy
I can perfectly understand that you play around with the code of the .val, but I really strongly suggest to work on a copy and leave the “master” as it is
Oh yeah, I always work on a copy. But now that it appears that the methods described above work appropriately, I think I can move ahead using this modified file.
Knowing that I have the ability to change nodes in history (either via the history window or a text editor) will be a good skill to have as it can allow future customization of previous patterns.
No, but I do think that it’s extremely seldom that you find that you need a node 3 nodes back when you’re trying to use it 3 nodes in the future. Normally, you’ll find that you need a node 3 nodes back and once you place it, it will be available 3 nodes in the future


 I can perfectly understand that you play around with the code of the .val, but I really strongly suggest to work on a copy and leave the “master” as it is