I am new to Seamly2D and I am curious if anyone else has experience with using the software to grade, or to create different size pattern blocks? For example, I am creating a basic bodice block for 4 different models who all have different body measurements. The formulas for creating the block and the steps remain the same, so is there a way to save the pattern I create and just input different measurements?
Thank you! So just to be clear, I should be able to load in different measurements to the same pattern and just “save as” a different file name to create different size blocks? I have uploaded all the model measurements to SeamlyMe, and I am familiar with how you load measurements into a new pattern. I just haven’t tried changing out the measurement files yet.
I am a fashion design student and I am creating a senior collection with 7 looks, so being able to streamline the process using Seamly2D is really making all the difference!
That’s right! Just go to the Measurements menu & Load Individual, then Save As... if you want a separate copy of the pattern with the new measurements. I’m guessing that you’ll need to export the layout for your school, so saving the file with the different measurements might not be worth the trouble. If you need help with using multi-size measurements, @Grace has experience with those.
I will ultimately be printing out each block and sewing up a muslin/toile to fit on each model. I have seen others have success printing using the export as PDF and then printing using Adobe Acrobat. I plan to print a large scale print at Fedex.
I’m not sure what you mean when you say that it may not be worth the trouble? My goal is to be able to create different size blocks custom to my model measurements to then use later to develop patterns off of, that will custom fit each model. I am not familiar with the multi-size function. What is the purpose of it?
Simply that it can be exported without saving, & some organizational methods would prefer having one master pattern to which the individual clients measurements are loaded as needed, rather than multiple copies of the same master pattern, -one for each client. & I’m not making a judgment as to which method is best for you, but feel that knowing of multiple options is important.
It’s for if you’re making ready-to-wear garments rather than made-to-measure. It can also be helpful for proofing your formulas, without needing to measure as many individuals.
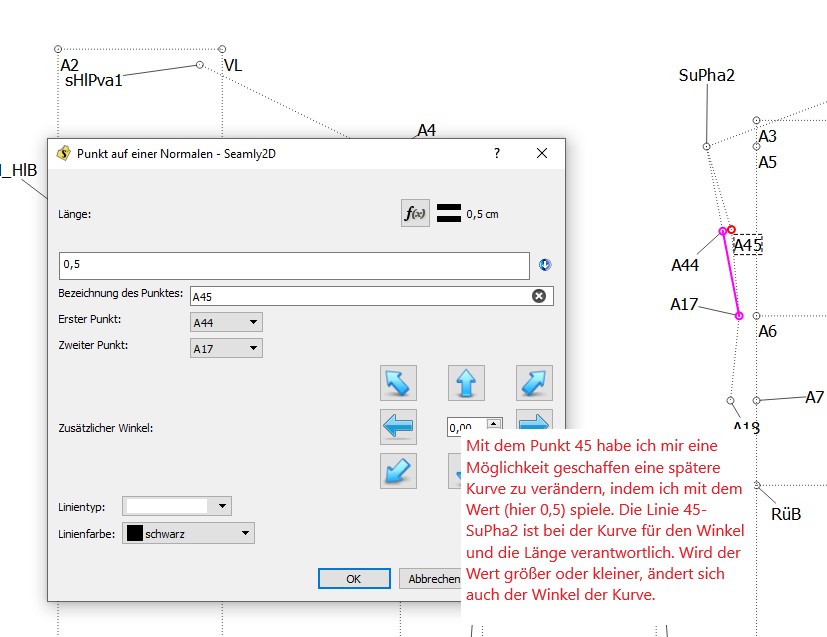
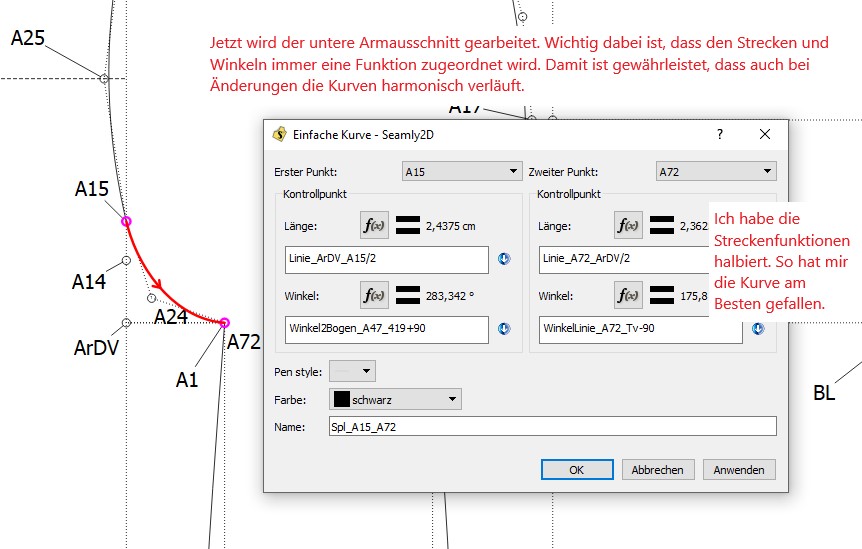
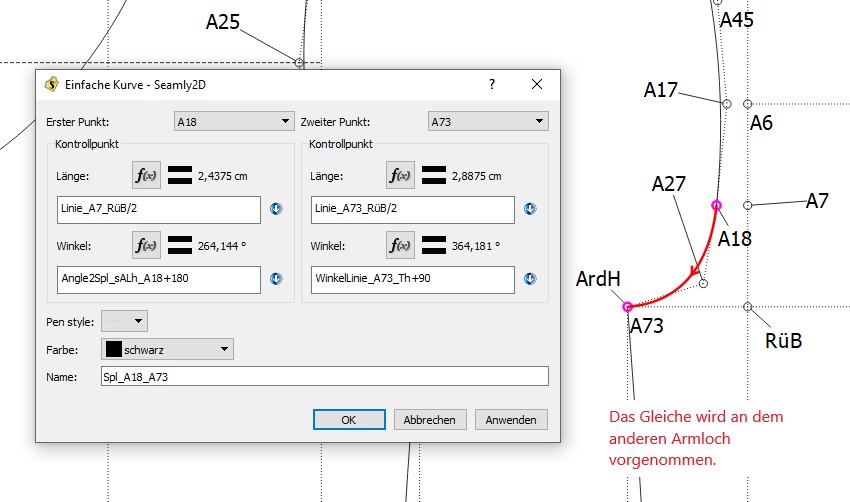
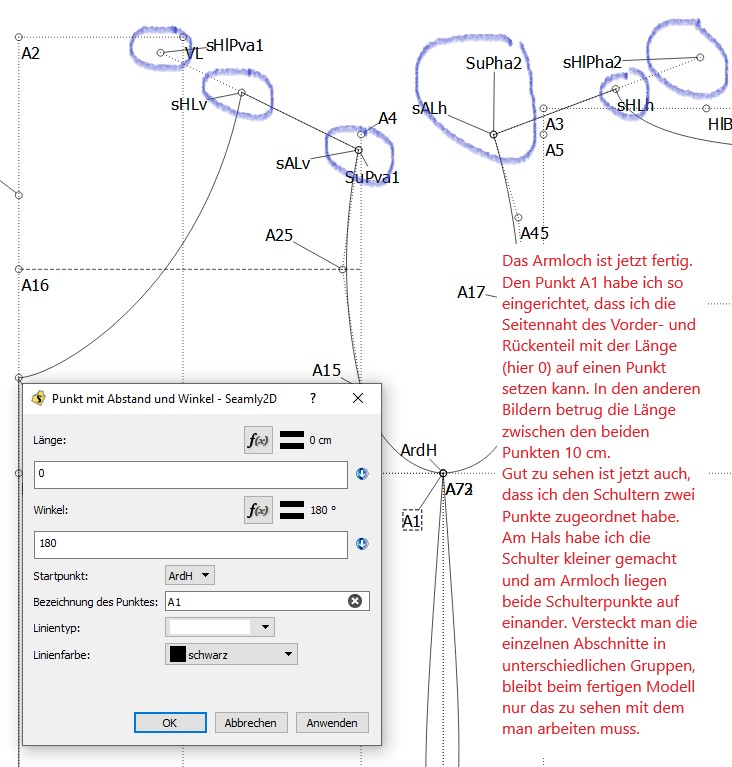
Hallo @Natdellas ich habe mir angewöhnt alle Schnitte in multisize anzulegen. Im Schnittblock habe ich immer eine Gruppe mit Änderungspunkte. Dort sind die Punkte hinterlegt mit denen ich einzelne Maße gut und schnell ändern kann. In Multisize habe ich die Möglichkeit schnell zwischen den normalen Größen zu wechseln. Die Sprungbeträge kann man selbst bestimmen und hinterlegen.
The beauty of Seamly2D is that you can make one basic pattern which you can use as the base for other patterns. You will need to save your basic pattern under a different name when you load it to start getting creative for each new design. This saves you the trouble of creating the basic blocks over and over again.
Each person or pattern making system uses a certain set of measurement areas that they use in their pattern making, so it stands to reason that these measurement are used in making the base pattern, so for each person, you can create a measurement file of the same measurement areas and you can resize the pattern by simply changing the measurement file.
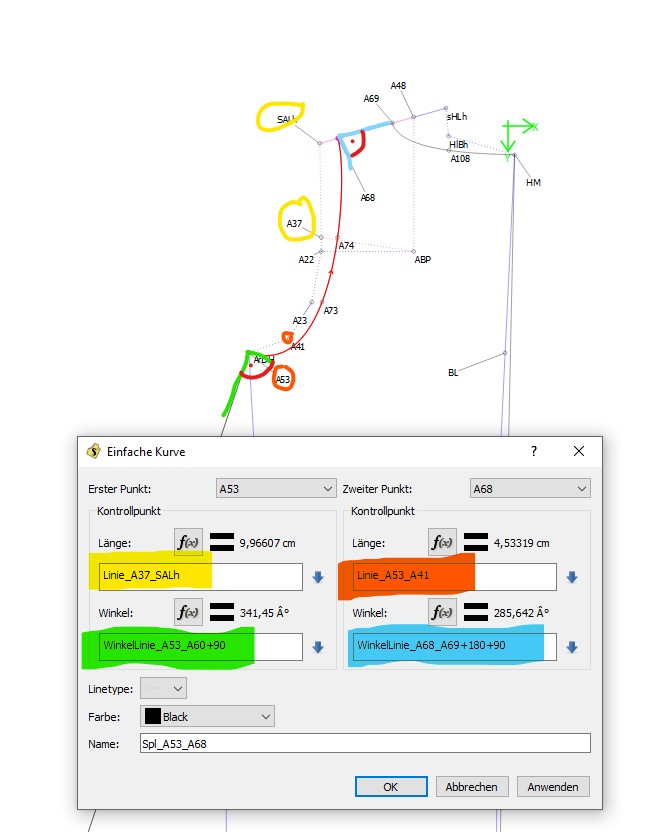
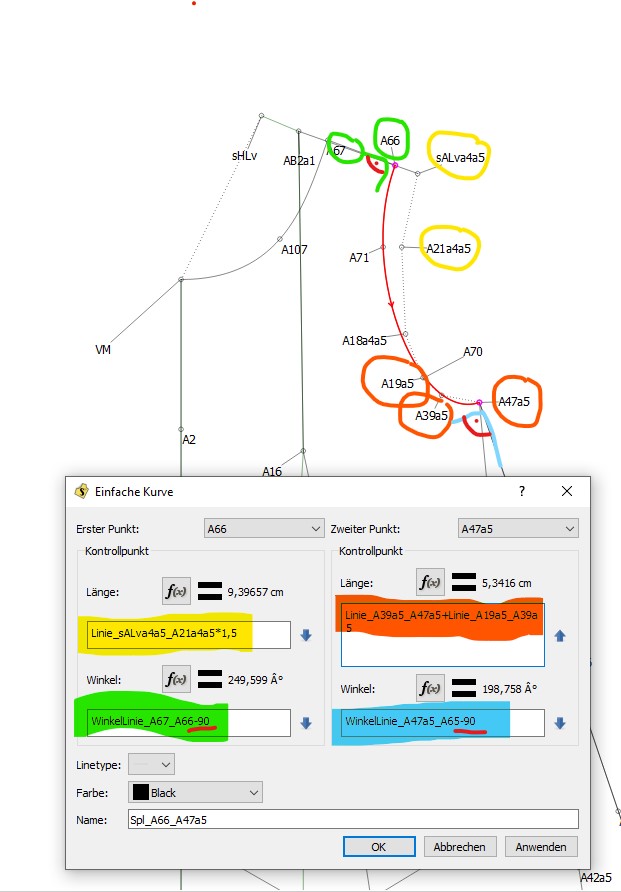
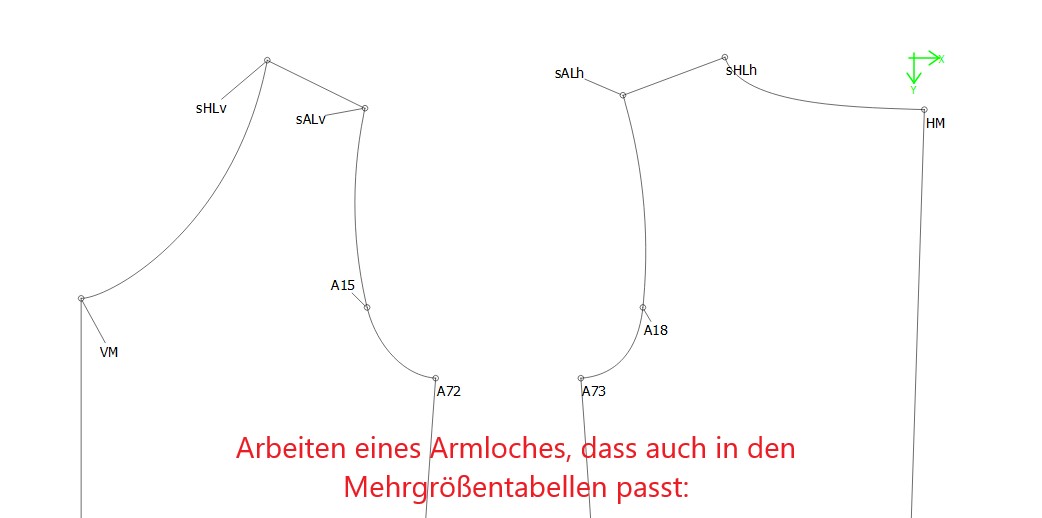
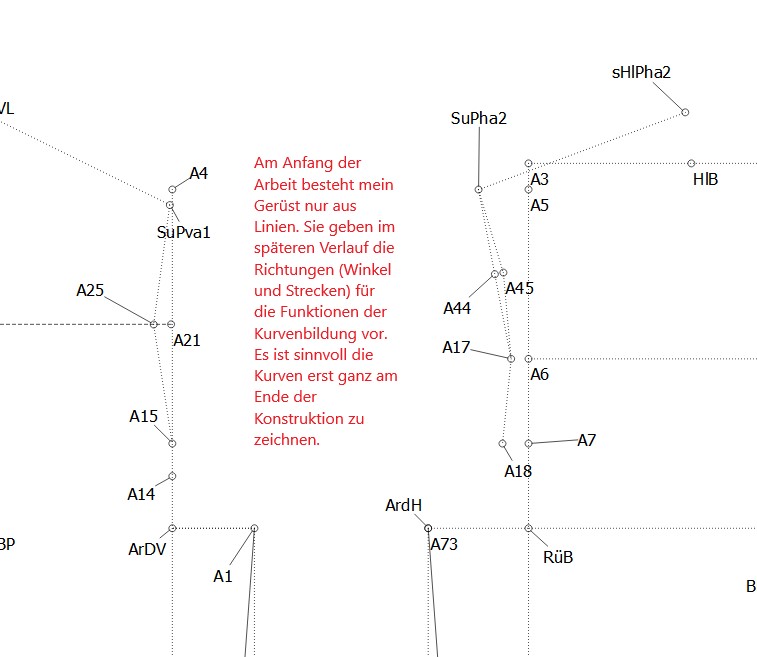
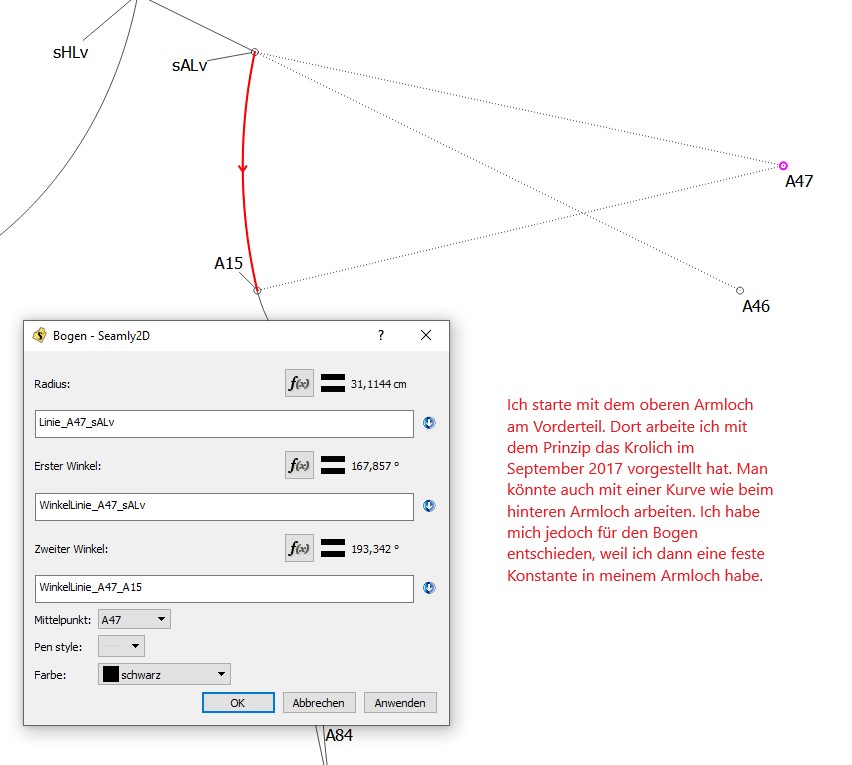
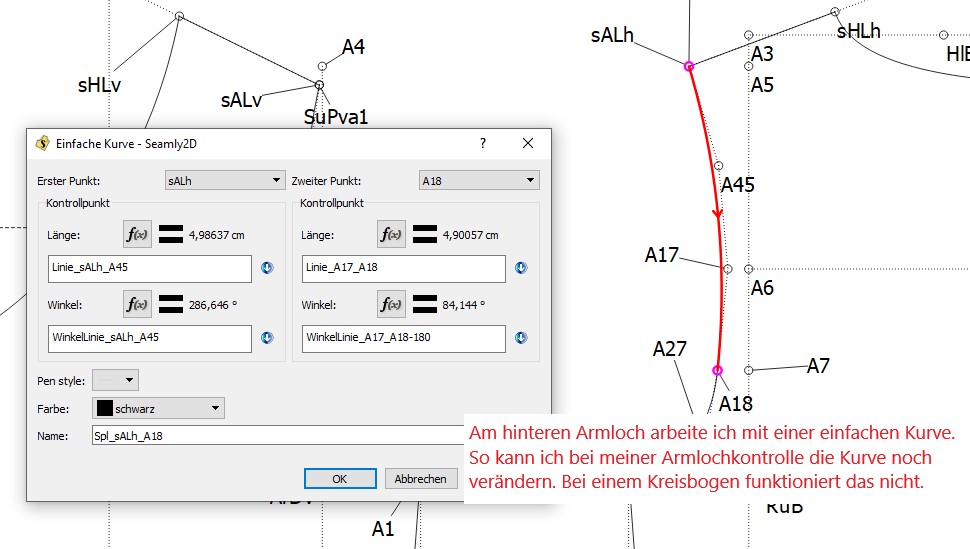
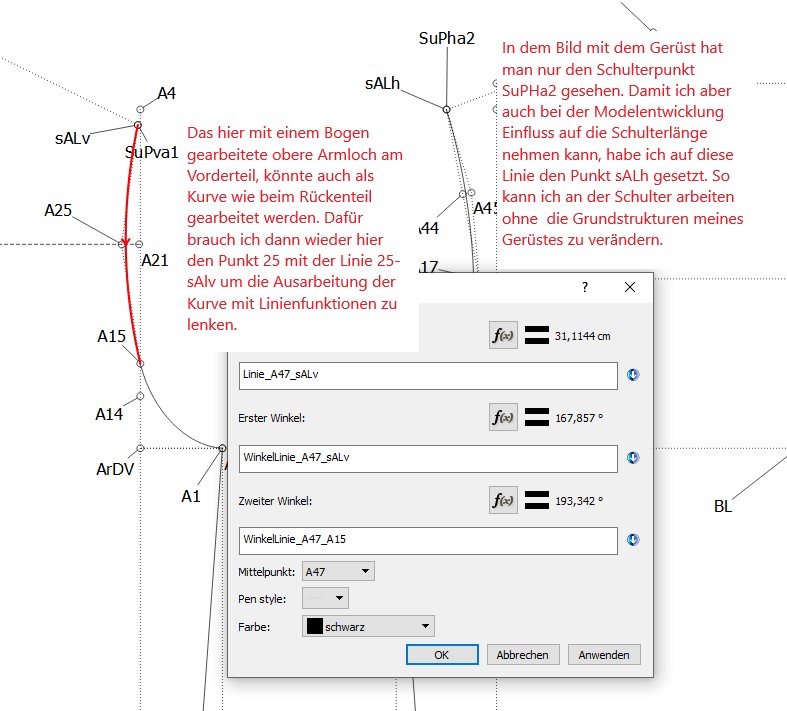
There are some areas that may not work so well, that will need some careful thought while making your basic pattern and any additions/changes to it later - the main one is the curves. If the difference in size between the different measurement files is quite big, then these may not curve so nicely. To overcome this, one uses formulas to create the angles and length of the curve handles to make sure that the transition between sizes is consistent.
This sounds very complicated, but with a little practice, it becomes 2nd nature
Like @Scholli, I do all of my drafting using a multisize measurement file so that I can change the sizes while I’m busy and check that the curves work perfectly at each curve. However, once my pattern is made, I often load an individual’s measurement file to export the pattern for printing.
I tried out using a basic jacket block and resizing it to a different model set of measurements and I see what you mean about the curve. I don’t mind going through and doing a bit of editing to each block, it’s just really helpful to be able to not have to go through and recreate the same block from scratch each time.
I will have to play around with multi-size as I am not familar with how it works/functions, but it seems like it may be a good option for me going forward.
Do you have any tips for creating curves? Do you just play around to get the right angle and length or do you already know what angles and lengths tend to work in different situations?
yeah… right… It becomes a total pain because when you’ve edited for one size, it won’t work for another size, so the editing becomes endless and almost totally negates the beauty & ease of using Seamly2D.
No, you need to use the formulas to reference line lengths and angles used in the pattern to get the handles and angles to change automatically when one changes the size of the pattern.
I’ve made it a habit to use formulas that either access the measurements, variables or parts of the pattern as much as possible, while drafting, specifically so that everything resizes correctly over various different sizes. Only in very special cases (or in the 1st few strokes) do I use a direct length or angle.
I have a few topics on my blog that may interest you but I still need to do a detailed one on curves.
Here are 2 topics on here that got me started with curves:
Oh wow! Lots to learn. Thank you for the in depth response. I will be sure to check out your blog to learn more about this. I really appreciate your insight.
Ahhh… @Scholli, thank you very much for this. I’m going to have to OCR all the images so that I can translate the sentences to English before I can try your methods
Hello @Scholli Thank you for your reply. I have not tried out the group function yet. This sounds extremely helpful for staying organized. As I have gone through and loaded different individual measurements into my pattern blocks, I have kept a list of which points I need to go through and edit, but having them all in a group would make that so much easier! Thanks for the tip.
If you have measurements in a .vit file, you will need a new measurements file. Since you are specifically designing this pattern for standard measurements, you should be using a Multisize, .vst, measurement file.
I’m not sure what the numbers in the Base size field are supposed to be referring to, but they are merely affixed numerical identifiers for size variation, you can decide what sizes they refer to yourself.
Or, yes, you could just use a different individual measurement file for each of the standard measurements, & go to the Measurements menu & Load Individual every time you want to use a different standard size.
You did make an individual size file, right? When making a new measurement file, select the dropdown that reads “Individual” & change it to “Multisize”
When in the New measurement file creation dialog you have selected “Multisize” instead of “Individual” you should notice that right beneath that section, a previously greyed-out option reading “Base Size” will become active. It’s technically more of a dropdown. The default “Base Size” is 50. You can probably ignore the Base Height option.
With your heart. Since it’s a rounded number near the middle of the list, 50 is probably a good choice to use for Medium or Large, depending on if your system works best for smaller or larger garments. You probably want to put a note in the Information tab to remind you/others when viewing your measurement file later.
As Ms Frizzle taught us, “Take chances, make mistakes, get messy!” (But save first, for safety!)
 I really appreciate your insight.