Creating Multisize Measurement Files

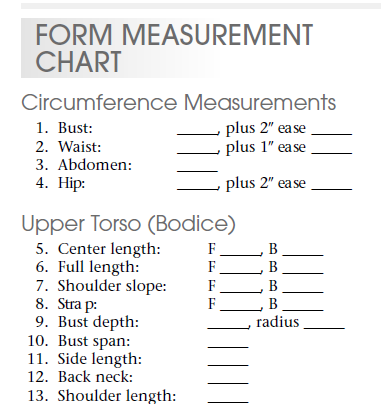
I take my time about setting up a spreadsheet with the pattern system’s own sizes measurement chart, if necessary, I convert the inch measurements to centimeters - because I prefer to work in centimeters - and I establish how many sizes have one grading amount before changing to another grading amount.

In this example, I’m using Helen Joseph-Armstrong’s book: Patternmaking for Fashion Design.

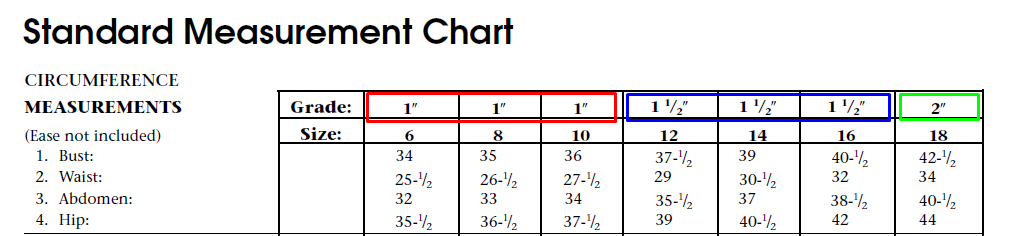
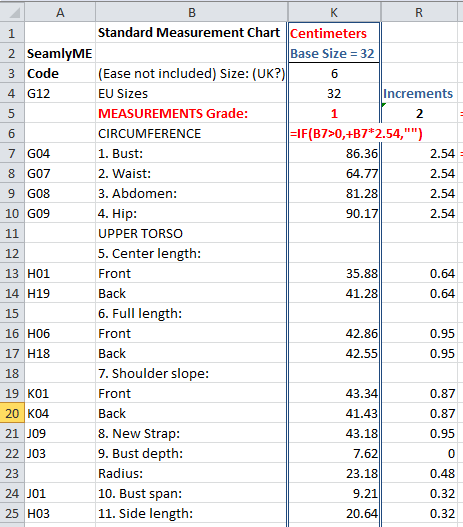
As you can see, she has already divided her standard measurement chart into 3 sections. I’ll only be working with the 1st section with the sizes 6 - 8 with a 1" increment in grading.

Once I have everything set up according to the book, I then add SeamlyME codes, convert the measurements to centimeters and work out the increments.

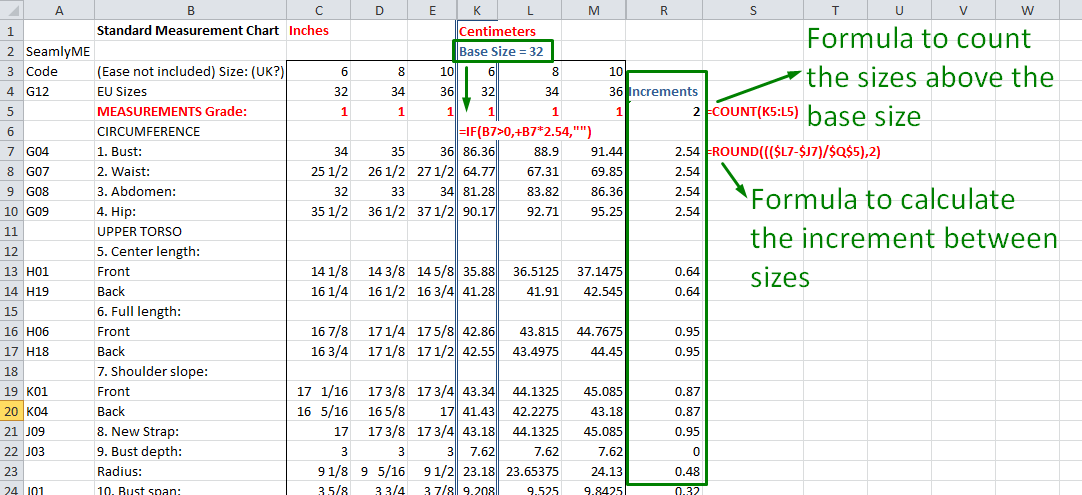
So this is what my spreadsheet looks like. I’ve hidden the columns that I won’t be working with. At this point, I normally hide all except the Code, Description, Base Size & Increment columns, because these are the only ones that matter from here forward.

image

Measurements.xlsx (19.9 KB)

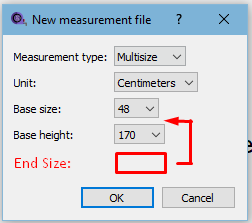
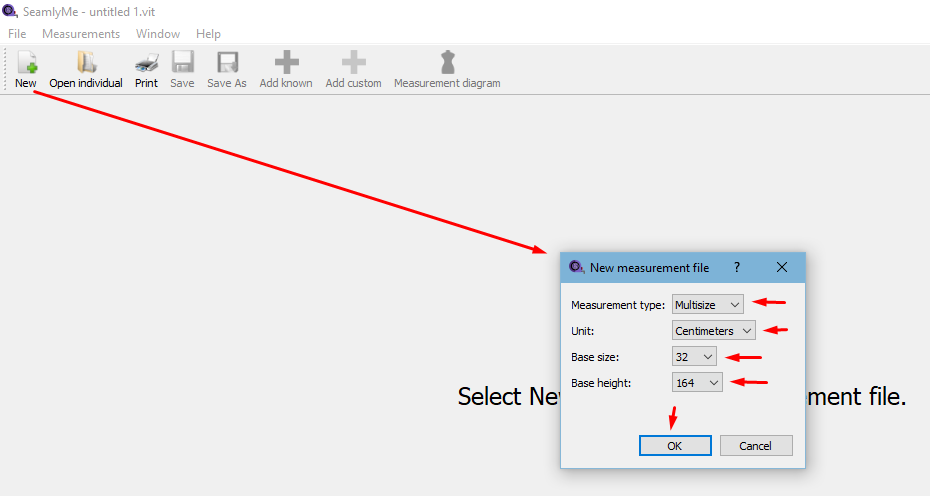
You may now create your measurement file in SeamlyME. Open SeamlyME, select New, Multisize, Centimeters, Base size 32 & I’m quite short, so I enter 164cm for base height. Click on OK & you can start keying in your values.

image

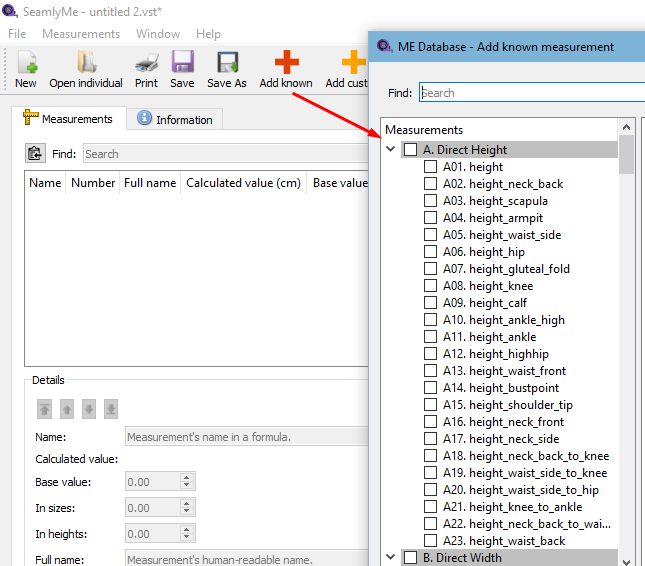
Just place a checkmark into each box that’s on your spreadsheet to open all the codes. You can use the scroll on the right to move up and down the list to find the codes.

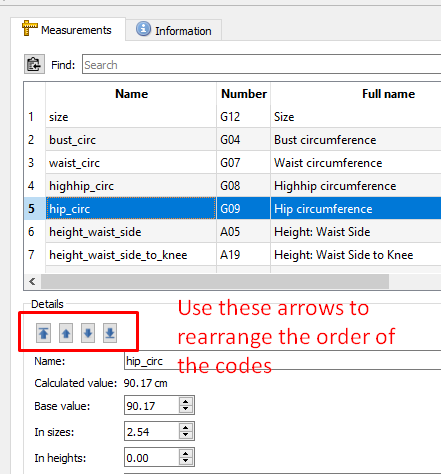
I normally rearrange them into the order on my spreadsheet (saves me looking for them all the time) and then it’s easy and quick to enter the base and increment value just moving down the spreadsheet list.

image

All the initial work takes a bit of time but it pays dividends in time saving later and this multisize file can be used to setup measurement charts for individuals, as well.

And this is the multisize file that I made a few years ago:
Armstrong Womens Size 6-10.vst (5.7 KB)

I go through this process with every pattern making system that I choose to explore, as I prefer making my original basic pattern drafts using a multisize chart so that I can see that everything resizes smoothly before uploading individual measurements for a specific garment for a specific person. I use the spreadsheet later to create a measurement sheet that I can use to record a person’s specific measurements, so this also lives forever :slight_smile:

8 Likes

:heart_decoration: :heart_decoration: :heart_decoration: :heart_decoration: :heart_decoration: :heart_decoration: :heart_decoration: :heart_decoration: :heart_decoration: :heart_decoration: :heart_decoration: :heart_decoration: :heart_decoration: :heart_decoration: :heart_decoration:

1 Like

Execllent… this will help to clear up a few things I’m still in the dark with the multisize stuff. :slight_smile:

This may be a little off topic, but is there something we could do / add to SeamleMe so that using the spreadsheet would not be neccessary?

2 Likes

The spreadsheet isn’t necessary, it’s just my way of doing things. You can sit with a calculator, add the code & the base value, check the calculator for the average increment and enter it. I just like mine all done on a spreadsheet so that I can enter the stuff all in one breath :rofl:

You can write the codes in the book & work out the increments at the side. That’s just another way. I don’t like writing in my books, I like them all nice & clean & original, but that’s me.

And then, like I said, you can use that spreadsheet to create a measurement form that you can load onto your phone or ipad/android and fill it in as you measure your client.

The world is your oyster :grinning:

1 Like

Let me just mention that HJA has kindly given the grading at the top of her table of measurements. Other systems don’t do this. In this case, you need to calculate out all the increments between sizes on all of the lines and find where they change to decide how many sizes are in each grading and then work only with those sizes.

Where the increments change at various sizes in some of the items, I find the majority and then average the increments, so they’re not 100% true to the measurement chart, but a pretty close average.

It depends on the grade rules. The rules, and thus the amount of grade between sizes depends on the figure type you’re grading for. Womens is different from Misses which is different from Petite which is different from Womens Plus size, etc, etc, etc. In general commercial patterns follow the ASTM standards… but from experience the fit can depend on how generous the ease is. We’ve found Vougue Men’s jackets to have way too much ease… like upto 7 inches or at least a size larger than it should be. BUT… their Double Breasted suits never have enough room in the hips if you use a size that fits the waist and chest.

ASTM provides standard sizing tables… of course at a price. :frowning:

1 Like

Yes, ease is a totally different kettle of fish. I prefer my measurements to be totally without ease and I have custom codes in the Variables Table for ease. This way, if I’m creating a Moulage, I can zero the ease to get the skin tight garment. Or if I’m creating an overcoat, I can adjust the ease to allow for movement and additional layers of clothing underneath it. And this is all inside the Seamly2D program rather than having to switch between Seamly2D and SeamlyME and then my measurements chart won’t work nicely with other garments using the same measurement chart.

IOW, I try to keep the ease garment specific and my measurement chart universal :slight_smile:

2 Likes

I guess what I was getting at… is there any ease in the sizes of the Amstrong table? Plus… like I mentioned with the Vougue mens patterns - you can’t always trust what the chart on the envelope says as far as the sizes go. Sure modern suits are more loosley fitted, but 7" of ease is a bit much.

Also, I know that from some of the systems I’ve used there is ease built into the draft, while others none at all. For ex: The older Supreme system (Blue or Red book) has little to no ease and produces a very tight fit.

2 Likes

Sorry, I misunderstood. No, there’s no ease in her standard measurements. And ease gets added to the individual measurements, separately:

image

2 Likes

When you deal with large groups of people (and you do not know anything about them in advance) there will be a large variance in body shapes. There have been many books and articles written about apple shape, pear shape, hourglass shape, P shape, and various other ways of describing different shapes. Add this to the variations in height, proportion (e.g. long waist vs short waist) it starts to show why the effort put into the set of measurements available in SeamlyME is meaningful.

3 Likes

Ain’t that the truth, Plus you can add, that the majority of people don’t know how to properly take measurents.

Thus the “lengthen or shorten here” on commercial patterns. Probably the most common change I would make with mens jackets is grading the length up or down. Next to the chest and waist measurements, the nape to waist is one of the important measurments… even more so than the height as like you said it establishes the proportion or where the waist sits.

4 Likes

Yes. We can enable both methods that patternmakers use to create size charts.

  1. With increments: Enter the begin and end sizes with size increment, and enter each measurement with measurement increment or formula.The size chart is calculated like Variables, and refreshed after editing.

  2. Without increments: Enter each size with measurements manually with an Add New Size tool. Useful for entering data straight from a patternmaking book or from a user’s own calculations for each size.

.

2 Likes

Thank you for this topic, for me as a beginner this is opening my learning curve and minimising time spent in searching and trying to search for codes

2 Likes

You’re very welcome, @Wakho. I did a blog a few years ago to show how to convert the Burgo method of pattern making from doing it by hand to doing it on Seamly - only the basics to give an idea. I’ve added some posts there about measurement charts, using variables, can’t remember what else :blush: but if you have time, have a browse through, you may pick up a few tips.

1 Like

Good day, where do I setup seamlyMe to use a full stop instead of a comma

1 Like

Hello, @Wakho. That is normally setup through your operating system along with the date, time, regional & language settings.

thank you much appreciated

1 Like

Yes :grin: you can make the multisizes also to be created in inches :grin: Darn! I’m missing this. But it still won’t do anything about the spreadsheet that I use. I just do it this way so that I can have everything nice & ready to create my multisize chart without having to bounce around too much juggling calculators, searching for measurement numbers, etc. etc.

Hmmm… I quite like this idea. If I can expand on it… Perhaps we can change the widget where we create a new multisize file to give the base size and the end size for that range of measurements.

image

Then at the actual measurements, we can enter the base value and then the end value and the increment will be auto-calculated but will remain editable, if needed.

image

Tab to move to next box.

2 Likes

This would be so useful! There are quite some grading tables & rules that don’t proceed in a “linear” way through all sizes. And also one measurement’s grading will change between size A and B, while another measurement’s grading changes between size C & D.

2 Likes