First of all, I appology for my english, I’m not very good, I’ve translated it in my language (french) below.
I’m using Valentina 0.5.0.1.
This is a wonderful project and thank you for it.
I write to you in order to find a way to copy/past my pattern element in a second pattern element.
I found in the forum this subject : Copy past pattern (Copy past pattern), but it’s not exactly what I’m searching for.
The question I have was asked also in the forum with a french subject “Comment copier un élément de patron” but the answer is about printing and not copy.
In fact, I want to create a pattern of a trouser for example. First I begin with the front.
Then to create the back of my trouser, I create a new pattern element but I need the elements from the front but I didn’t find how to do it.
I can restart a new front to create my back, but it’s very long.
I can also create a new project in “save as” a different name, but when my data will change, I should modify my 2 files.
I hope my request is clear enough, and you will have a solution for my “problem”.
Thank you,
Translation in french
Bonjour,
Je cherche à copier un élément de patron et à le coller dans un nouvel élément de patron par exemple, une fois le devant d’un pantalon réalisé, je voudrais créer le dos, mais en partant du devant.
Ainsi je garde mes données et mes valeurs.
J’ai peut-être mal regardé dans le logiciel.
Je vous remercie pour toute réponse que vous pourrez m’apporter.
Unfortunately, as far as I know, you can’t do this in Valentina yet.
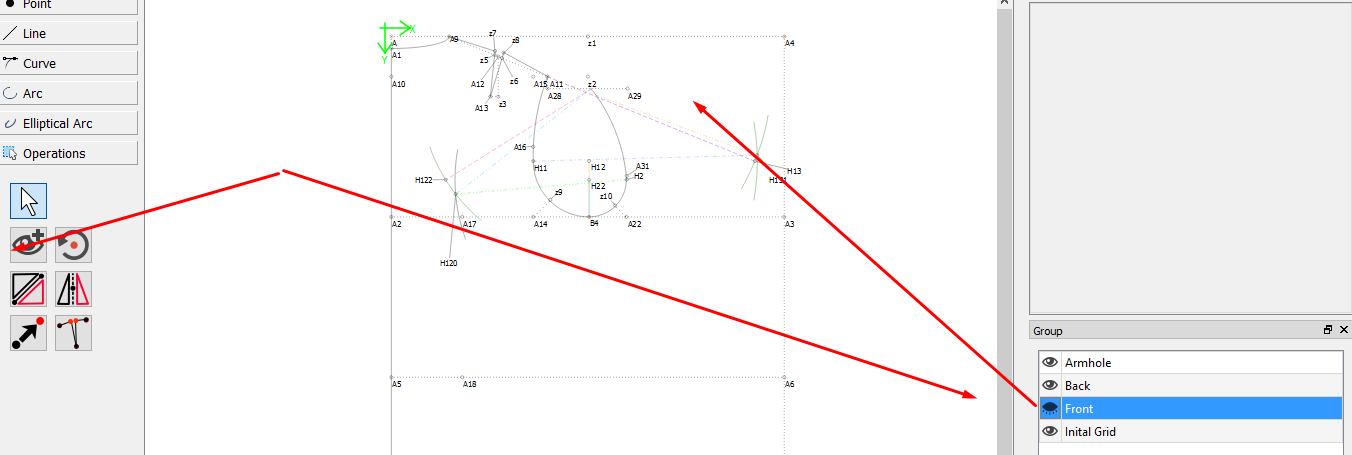
What I would do is to make a group of the front piece. That way, I’d have that all in one place where I can turn it invisible if it gets distracting to me.
Then I’d make the back piece on top or next to the front piece. That way, I’d be able to access all the points of the front piece.
Malheureusement, pour autant que je sache, vous ne pouvez pas le faire encore à Valentina.
Ce que je ferais, c’est faire un groupe de la façade. De cette façon, j’aurais tout cela dans un endroit où je pourrais le rendre invisible si cela me gênait.
Ensuite, je ferais le morceau arrière sur le dessus ou à côté de l’avant. De cette façon, je serais capable d’accéder à tous les points de l’avant.
Aaaaactually, if you open up the ‘.val’ file in Notepad++, you can do all kinds of things. (Most of which will fail unless you understand how XML files work.)
It is. You just need to click through Settings|Style Configurator|XML, enter ‘vit val’ in ‘User ext.’, then click ‘Save & Close’ to let it know that Val’s files are XML.
You can run it in WINE, or try one of these others.
One of my favourite tools in it is the ability to select and work on columns of text by simply holding down <ALT> while selecting. In fact, if you select a zero-width column, you can paste that same text string at the same location in each row, just like you can with a spreadsheet. It made making a grid pattern in Val downright trivial!
I see that KATE is listed in the article. That is my go-to editor in my particular flavor of KUbuntu (linux)
Probably many people will not want to know anything about the internal format of XML files in general or .val and .vit files specifically) and will want to rely on a GUI (TAPE and VALENTINA and others) to manipulate the XML.
If you want to explain more about making a grid pattern in valentina, that sounds useful. I would like to suggest that if you do so you should do it on a new thread. New threads make it much easier to go back and search for things or for someone who might not be part of the original discussion to follow
You can find the elements from the front. We can help you learn how if you upload your pattern *.val and *.vit files with the front drafted, and also post the instructions for the back?
It shouldn’t be necessary to change your pattern when your data will change, unless you are altering the current design. We can help you with this too, and we can discuss when you’ve uploaded your pattern file with the front drafted.
Please, make a copy before opening a .val file in a text editor. There are a few sad posts on this forum where someone hacked their pattern file in a text editor and created errors, then couldn’t get it back.
OH, LORDY, YES!Always make a backup before doing something ‘adventurous’. I ‘save as’ and add an exclamation mark to the beginning of my file name to mark that it is one.
Yeah… changing things like a color or cm to inch is one thing… deleting or adding stuff is probably going to fail with some error blah blah id=xxx not found. It can be like messing up a < table > in HTML.
I don’t “know” xml but I opened a test val pattern and it seems pretty straight forward. So keeping on this topic about copying one pattern piece to a second pattern piece via the xml file I have a few questions.
A) can this be done in Seamly yet or no?
B) if not does XML have global and local variables?
C) if so would it not be an idea to have the id’s be local vs global variables?
The first error I got was the the id was not unique so I went and found another .val file that already had multiple pattern pieces to see how it was laid out and how each pattern piece starts with the next id after the last one on the pattern piece. Could it not be made to start each pattern piece at 1?
I can handle the find and replace of A to B, but trying to keep focus long enough to edit the ids properly… haha not likely, it would be quicker to redraw the pattern
How do I copy a line in notepad++?
I successfully changed the color from pink to black but do not know how to make a duplicate line. I am familiar with basic HTML.
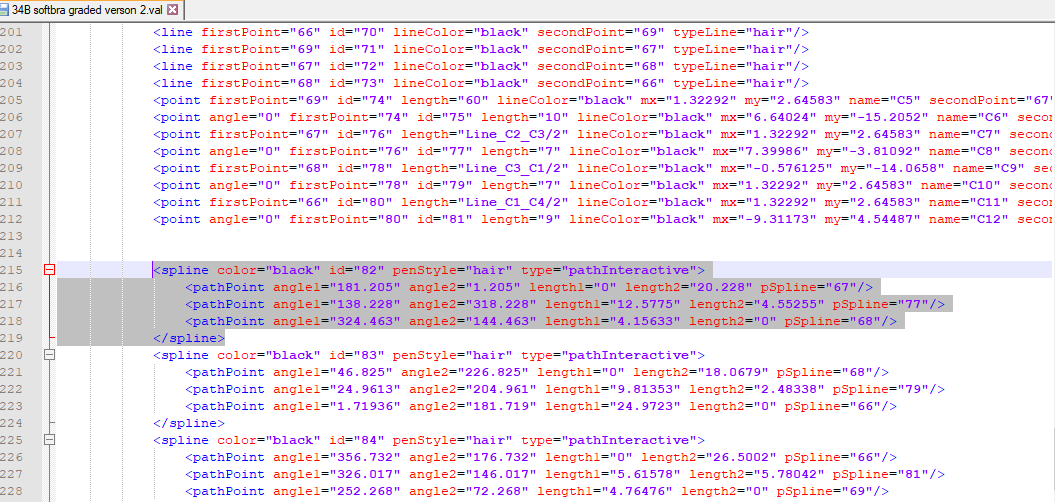
As you can see, each item has an ‘id=##’, so you will need to create an item using the same tool in Seamly, then drag it to where you want it in the program and then paste the values part over the code there. DON’T FORGET TO SAVE TO A DIFFERENT FILE NAME BEFORE ATTEMPTING TO DO THIS!!!
But… excuse me for asking… why would you want a line exactly over another line? Since you can use the existing line or curve over & over again in many pattern parts?