Would still use a set of radio buttons, and the image would change to reflect the corner type chosen. The images would just be a visual feedback to help show what the corner (or seam node such as in Susan’s issue example) might look like. Truth be told 1/2 the time I can’t remember what each type does. Lol
2 Likes
![]()
![]()
![]() Me neither. If the result of the 1st one doesn’t look good, I move onto the next one until I find one that I can work with.
Me neither. If the result of the 1st one doesn’t look good, I move onto the next one until I find one that I can work with.
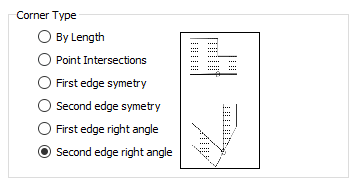
Anyway… I quickly mocked-up something that I would like to have the options to use:
They are all based on mitered, beveled or none ![]()
I’m off to work now, but will look forward to your thoughts this evening ![]()
PS.
Ah! Another great idea. Yes, I like that ![]()
1 Like
Use of the term ‘corner’ instead of ‘angle’ or ‘miter’ removes 100% of ambiguity. Brilliant!
Also the large explanatory diagrams cuts through language barriers and make it obvious what should be selected.
3 Likes
That’s what I thought after I looked at the dialog with fresh eyes. In an odd sort of way I’ve gotten use to lack of RT’s grasp of English semantics.
Exactly. Which ironically fits in with a post you made way back regarding the development of the seam allowance tool. I was searching for info on what the custom SA does, and came across the link for RT to look at for the article " Crafting The First Mile Of Product"… great read - I have the feeling RT probably did not read it. A prior article of Belsky “The First 15 Seconds” is even more applicable here. While I don’t want to go way off on a tangent, there are many concepts Belsky writes about , one that is so applicable to not only this one item in the SA dialog, but the program as a whole… and that is “what do I do now?”.
3 Likes
Hey Grace… Here’s sort of what I had in mind… not necessarily to scale. The diagram would show what the corner type does on a seam node and what it does at a corner. In all there would be 12 images. After doing this it probably would work better side by side rather than vertically placed.
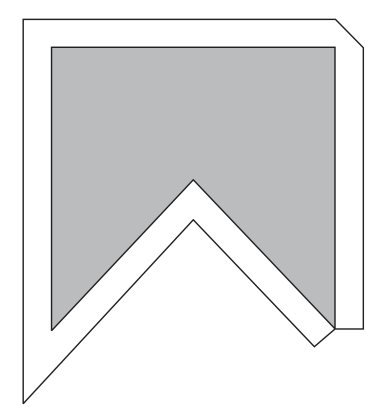
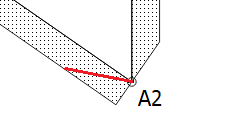
Which brings up a few other issue I thought of. There are several options that you can’t select at the moment. Such as the the lower right corner in your image - you can’t select a right corner by first AND second edge. Such as:
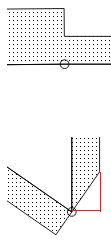
Also cant do this… which could be part of the original bug:
Or this… which by the true definition - a mitered corner.
But here’s a good thing that I can look at implementing… Unlike a combo box you can program radio buttons to allow multiple, but still exclusive selections. So we could do something like selecting:
First edge right angle AND Second edge right angle…
or
First Edge Symmetry AND Second edge right angle…
but not
First edge symmetry AND First edge right angle.
2 Likes
So… the User would have two choices: One for First Edge and Second Edge. This enables all possible outcomes. It may also de-spaghettify the code 
Do we want to rename Angle to Type instead of Corner?
2 Likes
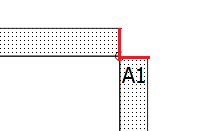
If we were to leave it in the same box, & rename “nodes” in this context to “intersections”, just changing “Angle” to “Type” would work, but if we were to put it in a separate box, as in the mockup picture, maybe “Intersection Type” would work better.
![]()
2 Likes
A node (point) is not always an intersection… such as in Susan’s orginal example of the bug. And while it doesnt necessarily describe that example, I think “corner” type is easily understood. CorelDraw, Adobe Illustrator, and AutoCad all refer to it as a corner type.
2 Likes
Fair 'nuff. I guess since there isn’t really a good, recognizable word for it in English, we might as well accept the norm. Joint or Socket are the only other options I’m thinking of, & they carry their own baggage without the benefit of establishment.

1 Like
Right. They’re not all intersections. How about just ‘Type’? This avoids translation issues. The User knows they’re on the Seam Allowance tab, and they know this field defines the behavior of the seam allowance for both sides of the current point. Is there a need to provide further clarification?
2 Likes
I’m going to say… let’s find out.
I definitely don’t want to be responsible for insisting that a lot of kruft get piled on the project. That’s why I don’t like to post feature requests to the Git without invitation.
Apropos, amusing, <5min video:
 - ORIGINAL")
2 Likes
Works for me.
That being said… I tried a fix that I thought would fix the issue, but no good. It’s going to take some time to go through the seam allowance functions to fully grasp what RT did to create the seam allowance points and corners. Stay tuned.
That’s just too funny.
Truth be told having worked in theatre for nearly 40 years I’ve experienced meetings with directors that resemble this video. Was designing lighting for a ballet once and the director said she wanted it to look like a Siberian Sunset. Sure no problem Barb… to myself - what the heck is a Siberian Sunset?
2 Likes
I’m thinking that we should stick with “Corner” which is defined as “a place or angle where two sides or edges meet”. 
2 Likes
As I’m looking into and thinking about fixes / updates to the SA corner types… does anyone have a problem if I ditch the “FancyTab” code for the SA dialog and refactor it to work like the Preferences dialogs?
It’s just more “spaghetti” thrown in that really doesn’t accomplish anything other than having to maintain those dialogs in 2 different manners.
2 Likes
![]()
![]() ______________________
______________________
2 Likes
This is what I gave RT to calc the curve offsets. I used the ‘Curve Offset’ section in the prototype.
2 Likes
Whoo hoo… some late night reading. ![]()
2 Likes
I don’t know how splines are stored and processed in the code. This might be helpful: http://www.joshbarczak.com/blog/?p=730
And here’s how to handle offset calculation for tight curves:How to Draw an Offset Curve | unbox
2 Likes