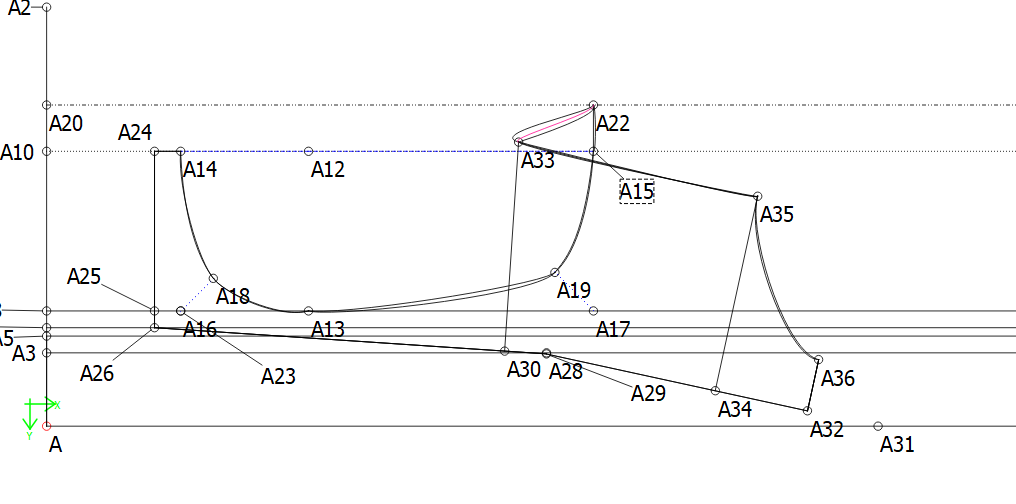
When grading i decided to try going out point A15. How do you keep the lines from going distorted and matching the cup lines to the cradle lines. Or will this not be possible?
1 Like
I am hoping for @grace to answer this one because she is so much more practicid with curve shaping than am I. There is a time difference for her, since she lives in Africa. I will look again tomorrow and spend some time on your concern if she has not been able to
1 Like
This is way above my head. I have watched it numerous times trying to figure out how to apply this to the top cup center front and top cup breast root and then angle them both 90 degrees.
1 Like
Thank you, I’m looking to input my measurements and make a pattern for trial.
1 Like
Ok, I’ve had a quick look and the first thing that I see is that you have ‘hard-coded’ the measurements. It would be a lot quicker and easier in the long run, if you created a .vit (measurement) file using SeamlyMe. Then you could create one for the tutorial pattern so that you could follow the tutorials and then copy that .vit file by Save As and add your name or something. Edit the values to your own measurements.Then you can just change the measurements file to resize your pattern and all the points should move according to the measurements.
You may need to tweak the curves a bit, but the basic layout shouldn’t cause what has happened in your image above unless you have made a small error in the measurements.
As it is, you’ll need to edit or redo the pattern using references to your measurement file instead of exact measurements.
If you check out this topic, I did this tutorial that @AVI posted & added my files for comment: Kristina Shin Basic underwire bra tutorial - #6 by Grace
1 Like
Goodmorning
Would I be able to see how the go 90 degrees from a top cup draft? Much appreciated, sorry for the inconvenience. https://forum.seamly.io/uploads/db1488/original/2X/2/2c62e058fac25a5001cc4706b6d22a004672a64a.mp4
Question 2.
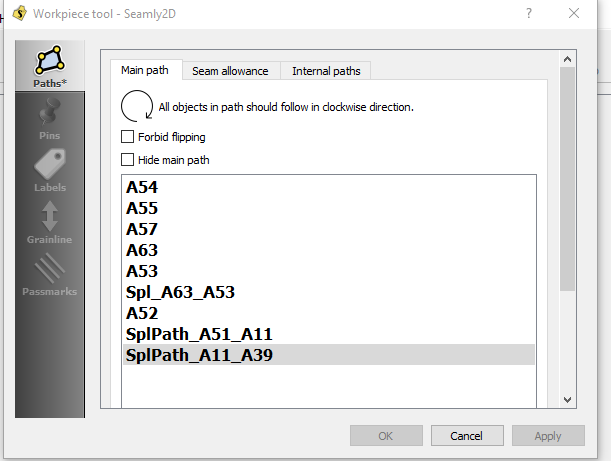
How do I group the lines for the cradle more efficiently?(workpiece tool) is there a way to update the software so that the workpiece tool does not have to go clockwise? There is an error, it won’t let me group
Here is the pdf of the exact steps I have taken when drafting this cradle
 !
!
1 Like
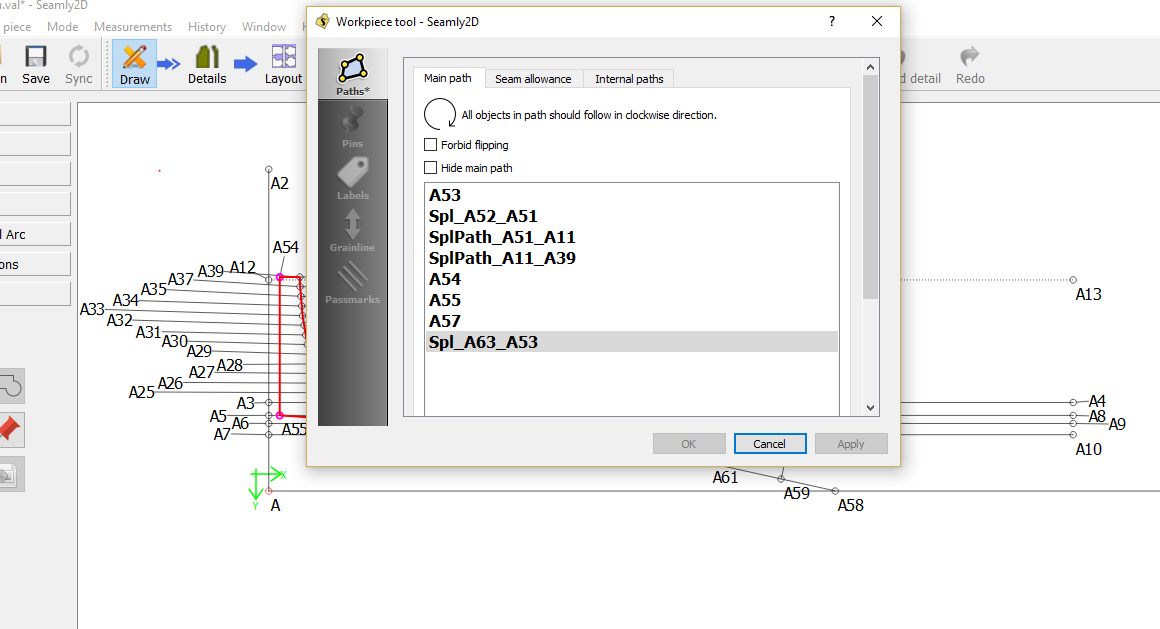
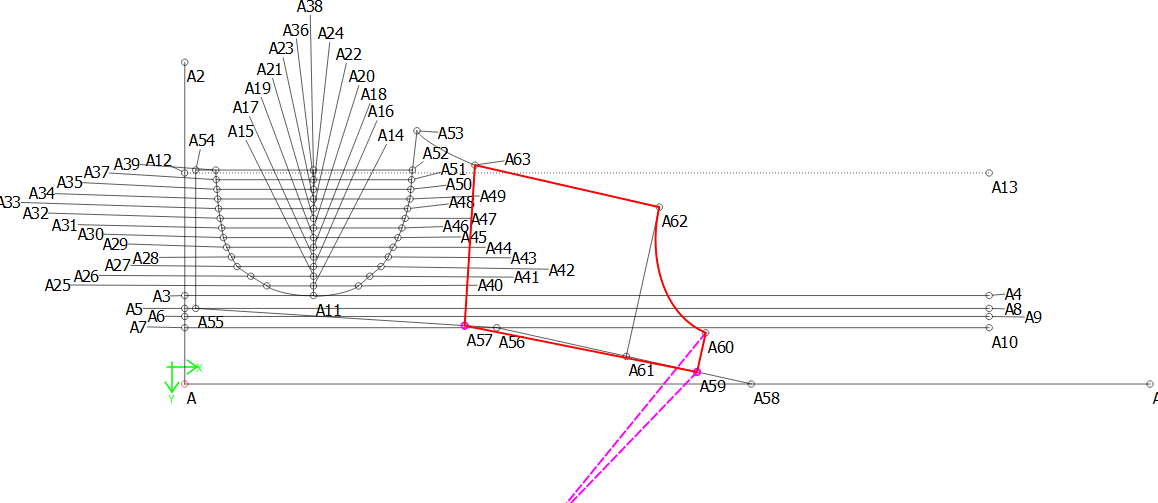
Actually, you can do this without requiring a change to the tool. I have created the workpiece that I think that you want in this file. 34B softbra.val (26.3 KB)
Here is a screenshot of the elements I used.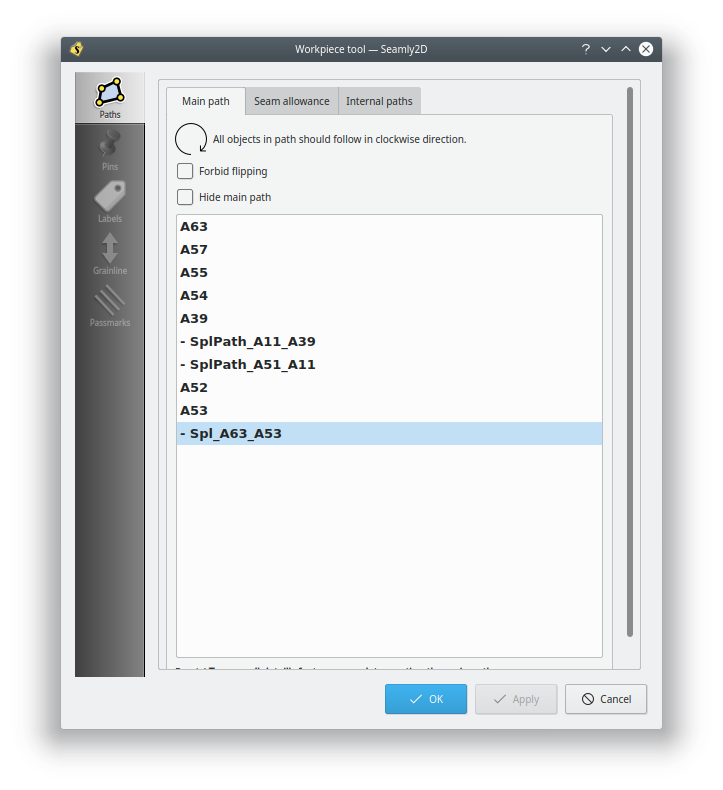
1 Like
You may notice that the curves are listed with the “-” sign in front. This indicates that the shift key is pressed while the mouse click is used to select them. The shift key causes them to be used in the clockwise mode as required by the tool
1 Like
Thank you, you goddess you! So esctatic right now! It worked. That shift key, I just used it for everything I clicked.
Now I just have to wait for someone to answer how do I flow 90 degrees from a curved line.
Is there a way to make the top cup line match exactly the bottom cup line where the seams attach?
1 Like
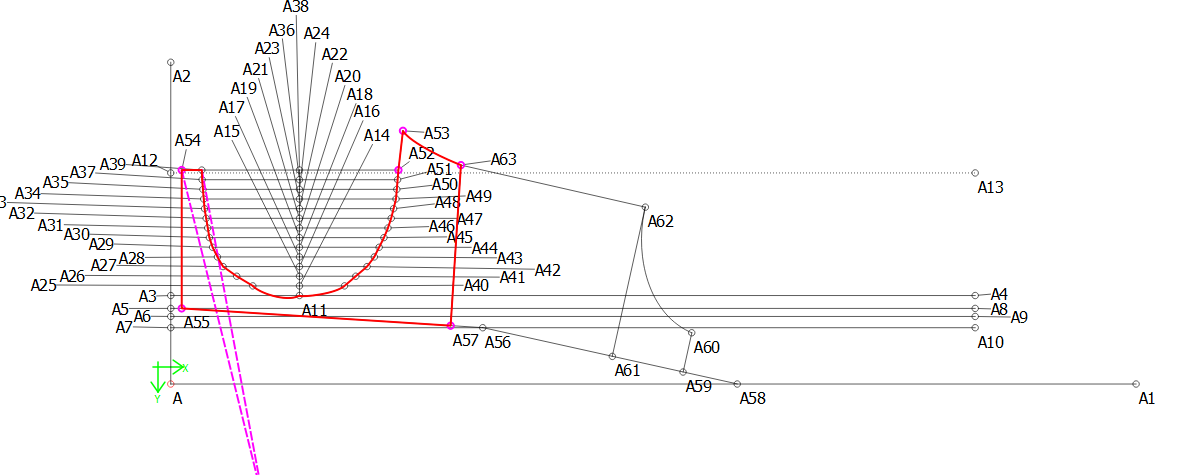
I do not understand the question “flow 90 degrees from a curved line” Since the line is curved, it seems to me the answer is undefined. That said, would the line in your softbra pattern from A38 to A11 illustrate what you are talking about?
Can you clarify further which line you mean when you say the bottom cup line where the seams attach? (Please name the points that define the line you are talking about)
1 Like
You might find these tools especially helpful: fourth tool on the “point” tab which is point along a perpendicular and seventh tool on the same tab Point at intersection of arc and line
1 Like
https://forum.seamly.io/uploads/db1488/original/2X/a/a5b79cd8a10f6c057e6a82b96c32dae5ef898c1b.mp4 https://forum.seamly.io/uploads/db1488/original/2X/0/07d5734a2dc07f19a9efb580ad682ccdd4e90fcc.mp4
Thank you for the video. As you can see in the videos I uploaded, the B7, 90 degree angle off the B5 curve seems off. However the B6, 90 degree angle off the B2 curve 90 looks great. Is the B7 done correctly?
1 Like
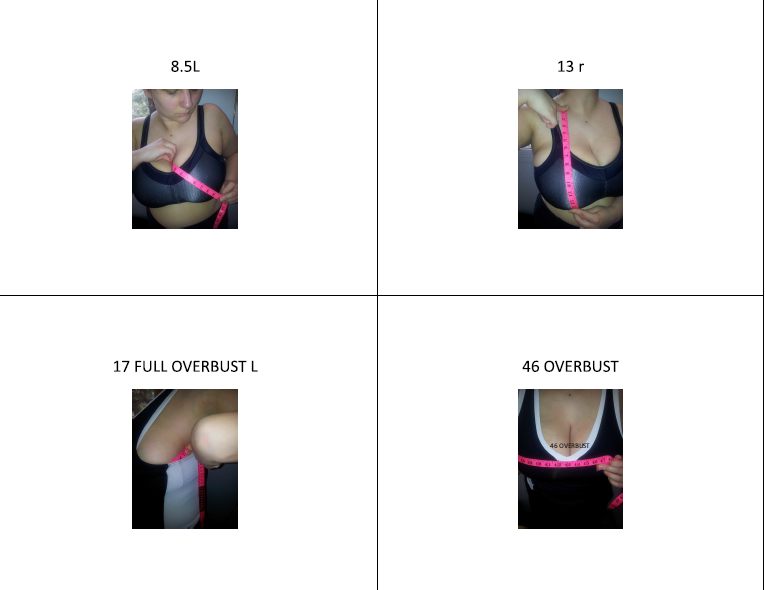
These seams are not the exact measurement. Is there a way to do this. Top cup B1 to B3 = 105.25mm Bottom cup C2 to C3 = 105.02mm
Top cup B1 to B2 =95.68mm Bottom cup C2 to C4 = 95.70mm
1 Like
@AmandaClarice I must admit that I find it almost impossible to get anything meaningful out of the video you just uploaded. My brain will not process quickly enough to watch the video at that speed. I am more able to understand what you show me from the .val file. Is this still consistent with the last .val file you uploaded, or do you need to upload a different one?
Second, I need to ask if you considered what @Grace said earlier about the fact that your measurements are hard coded into the file. Is there a reason for this? If you take the measurements required by the pattern drafting instructions and record them into a measurement file with the SeamlyMe program, then follow the drafting instructions incorporating the measurements you will have a pattern that can be easily resized.
Please take a look at this pattern Basic Underwire Bra.val (31.0 KB) and this measurement file Bra.vit (1.4 KB)
This, I believe is one that Grace previously posted and I repeat it here to show you the diffenence when the measurements are separated OUT from the pattern file.
Could you remind me again where to find the reference to the specific drafting instructions you use? I may be able to be of further assistance, but for now I really do not know where to start to provide help with adjusting the size for you
1 Like
The only way that you can get the measurements almost the same is to fiddle with the length of handles of the curves. By shortening them slightly, the length of the curve should get shorter and lengthening should get longer.
One thing that I noticed in your pattern is that some of the curve handles are at the incorrect angle - pointing in the wrong direction. This will add to the length of the curve unnecessarily, even if it is only a few micro millimeters, since the curve line will first go in that direction and then circle back to go to the next point.
If you can get the curves to within, perhaps, 2 or 3mm of each other in length, I don’t think it will make much difference when making up the garment unless you’re working with steel ![]() Fabric can forgive such a small difference very easily.
Fabric can forgive such a small difference very easily.
2 Likes
![]() A picture says it all
A picture says it all ![]()
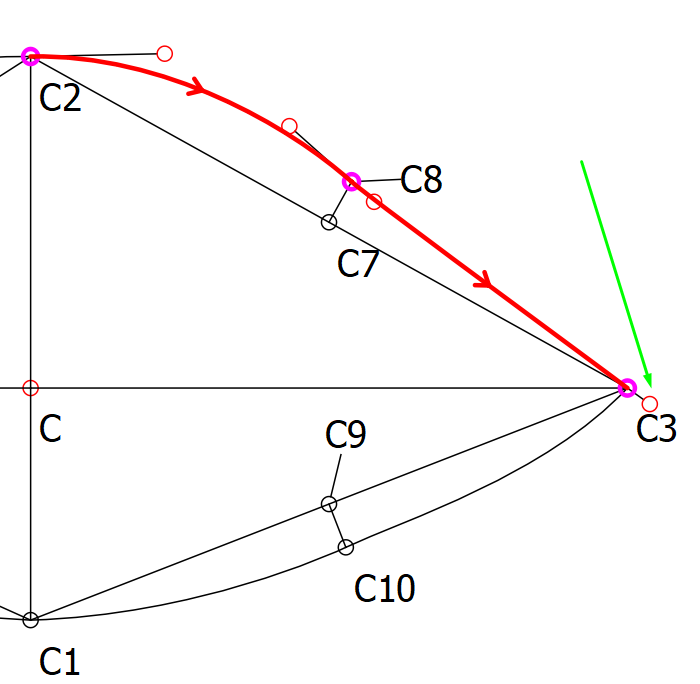
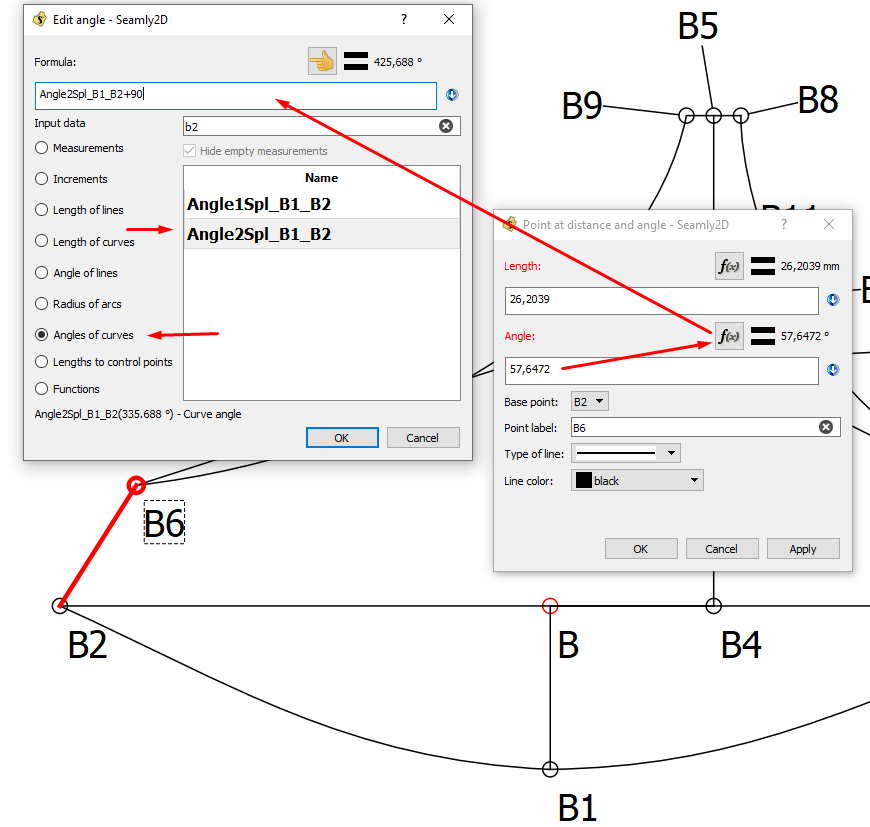
Click on the Angle formula. Remove whatever you have in the formula box. Select Angle of Curves.
Find the curve that you want to use the direction of. In this case, your curve goes from B1 to B2, so the handle that you want to use is the 2nd handle, which is the one at B2.
Double-click it so that it copies it into the formula box and then add 90 degrees.
I hope this helps ![]()
2 Likes
Yes it is the same pattern file. It is a simple 34B SoftBra draft from Dave Morris DeMontfort University. I can share it with you privately. I am not sure about legal ramifications for sharing openly. Do you think it would be ok I shared the pdf in the forum?
I hard coded for the simple fact: -tried to do the other way and unsure if i was doing it correctly. -I thought i could go in afterwards with Seamly Me and fix things.
Are you familiar with grading? I want to go out 30 and up 75.
Thank you for your valuable expertise. Its very much appreciated.
1 Like
It gets a bit confusing finding all the places that rely on measurements once your pattern is finished, so I’d consider using this as the trial run and do another one with a measurement file created in SeamlyME. In this pattern, you learnt a lot about using the program, which is very good ![]()
I’d rather not risk sharing this with the whole world openly, if I were you ![]()
Personally, I’m a home sewer, so no, I’m not too clued up on grading. I just change the measurement file to one that I create to a bigger or smaller size, tweak the pattern - if necessary - and print a whole new pattern.
You’re very welcome ![]()
2 Likes